Monday, December 31, 2007

Homegrown Gourmet- Round 4 Lobster Casserole


My little blogging event has jumped the Atlantic ocean over to the UK- isn't that exciting! Michelle from GreedyGourmet.com has chosen Stews & Casseroles for this round. Finding a stew or casserole that represents New England was a challenge for me... I'm not a big stew or casserole fan!

When you mention Maine to anyone, the first food that comes to mind is lobster. I actually don't really like lobster- I'd rather have crab. But I thought a nice lobster casserole would be both a new challenge for me and a yummy way to serve it.

So I bought a live lobster, which we named Mr. Pinchy just like Homer Simpson did, and I was horrified. First the thing looks like a gross huge bug, and I hate bugs. Second it's alive and in my fridge. Third, it's alive and I have to kill it to eat it. The whole experience was traumatic! With my husband's help though, we cooked poor Mr. Pinchy, I tore him apart, and served him up in a bubbly delicious casserole.
Mr. Pinchy, all torn up All the meat from Mr. Pinchy


It was so tasty I may just endure the torture of lobster again!


Maine Lobster Casserole
Inspired by AllRecipes.com

  • 1 1.25 Lbs. Lobster (enough to make 1+ C. meat)
  • 1-2 Tbsp. Butter
  • 1 1/2 Tbsp. Flour
  • 1 C. Milk
  • 2/3 C. Heavy Cream
  • 2 Tbsp. Onion, chopped
  • 1 tsp. Dry Mustard
  • Dash of Salt & Pepper
  • 1/2 tsp. Paprika
  • 1/4 tsp. Chili Powder
  • 1 1/2 C. Fresh Sliced Mushrooms
  • 3 Tbsp. Swiss Cheese, grated
  • 1-2 Slices White Bread, cubed/ torn into small pieces
  • 1/2 C. Bread Crumbs
  • Dash Paprika


  1. In a large pot, heat about 2 inches of salted water to a rolling boil. Add in a steamer basket and place poor helpless lobster in the steamer. Cover pot and cook for about 18 minutes.
  2. When lobster is cooked, allow to cool to the touch. Remove meat from all the nooks and crevices including all the little legs!
  3. Preheat oven to 350 degrees.
  4. In a sauce pan, melt the butter. Stir in the flour and mix until smooth and bubbly.
  5. Pour in milk and cream and whisk until creamy. Bring to a low boil and stir until until thickened.
  6. Add in mustard, onion, salt, pepper, paprika, and chili powder. Allow to simmer for 2 minutes. Add in mushroom and continue to cook about 10 minutes, stirring occasionally.
  7. Grate in the cheese and stir until melty. Finally stir in the lobster and bread pieces.
  8. Pour mixture into a small casserole dish. Sprinkle bread crumbs lightly over mixture and throw on a dash of paprika. Bake in oven for about 25 minutes until bubbly.
  9. Serve using a large spoon and garnish with parsley.

Sunday, December 30, 2007

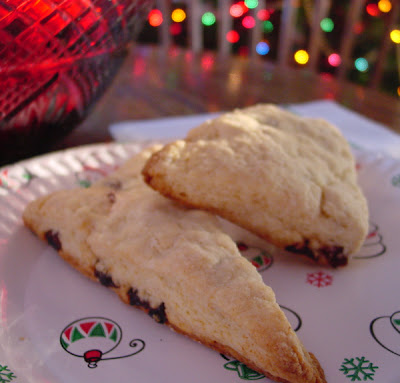
Cherries and Cream Scones

I wrote below about my in-laws family tradition of eating well on Christmas Eve. They are such a great family that they like to carry that sentiment in to Christmas Day too and have a brunch to beat all brunches. Eggs Benedict, mimosas, blood grapefruits, and scones were all on the menu. They had this luxury as they never went anywhere that day and usually stayed in pajamas from dawn til dusk.

Things are not like that in my family. We get up, do presents, throw something down and drive to whomever's house we're visiting or start cleaning up for guests. It's far more frantic. So with marriage blending two lives, the holiday traditions have to meld too.

I don't have the time to do such a nice meal all before I have to be in the shower by 10:30 to be on the road by 11:30 to be to Mom's by 1:30. Eggs Benedict is out. However, I was able to make scones for this year thanks to my lovely boss! She has a fantastic recipe that I think will stick around for many a Christmas morning to come. It is versatile and the cherries can be swapped for currents, raisins, orange zest or any other tasty treat you want to blend in. It is moist and very easy and makes plenty to keep you fed for the week!


Cherries & Cream Scones
From my boss, Leslie

  • 2 C. Flour
  • 1/3 C. Sugar
  • 1 Tbsp. Baking Powder
  • 1/2 tsp. Salt
  • 6 Tbsp. Butter, cut into small pieces
  • 2/3 C. Dried, Pitted Cherries
  • 1 C. Heavy Cream
  • 2 Tbsp. Flour (for rolling out and coating at end)

  1. Preheat oven to 400 degrees.
  2. In a large bowl, mix together the dry ingredients.
  3. Using a pastry cutter (or maybe a fork?) work in the butter until the mixture resembles a coarse meal.
  4. Mix in the cherries and cream using a fork to blend. Let the dough stand for 2 minutes.
  5. Transfer the dough to a board floured with half of the 2 Tbsp. Flour. Press the dough down gently, working it into a flat, 1/2" thick sheet. Dust the remaining flour on the top.
  6. Cut the scones into triangles or any other shape. Please on a baking sheet, leaving at least 1/2" between each scone.
  7. Bake for 15 minutes until just golden brown. Remove to a baking rack to cool. Serve plain or with butter and jelly.

Ball of Heaven

I love Christmas Eve. Wanna guess why? Nope, it's not the anticipation of Christmas day. Naw, not friends and family. The beautiful church service? Don't be silly.

No, I love it because I get to make and consume a cheeseball. It's the only time of the year I can get away with making a 6" diameter sphere of cream cheese, cheddar cheese, and other seasoning and then devour it with crackers. It's like a dream come true!

My husband's family has a wonderful tradition of feasting on all the wonderful finger food goodies that they like, and I have happily taken this tradition to heart. Most the items come back every year, and the reason is that they are so good. This year we ate:

  • Crab legs
  • Smoked salmon (excellent with cheeseball)
  • Finger deli sandwiches
  • Veggie crudite with ranch dip
  • Big purple grapes
  • Sliced Gouda, cheddar, and pepperjack with crackers
  • Cookies (which we didn't touch)
  • Sparkling Red Wine
  • And of course... cheeseball with crackers


Happy holidays indeed!


Cheeseball
From my Mom
  • 11 oz. Cream Cheese
  • 8 oz. Extra Sharp Cheddar Cheese, grated
  • 1 Tbsp. Onions, Shallots, or Green Onions, chopped
  • 2 Tbsp. Blue Cheese or Roquefort Dressing
  • 1 tsp. Tabasco Sauce
  • 1 tsp. Worcestershire Sauce
  • Crushed Walnuts

  1. Mix together all ingredients except the walnuts in a large bowl. Blend well.
  2. Remove mixture from bowl and form into a delicious large ball of joy with your hands. Or, you can make a log or multiple cheeseballs.
  3. Roll/ press cheeseball into small ball of walnuts to coat completely.
  4. Place on a plate and cover with plastic wrap. Chill for at least an hour before serving.

Italian Christmas Cookies

My grandfather, Anthony, is very Italian. Holidays in our family often included meatballs or stuffed shells or other delicious Italian fare. And Christmas was no exception. My grandmother always made these cookies for my grandfather, but after 50 years of marriage, she is sick of it.

Luckily she has me for a granddaughter who is eager to use family recipes and keep them alive. I'm still improving my technique, but the family gave them overall approval. And they looked just as festive as ever with their multi colored candies on top!

These are anise, or licorice, flavored. I use anise extract, but Grammy says the way to go is anise oil. This is very hard to find and the last time she looked, she could only find it at the drug store. The recipe below gives how I made the recipe and then in parenthesis how it should be.

Buen Natale!


Italian Christmas Cookies
From my Grandmother

  • 3 Eggs
  • 3/4 C. Sugar
  • 1 C. Butter, softened
  • 1/2 1 oz. Bottle of Anise Extract (Should be 1 oz. of Anise Oil for more bite and flavor)
  • 3 C. Flour
  • 3 tsp. Baking Powder
  • 1/4 tsp. Salt

  1. Preheat oven to 375 degrees.
  2. Mix together eggs, sugar, butter, and anise flavoring either in a stand mixer or large bowl with hand mixer.
  3. Blend in dry ingredients and mix well.
  4. Roll dough into small balls, only about 1/2" wide as they will expand quite a bit.
  5. Bake on ungreased baking sheet for about 10-15 minutes until they are just starting to get golden brown on top. These cookies to not get very brown on top, but if you lift one up, the bottom will be a lovely golden color. Be sure to cook enough as they should be just slightly cakey when done right. (I haven't mastered this yet!)
  6. Allow to cool completely and then glaze and sprinkle with colored candy balls. Glaze recipe below.


Sugar Glaze
  • 1/2 C. or more Confectioners Sugar
  • 1 tsp. Milk
  • Colored Candy Sprinkles

  1. Mix together sugar and milk until a thick liquid is achieved. You want the glaze to be thin enough to drip off the cookies, but thick enough to leave a nice off-white coating on the top.
  2. Leave glaze in a small bowl. Hold each cookie upside down and dunk the top into the glaze, holding it out over the bowl to let the excess drip off. Flip over, place on parchment paper or wax paper (for easy clean up) and sprinkle with candies while wet. Allow to dry before serving.

100th Post- Penguins!


We interrupt the Christmas '07 goodie train to announce my 100th post! Woo hoo! I started this blog back in July while hopping on the popularity wagon and have really enjoyed recording my endeavors in the kitchen. Most posts have 1 recipe, but I've had some that are more than 1 and just a couple that are non-cooking related.

So to celebrate, I'm going to pull something out from last year's holiday celebration. I was not in the habit of photographing food before my blogging days, but this little number was too cute.

Mom asked me to bring an appetizer to Christmas dinner last year and I found this one at my go-to site, Allrecipes.com. Are they not the cutest things? Large black olives stuffed with herbed cream cheese, topped with small black olives decorated with thin thin sliced carrot rounds and roasted red pepper strands make for adorable and pretty tasty treats.

Cream Cheese Penguins
Recipe and Instructions available at AllRecipes.com

Kim's Country Cookies

Who the heck is Kim?

This recipe makes me giggle a little every time I or my mom make it. The reason is that there is no Kim in our family tree or circle of friends. Kim's Country Cookies are from a doll I had when I was a kid- apparently that was her name. For whatever reason the marketing folks decided, this doll came with a recipe for delicious molasses cookies that have become a Christmas staple in my household.

These cookies are chewy, sweet, and I love the raisins. At the holidays it's very easy to get chocolated out- I know, that sounds crazy, but it's true. These baked goods are a nice change of pace and are just as simple as any recipe you'd make the rest of the year. So we keep it around and occasionally it makes an appearance at the 4th of July.

Kim, however, we believe has gone the way of the Goodwill truck, though it's possible she's crammed in a box in my parents' attic- you just don't know. Thanks anyway doll!


Kim's Country Cookies
From a random toy from the 80's

  • 3/4 C. Vegetable Oil
  • 1/4 C. Molasses
  • 1 C. Sugar
  • 1 Egg
  • 2 C. Flour
  • 1 tsp. Cinnamon
  • 2 tsp. Baking Soda
  • 1/2 tsp. Salt
  • 1/2 tsp. Ground Cloves
  • 1/2 tsp. Ginger
  • 1/2 C. Raisins (or more)
  • Sugar (white granulated)

  1. Preheat oven to 350 degrees.
  2. In a Kitchen aid mixer, or large bowl with hand mixer, beat together the oil, molasses, sugar and egg on medium speed until smooth.
  3. Add in dry ingredients and mix. Stir in raisins.
  4. Roll dough into small 1" balls. Place dough onto ungreased cookie sheet and sprinkle with a little bit of white sugar.
  5. Bake in hot oven for about 8 minutes until the cookies have flattened and set up. Cool on a baking rack and store in airtight container until ready to serve or give.


Note that my cookies were kind of crumbly and susceptible to breaking easily. This may just be because I was storing them in a loosey goosey freezer bag on the counter where they no doubt got shoved around by me and Adam. The fridge might have been a better place for them.

Chocolate Covered Moose Chips


Appealing recipe title, eh? :-) Well, the name might not be great, and the caloric count for these is definitely not great, but the taste sure is fantastic. There is a reason these bad boys only come out around the holidays- I think I'd be long dead of clogged arteries if they were a year round treat!

But since the holidays are about taking pleasures all around, these chocolate and peanut butter bars are perfect. They've got a nice crunch with the graham cracker chunks and the crunchy PB, but the butter, chocolate, and sugar add an almost grainy smoothness to them. Mmmm. I will admit I usually partake of too much batter when making these and feel a little sick.

Thank goodness the holidays are also about sharing pleasures, so I was able to get most of these tempting treats out of the house and into friends' and neighbors' hands!

Chocolate Covered Moose Chips

  • 2 Sticks of Butter (1 Cup)
  • 1 1/3 C. Graham Cracker Crumbs/ Crumbles
  • 2 1/3 C. Confectioners Sugar
  • 1 C. Chunky Peanut Butter
  • 1 12 oz. Bag Chocolate Chips

  1. In a medium saucepan, melt the butter. All that wonderful butter...
  2. Stir in the graham cracker crumbs and confectioners sugar, getting everything moist and well mixed.
  3. Stir in the peanut butter and mix until PB melts.
  4. In a 9" x 13" pan, preferably lined with wax paper for easy handling and clean up, pour in the peanut batter, spreading it evenly across the bottom of the dish.
  5. Put dish in fridge and let cool for about 15 minutes.
  6. While cooling, melt the entire bag of chocolate chips in a small pot on the stove over low heat. This is probably a good use for a double boiler if you have one. I don't though, so I am sure to stir the chocolate often to prevent burning.
  7. When peanut mixture is chilled, evenly spread the chocolate on top all the way to the edges.
  8. Allow the goodies to chill for at least an hour. When cooled through, cut into small bars. They should be no more than 2" by 2" as they are very rich. Keep chilled when not serving as they can get melty.

Butternut Squash Risotto & Apple Scented Pork Chops

Mmmmmm, risotto and baked pork chops make for such a nice warm and hearty meal. Risotto is one of my favorite things to make. Everyone talks about how labor intensive it is, and how difficult... I don't get it. Sure, you can't walk away from it like a crockpot or baked dish in the oven, but I do all my cooking actively standing in the kitchen for at least 30 minutes most nights. So risotto ain't no thing to me! And hubby loves it too, which is an added bonus!

Pork, on the other hand, hubby does not like. He's not totally against it, but it is low on his favorites list and complains about it whenever I make it. So I only make it about 6 times a year. That's about the same amount we eat beef steaks. (We eat lots and lots of chicken and fish and pasta!) But I am off topic... I was in the mood for pork, so I declared we were having it. I thought a nice sweet dish would go well with the risotto.

Goodness it was good...


Butternut Squash Risotto

  • 2 Tbsp. Butter or Olive Oil
  • 1 or 2 Cloves of Garlic, minced
  • 2 Tbsp. Onion, finely chopped
  • 1 C. Arborio (Risotto) Rice
  • 1 C. White Wine
  • 3+ C. Chicken Broth, warmed
  • 1 C. Butternut Squash, cooked and cubed
  • 2-3 Tbsp. Parmesan Cheese, grated

  1. In a medium pot, heat the olive oil over medium heat. Add in the garlic and onion and saute until delicious smelling!
  2. Stir in rice and coat with oil/ butter and let heat up, about 1 minute.
  3. Pour in white wine and stir, continuing over medium heat. The wine should start to bubble and soak into the rice. If you do not want to use wine, you may just use the equivalent amount of chicken broth.
  4. Add in 1/2 C. (or so) of chicken broth and stir. The broth should simmer and slowly soak into the rice. Stir every couple of minutes to make sure the rice is not burning and sticking on the bottom and to make sure there is enough liquid. Once most of the liquid is absorbed, add in another 1/2 C. and repeat the process.
  5. With around 1 C. of broth remaining, stir in the squash. As the rice finishes cooking, the squash should cook further, getting softer and breaking into tiny pieces with the rice. You will get a lovely orange color and the rice will almost be coated with the squash.
  6. Continue adding in the broth until the rice is thoroughly cooked through. If you need more broth to get a tender, al dente texture, add more in.
  7. Just before serving, stir in Parmesan cheese until melted.


Apple Scented Pork Chops
From Allrecipes.com
  • 2 Medium Pork Chops
  • 1 Apple, peeled, cored, and sliced
  • 1 Tbsp. Brown Sugar
  • 1 tsp. Cinnamon
  • 2 Tbsp. Apple Jack Brandy
  • 1 Tbsp Butter, cut into smaller pieces
  • Salt and Pepper to taste

  1. Salt and pepper both sides of the pork chops. Brown both sides in a hot pan on the stove top.
  2. Pre heat oven to 350 degrees.
  3. In a glass baking dish lined with foil, place apples slices along bottom of pan. Sprinkle with brown sugar, cinnamon, and butter.
  4. Place browned chops on top of apple slices and pour Apple Jack on top of everything.
  5. Bake uncovered in oven for about 45 minutes until pork reaches a temperature of 160 internally. Serve warm with cooked apple slices.

Chicken and Potato Croquettes


My mom used to make croquettes from leftovers when I was a kid, but then they fell out of circulation. Was it the deep frying she was avoiding? All the messy effort? I don't know, but with a fridge full of leftover chicken and a desire for something a little bad to eat, I found a new recipe.

Now I had Mom's old version, but hers calls for deep frying and I didn't have enough ingredients for the whole recipe. Instead I went out on the web and found some recipes, eventually taking everything I liked and making it my own.

In the end I had small pan fried medallions of chicken and mashed potato that were quite tasty, especially with the roasted butternut squash and raw spinach to counteract the fried part!

Chicken & Potato Croquettes

  • 1 C. Mashed Potatoes (don't hate me, but I used instant potatoes!)
  • 1/4 C. Onion, chopped and sauteed
  • 1/2 tsp. Dried Parsley
  • 1/4 tsp. Dried Thyme
  • 1/2 C. Panko Breadcrumbs
  • 1 Egg
  • 1 Tbsp. Prosciutto, cut into small pieces
  • 1 C. Cooked Chicken, cut into small pieces
  • 2 Tbsp. Grated Romano Cheese
  • Olive Oil

  1. In a large bowl, mix together all the ingredients.
  2. In a skillet, heat about 2-3 Tbsp. Olive Oil over medium high heat.
  3. While pan heats up, roll a 1 1/2 (or so) Tbsp. of the mixture into a ball with your hands, and then flatten slightly. Place medallion into the hot pan, being careful not get burned by hot oil, and let it cook on one side.
  4. Repeat making medallions until the pan is full, leaving about 1/2" space between each croquette.
  5. As each croquette cooks, flip gently when original side is well browned. Cook other side until similarly browned.
  6. When croquettes are done, remove from pan and drain on paper towels. The medallions will stay relatively warm to cook the 2-3 batches on the stovetop. If you need more oil, pour it in 1 Tbsp. at a time and only allow it to heat briefly as you do not want the oil so hot that it burns the food without warming through first.
  7. Serve warm. A dipping sauce would be excellent with these- anything from creamy to tangy to sweet would be appealing.

Lemon Caper Salmon

My mom gave me this recipe with the promise that it is both easy and delicious... she was right on both accounts! Mom is not a big salmon lover, and she just loved this recipe. Adam and I are HUGE salmon lovers, and we too thought it was great.

The beauty of this recipe is that you really can use as much or as little of all of the ingredients to suit your personal taste. We went heavy on the capers and lemon juice- yummy!


Lemon Caper Salmon

  • 1 Large Salmon fillet, with or without skin
  • 2-3 Tbsp. Butter
  • 1/4 C. Onion, chopped
  • 1-3 Tbsp. Lemon Juice
  • Capers to Taste

  1. Salt sides of the salmon fillet.
  2. In a skillet pan, put in 1 tsp. of olive oil and heat over medium. Add in salmon fillet, skin side down if there is skin.
  3. Cover and cook for about 7-10 minutes until the fish flakes easily.
  4. In the meantime, in a small pan, melt the butter.
  5. Add in the onions and saute until translucent.
  6. Stir in the lemon juice and capers.
  7. Serve salmon with sauce drizzled generously over it. (Do not serve with skin; the meat should come easily off the skin in the pan.) Crusty bread, noodles or rice are all great with it to soak up the sauce.

Monday, December 24, 2007

Hearty Wild Rice Soup & Rosemary Biscuits

A while back the second round of Homegrown Gourmet was held with the theme being Soups. It was right at the start of autumn and there were some really great looking entries. One caught my eye and I had it saved for a while before I got around to making it. It was Carrie's Wild Rice Soup. (Apparently Northern Wild Rice is the national grain of Minnesota.)

Now, I should tell you that my darling Adam usually turns his nose up when I suggest soup for dinner. He doesn't think it is enough for a full meal. (He seems to have a hollow leg that he fills up every meal!) This recipe however has changed his mind. He LOVED it- I mean, he has brought it up a couple of times since I made it at the start of December saying that I should make it again. This is crazy and a huge compliment to Carrie and her mom, the originator of the recipe!

It helped that I accompanied the meal with rosemary biscuits. Anything with rosemary gets 2 thumbs up from my husband. And you can't say no to biscuits- even the Bisquick variety!


Carrie's Wild Rice Soup
Modified from Carrie's Cooking Adventures

  • 3 Tbsp. butter
  • 1 Tbsp. Onion, minced
  • 1/2 C. Flour
  • 4 C. Chicken Broth
  • 2 C. Cooked Wild Rice
  • 1/2 C. Carrots, finely grated
  • 1/2-1 C. cooked chicken
  • 1 Small Can Sliced Mushrooms
  • 1 1/2 Tbsp. Cashews (chopped)
  • 1/2 C. Heavy Cream
  • 1/2 C. Milk
  • Salt & Pepper to taste

  1. In a large saucepan or medium stockpot, melt butter over medium-high and saute onions until translucent.
  2. Mix in flour and stir until smooth. Add in 1 C. chicken broth and whisk over heat. Bring to a boil, stirring constantly. As the mixture thickens, add in the remaining broth and stir. Allow to boil for about a minute.
  3. Add in rice, carrots, chicken, mushrooms, and cashews. Heat through and let simmer for 5 minutes.
  4. Stir in cream and milk and heat. If soup is too thick for your taste, add more water or chicken broth. Add salt and pepper to your tastes.


Rosemary Biscuits
  1. Using a standard biscuit recipe or Bisquick, prepare biscuits as normal, but add in about 1-2 tsp. of dried Rosemary to the dough.
  2. Cut with biscuit cutter and bake as usual. Serve hot with butter on the side.

Dijon Shrimp

Mustard is a great flavor that gets forgotten about so often. It has a wonderful tang and can really take an everyday ingredient like chicken or shrimp and make it something special.

I was in the mood for shrimp a couple of weeks ago but couldn't bring myself to do the normal butter or garlic or teriyaki flavors from the standards list. Then I remembered mustard! A quick search on the web and I found a great, simple recipe at AllRecipes.com. It had mustard, butter, and lemon- yummy! This was fast and quite delicious... it was even better with a side of orzo that soaked up all the tasty sauce.


Dijon Shrimp
Based off AllRecipe.com

  • 1/2 Lbs. Shrimp, peeled and tails removed (about 12-14 shrimp)
  • 3 Tbsp. Butter
  • 1-2 Tbsp. Lemon Juice
  • 2-3 Tbsp. White Wine
  • 1 Clove Garlic, minced
  • 2-3 Tbsp. Dijon Mustard
  • 2 tsp. Dried Parsley, or 1 Tbsp. Fresh Parsley, chopped

  1. Preheat oven to 425 degrees.
  2. In a small saucepan, melt the butter. Add in all ingredients but the shrimp. Saute over medium-low heat for about 5-8 minutes to blend the flavors.
  3. Arrange shrimp in a small baking dish. Pour butter & mustard sauce over the shrimp.
  4. Bake in oven for about 12-15 minutes until the shrimp are pink throughout.
  5. Serve warm with orzo, pasta, or brown rice, pouring sauce over sides.

Cream of Mushroom Chicken

Sometimes I want to cook a nice dinner that has a decent and newish flavor, but I don't want to take a lot of time at it. This was one of those meals. It was ok- nothing fantastic, but it got the job done. I made this about a month ago, and am going to guess on what I put in the sauce.

I'd say more about it, but let's face it, it's just a meal for a Tuesday! The sauce was good with the ziti and broccoli, and it was fast. And that's that!


Cream of Mushroom Chicken Bake

  • 2 Chicken Breasts, sliced in half
  • 1 Can Condensed Cream of Mushroom Soup
  • 1 Small Can Mushroom Pieces
  • 1/2 C. White Wine
  • Garlic Powder
  • Salt & Pepper
  • Olive Oil

  1. Preheat oven to 350 degrees.
  2. In a saute pan, heat the olive oil at medium heat. Salt and pepper the sliced-thin chicken breasts and brown on each side, about 2 minutes per side.
  3. In a glass baking dish, mix together condensed soup, mushrooms, wine, and some garlic powder. Place chicken breasts on sauce and spoon some mixture over the meat.
  4. Bake for about 30 minutes or until the chicken is cooked through.
  5. Serve with pasta or rice and spoon sauce over sides.

Swedish Apple Crisp


Before you ask, no, I don't know why this is Swedish! This recipe is from my mom and is so stinking easy, I can't even begin to say what a delight it is to make. And my mom has it written on her recipe card as "Swedish" and so it sticks.

Like I said, this is so darn simple to make. Step 1- slice apples and place in pan with spices. Step 2- whip up batter and slap on top. Step 3- bake then eat. No crust, no cooking the apples ahead of time, and the batter takes no time to make. And the best part? It is SOOO tasty! The crust gets nice and crisp on top and the smell is heavenly. The pumpkin cheesecake I made was well received, but everyone wanted a huge serving of the apple crisp with vanilla a la mode.


Swedish Apple Crisp
From My Mom

  • 6-8 Apples, any variety
  • Sugar, optional, only use if apples are tart
  • Traditional Apple Pie spices: cinnamon, ground ginger, cloves, allspice
  • 1 Egg
  • 1 C. Flour
  • 1 C. Sugar
  • 1 Stick Butter, melted
  • 1/2 C. Walnuts (optional- I never use)
  • 1/2 C. Raisins (optional- I never use)

  1. Preheat oven to 350 degrees.
  2. Peel, core, and cut up apples into bite sized pieces. Place in the center of a glass pie plate. Add in sugar, about 1/2 C. if using tart apples. Mix in spices, going heavy on the cinnamon. Stir in the pie plate to coat apples.
  3. In a large bowl, beat the egg. Add in the remaining ingredients and mix well.
  4. Pour the batter on top of the apples and press down to flatten as best as possible. Bake in heated oven for about 35 minutes or until browned.
  5. Let cool for a few minutes before serving. Excellent with a good vanilla ice cream on the side!

Delicious Little Dinner Rolls

When putting together a Thanksgiving meal, a lot of thought has to go into the side dishes. Sure, the turkey is the star, but it doesn't make for a very well rounded feast on its own. You've got to have various veggies, perfect potatoes, and can-shaped cranberry sauce.

And then there are the rolls. I have mixed feelings about serving rolls with dinner. I mean, at a restaurant they kind of serve it to you to fill you up while you wait for the good stuff- they are just empty calories. With the focus of the Thanksgiving meal being about all the wonderful things to eat (oh yes, and all the joy of family and thankfulness too) who wants to eat boring bread?

Yet, having a delicious bread on the table is somehow necessary. Why? I don't know, but I felt that I needed that extra warm, starchy addition and I wanted it to be homemade, not Pillsbury crescent rolls or the like. So I found a great recipe off of Amber's blog. They were sweet, but not too sweet, and just right as that buttery, squishy side that complimented the rest of the feast.


Sweet Warm Dinner Rolls
From Amber

  • 1/2 C. Water
  • 1/2 C. Milk
  • 1/3 C. Sugar
  • 1 (.25 ounce) Package Active Yeast
  • 1 Egg
  • 1/3 C. Butter, softened
  • 1 tsp. Salt
  • 3 3/4 C. Flour
  • 2 Tbsp. Butter, softened

  1. Mix together the water and milk and heat in the microwave until it is around 100 degrees, which is just pleasantly warm to the touch. Pour liquids into a pre-warmed mixer bowl. (I rinse the metal bowl with hot water to warm it up.)
  2. Stir in sugar until dissolved, and then add in yeast. Mix and let sit for 10-15 minutes until the yeast is activated and foamy.
  3. Add in egg, butter and salt and blend on low speed.
  4. Slowly add in in the flour, 1/2 C. or so at a time, mixing all the while with the dough hook. Continue kneading until the dough is smooth and elasticy and not sticky, about 5-10 minutes.
  5. Remove dough from bowl and shape into small round balls. Remember that the dough will rise to about twice the size, so size your dough balls accordingly to how large you want the final roll to be. Brush rolls with half of the melted 2 T. of butter.
  6. Cover dough balls with towel and place in a warm, draft free spot for about an hour to rise.
  7. Heat oven to 400 degrees and bake risen rolls for 10-15 minutes until just golden brown. Upon removing, brush rolls with remaining butter. You can either serve these rolls immediately or freeze, defrost, and reheat at a later time.

Marbled Pumpkin Cheesecake

Mmmmm... Cheesecake....

So my blog readers, I am still playing catch up and I'm afraid to say I'm losing! I am so far behind that I continue to work on getting Thanksgiving recipes up here on Christmas Eve. All my lovely holiday treats are stuck in the queue behind pumpkin and apple recipes from weeks prior! Today is the day though- they shall be liberated... starting with this treat I was proud to put on the table.

You must have a creamy pumpkin dessert on Thanksgiving. It's a law I think. I've been feeling ambitious and wanted to leave the traditional pumpkin pie for at least one year. And since I hosted T-day for the 4th year in a row, I had the luxury of making whatever I wanted!

There are lots of pumpkin cheesecake recipes out there and I'm not the world's best baker, so it's hard to choose between them all. I settled on a recipe I saw on AllRecipes.com, and made a few modifications along the way based on my "research" also know as looking at 20 similar recipes.

Once again I ended up with a crack in the top (dang it!) and hubby didn't particularly like the gingersnap crust, but everyone else loved it. We ate it for breakfast the Friday afterwards it was so tasty!


Marbled Pumpkin Cheesecake
Source: AllRecipes.com

  • 1 1/2 C. Ginger Snap Crumbs
  • 1/3 C. Butter, melted
  • 2 8 oz. Packages Cream Cheese, softened
  • 1/2 C. White Sugar
  • 1/4 C. Brown Sugar
  • 1 tsp. Vanilla Extract
  • 3 Eggs
  • 1 C. Pumpkin Puree
  • 1 tsp. Cinnamon
  • 1/4 tsp. Nutmeg
  • 1/2 tsp. Ground Cloves
  • 1/2 tsp. Ground Ginger

  1. Prepare the crust for the springform pan by combining the ginger snap crumbs and melted butter together and pressing to bottom. I mixed them together in a sauce pan and then only pressed them on the bottom of the springform, though I had enough to go up the sides if I had chosen.
  2. Preheat the oven to 350 degrees.
  3. Put the cream cheese in a stand mixer and whip on medium speed until light and fluffy.
  4. Mix in the white sugar and vanilla and cream until smooth.
  5. Blend in the eggs one at a time, mixing well after each addition.
  6. Set 1 C. of the plain cheesecake batter aside for marbling.
  7. In remaining batter, add in brown sugar, pumpkin, and spices. Blend well until very smooth and lovely.
  8. In the springform pan, pour in about half of the plain batter. Gently pour in some of the pumpkin batter into a second layer on top of the plain. Continue layering plain and pumpkin until you have run out. I believe I got 2 layers of each.
  9. With a butter knife, gently swirl the 2 batters together by holding the knife vertical and at a very slight angle, like a canoe paddle, and moving around the batter. Do not swirl too much or you will lose the 2 colors!
  10. Bake for about 55 minutes until the center has just barely set up. I baked my cheesecake in a water bath, though I still ended up with a crack in the middle. (A water bath means you wrap your springform pan in foil to prevent leaks and then place the cheesecake in the middle of a cookie sheet with water in the oven. This helps prevent the outside from getting too dry while the middle sets up.)
  11. When baked, let the cheesecake sit in the oven with the heat off so it can slowly cool down. Cooling too quickly increases the chance of cracking. When cooled, chill overnight or at least for a few hours before serving.

Sunday, December 16, 2007

Betty Crocker's Butter Lovin Stuffing

My husband told me, upon the suggestion that I add something like cranberries or nuts to the stuffing, that "you don't mess with the triumvirate of Thanksgiving- potatoes, turkey, and stuffing." Ok, ok- nothing "weird" in the stuffing!

Instead I stuck with the classic recipe I've made for a number of years now. It's from my go-to cookbook, Betty Crocker. Know why it is so good? The secret ingredient is butter! There is nothing fancy to it, and that is ok- it doesn't always have to be fancy to be delicious. Especially with butter involved!

I should mention that I've heard it is stuffing when it's in the bird and dressing when cooked outside. I think that's silly- it's stuffing no matter where it cooks. And that's my opinion!


Betty Crocker's Tried and True Stuffing
Source: Betty Crocker

  • 3/4 C. Butter
  • 2 Celery Stalks, chopped
  • 1 Onion, chopped
  • 9 C. Cubed White Bread (I used an entire loaf.)
  • 1 1/2 tsp. Fresh Thyme, chopped
  • 1 tsp. Salt
  • 1 1/2 tsp. Fresh Sage, chopped
  • Dash of Black Pepper

  1. Melt butter in a large sauce pan over medium heat.
  2. Cook the celery and onion in the butter for about 5-10 minutes until tender.
  3. Add in the remaining ingredients and gently mix to coat bread with butter.
  4. Transfer to a large casserole or glass dish and bake in a preheated 325 degree oven for about 45 minutes. You can cover for the first 30 minutes and then uncover for the last 15, but I don't think I remembered to do that. Also, you can cook it in the bird, but you should go to BettyCrocker.com for details!

Thanksgiving Wrap-Up

As an American foodie, you have to love Thanksgiving. It's all about love, and family, and FOOD. It's just the best.

For the second year now, Adam and I hosted. Our families are pretty small to begin with, and our house is even smaller, so we keep the "crowd" to a minimum. Once again my parents and little brother (not so little any more- he's 21!) came up on Wednesday afternoon and left on Friday. And this year, as a special treat, both my mother and father in law came up on Thursday! They live in Florida now and travelling is just not worth it. But circumstances made it possible to spend the holiday together- it was so wonderful.

And the food was pretty darn good too! My in-laws brought some delicious wine that we polished off between the 7 of us. My mom made pumpkin bread and marinated carrots. They also made pancakes and bacon for us on Thanksgiving morning. I made the rest and enjoyed every moment!


For appetizers we had Spiced Nuts, Spinach and Goat Cheese Tartlets, and Pecan Stuffed Mushroom Caps.


Dinner was so good and had all the trimmings. Bro is a vegetarian, so all of the side dishes were meat-free. We had a big turkey that I roasted with oranges and herbs in the cavity and minced herbs and butter under the skin. The pictures came out terrible though, so I won't be sharing! Sides were mostly easy as the appetizers and desserts were the stars. We had canned peas, canned cranberry sauce (in can shape of course!), homemade rolls, pumpkin bread, Mom's marinated carrots, smashed potatoes, gravy (thanks to Mom), and stuffing. Man, it was so good. I'll post the rolls ans stuffing recipe shortly.


Dessert was by far the best- marbled pumpkin cheesecake and apple crisp with vanilla ice cream. [drooling...] We indulged in more wine and coffee and everyone tried both of the desserts! We even ate cheesecake for breakfast the next day. Those posts are to follow as well.

Mystery Seafood Recipe

Hiiiiddy-ho! Good gravy it's been FOREVER since I posted something- mid-November to be exact, just before Thanksgiving. Sorry loyal readers!

I had prepped for hosting Thanksgiving, and it took a lot out of me. Not only have I been slacking in the ol' blog department, I've made a lot of super boring meals that are so not blog-worthy.

Then on top of that, I've made a couple of good ones and now have little to no idea what the heck I put in them! D'oh! The recipe below is one such example. I know a couple of ingredients, but really, I'm going to guess at what the heck I made. You know, I hear of these great new inventions called pen and paper that might help me with this little remembering problem of mine!


A Meal with Salmon and Scallops

  • Some Salmon
  • Some Scallops
  • A little bit of chopped fresh rosemary
  • Hmm, maybe minced garlic, or is it onion?
  • Brown liquid- soy sauce, balsamic vinegar, something else?
  • Olive oil, as I always use olive oil

  1. Put oil in pan and heat over medium?
  2. Saute any seasonings?
  3. Place salmon in pan and cook mostly through. At the end, add in the scallops and cook until just opaque- don't overcook or they will be chewy.
  4. Serve it with something that goes with it?


Sorry folks... I recall this was tasty, although not fantastic, but danged if I can tell you more!