Wednesday, October 31, 2007

Happy Halloween!

Happy Halloween Bloggers and Blog Readers!

Hope your day is frightfully fun and ghoulishly good!

I'm one of the few nuts decked on in full costume today- what can I say, I love Halloween. Like the vase with just rose stems? Hopefully the lack of costumes will give me a better chance of a placing a second year in a row in the company costume contest. Wish me luck!


Erika as Morticia Addams in her decorated cubicle!


My Inspiration for the day

Sunday, October 28, 2007

Halloween Par-tay!!!!

I love Halloween- the dressing up, the candy, the crisp autumn air, the pumpkin carving... it's all fun to me. Usually my husband Adam and I are all dressed up with nowhere to go. This year we decided we had a great couple's costume and wanted to be seen. The only way to assure that is to host a Halloween party- and that's what we did this past Saturday night.

We dressed up as The Dude and Maude Lebowski from the movie "The Big Lebowski." It was from the drug induced dream sequence of the bowling obsessed main character, The Dude. Here we are below followed by the movie poster featuring the scene as a point of reference. Like the "bodice accessories?" No, that isn't my hair. Yes, it is my husband's! No, I don't know why Adam has that goofy look on his face- he's much cuter with an actual smile! Yes, our kitchen has ugly mint green trim and cabinets that I want to change.


We had a great group of folks from my online message board on The Nest as well as a bunch of our neighbors. We had a ton of fun and a TON of food! I have all my goodies listed out in the posts below. In addition, I'd like to say thanks to some folks for providing equally yummy treats...

  • Nicole for the Oreo Truffles
  • Cathy for the Spanikopita
  • Kristen for the Cheese Ball (recipe please!)
  • My apologies to the kind folks that brought Sugar Cookies
  • Nancy for the Juice Boxes for the kiddies and the cute Halloween kitchen linens!


I think that was all the goodies. We also have some balloons and a bouquet of carnations from our "Publisher's Clearing House Rep & Winner" as well as a very nice camera from Kristen- we'll see if she gets that back, wink wink!

Thanks to everyone who came- it was wonderful having you all!

Halloween Cupcakes

This was definitely the highlight of our Halloween party- funny decorated cupcakes! I'm going to apologize up front though... I totally ran out of time that day and didn't have time to take pictures of each type I made, and then they got pounced on by the kids, so some only have partial shots. For example, the Dracula ones were too cute with these funny gummy teeth I found, but the kids snatched those right up, so no close up.

I got a bunch of hilarious candies from Le Roux, a local specialty kitchen store here in Portland. I'm not allowed in there often because their stuff is SOOO nice... and expensive. I got a "witches brew" mix with gummy worms, frog, and spider. There were gummy vampire teeth and then a small container of candy corn. With some different colored frostings and these tools, I made a whole assortment of chocolate and vanilla cakes that looked great on the tiered tray- with some fake severed fingers mixed in!

So first the basics... the chocolate cake was half of the infamous Hershey's Perfect Chocolate Cake. It can be found somewhere on my blog and on the Hershey's site.

I was desperate for a moist vanilla recipe, didn't really find a tried and true one, and resorted to my trusty Betty Crocker cookbook. I have to say, the Starlight White Cake actually was pretty good. I might try adding a 1/2 C. of applesauce next time to jack up the moist factor, but the flavor was nice. I've been updating the blog for literally over 3 hours now, so I don't want to type it out tonight. You can find it here and just know that I cut it in half, but used a full 2 eggs.

For frosting, I used a basic buttercream, making half of it vanilla (white), a quarter mint (green), and a quarter almond (orange). I only used the mint on the chocolate cakes.

Now for the good stuff... the fun decorations!


You can see the Dracula on the top tier- he's my second favorite. There are also a couple of orange jack-o-lanterns and the severed fingers and gummy worms. You can't really see the web ones or the white ghosts/ skeletons.


These were kind of dull, though tasty. I made 2 with random candy corn decorations. I figured not everyone wanted something gory or horrific!


I see you! A little chocolate vein action, a swirl of blue frosting, and a chocolate chip pupil make for a creepy cake. I can't claim this as an original though- I've seen these eyeballs a few places, including other blogs!


I also go this mummy idea from somewhere online. One of my guests almost broke a tooth on the "eyeball" though- everyone thought they were gumballs. Nope- jaw breakers! These were the biggest pain since I had to load up the frosting bag, but the effect was great.


Nightcrawlers, ew! With a little crumbled graham cracker and some strategically placed gummy worms, these cupcakes also had some of that gross out factor. The extra gummies looked great hanging off of various dishes on the table too!


And this was my favorite. I only had one little frog, and I thought what better way to honor him at the party than to feature him squashed by a car on the side of the road! Gruesome? Oh yes. Totally funny? I sure think so!

Spinach & Goat Cheese Tartlets

Tartlets! Something new for me that I've been eager to try!

Sometimes there are things you want to try your hand at, but you just don't have a good excuse to make it. For me, one of those was tartlets- that little appetizer that can be sweet or savory- and really just doesn't make sense when cooking for me and the hubby.

But now a Halloween party, that's a great reason to make tartlets! They are tasty, unique, and are a great compact finger food. And I'm surprised how easy they were. I suppose it would have been harder if I made my own crust, but I just didn't have that kind of time. This whole recipe came together in about 50 minutes, with 30 of those being baking time.

I think these will come back for Thanksgiving with all the parents and vegetarian brother!


Spinach & Goat Cheese Tartlets
(Makes 24 small tartlets)

  • 1 1/2 C. Fresh Spinach, chopped
  • 1 Stalk Green Onion, chopped
  • 2 Eggs
  • 1/3 C. Heavy Cream
  • 4 oz. Soft Goat Cheese
  • Black Pepper
  • 2 9" Prepared Dough for Pie Crusts

  1. Preheat oven to 350 degrees.
  2. In a small pan, cook the spinach and onion until the spinach is partially wilted. Set aside to cool in a medium bowl.
  3. Unroll pie crust and use a circular object to cut circles about 1/2" larger than the tartlet pan cups. (My pans had about 2 1/2" diameters, so I used a 3" wide glass.) Press the object into the dough, take the dough circle, and press it into the tartlet pan, keeping any excess on the top.
  4. In a small dish, beat the 2 eggs. Add in the cream and whisk again until smooth.
  5. Pour egg mixture in with spinach and stir. Crumble in the goat cheese and stir briskly to "melt" cheese into the batter. Stir in a couple of dashes of black pepper.
  6. Pour the spinach mix into each tartlet shell, filling about 2/3 the way up.
  7. Bake for about 30 minutes. Filling will bubble up slightly and set. Remove when shell crust is browned. Cool and serve warm.

Chocolate Chip Pumpkin Blondies

No Halloween party is complete without some pumpkin recipes! I actually had 2 in mind, but ran out of time. (The other was a savory dish- maybe I'll make it for dinner this week instead.) I already had chocolate and vanilla cupcakes, so I didn't want pumpkin bread. Pumpkin rolls are too much work. Pumpkin muffins just don't say party to me.

So I decided on a denser pumpkin brownie/ blondie. Now, I'm not a baker, so I can't just make these things up. Do you know how hard it was to find a dense pumpkin recipe? I searched all over. I finally found a keeper at Libby's- makers of yummy pumpkin puree. I enhanced it by adding chocolate chips- you can't go wrong with that! I did not use the icing- the reviews made it sound like they were sweet enough and with all the other desserts, I wanted something a little less sugary.

They were a big hit- the batch made about 40 blondies and I'm down to under 20 after 24 guests and a full table of treats! Hope the coworkers like them too...


Chocolate Chip Pumpkin Blondies
From Libby's

  • 2 1/4 C. Flour
  • 2 1/2 tsp. Baking Powder
  • 2 tsp. Ground Cinnamon
  • 1/4 tsp. Salt
  • 1 1/2 C. Brown Sugar
  • 3/4 C. (1 1/2 sticks) Butter, softened
  • 1 tsp. Vanilla Extract
  • 2 Large Eggs
  • 1 C. Pumpkin Puree
  • 2 Tbsp. Maple Syrup
  • 1/2+ C. Chocolate Chips

  1. Preheat oven to 350 degrees and grease a 15"x10" jelly roll pan/ cookie sheet.
  2. Beat sugar, butter and vanilla extract in large mixer bowl.
  3. Add eggs one at a time, beating well after each addition. Beat in pumpkin and maple syrup.
  4. Beat in flour, baking powder, cinnamon and salt until well combined and moist. Stir in chocolate chips. Spread batter into the prepared pan.
  5. Bake for 20-25 minutes or until a toothpick inserted in the middle comes out clean.
  6. Remove from oven and let cool a little. Cut into bars and remove to a rack to cool.

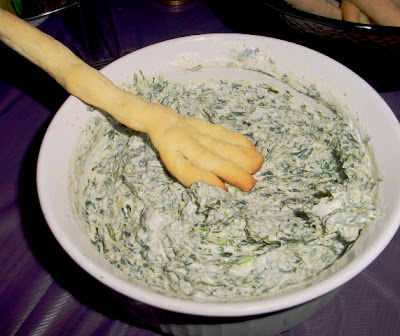
Witch's Broomstick Breadsticks & Spinach Dip

One of the things that is so fun about hosting a Halloween party is that creativity is very welcome and a little whimsy is encouraged. I tried to embrace this by finding a fun recipe that incorporated some haunting themes.

I searched around the web and found a really cute idea (don't recall where) to make crisp breadsticks that looked like broomsticks. I paired this with a creamy spinach dip- because green gooey dishes are great on All Hallows Eve!

The breadsticks were tasty, though time consuming to make. I would make them again as normal breadsticks if I used sesame seeds. They were a little bland as made, but were a great side with the flavorful dip. And all the babies in attendance loved them! They were hard enough that they didn't break off in large, choke-hazard pieces but soft enough that they could eventually gnaw off small amounts. They were also the perfect size for pint sized fists.


Witch's Broomstick Breadsticks

  • 1 Package Dry Yeast (.25 oz)
  • 1 C. Warm Water
  • 3 C. Flour
  • 2 Tbsp. Olive Oil
  • 1 tsp. Sugar
  • 3+ Tbsp. Olive Oil
  • Kosher Salt

  1. Dissolve yeast and sugar in the warm water and let it sit for a few minutes until slightly frothy.
  2. In a warmed Kitchen Aid bowl, pour in yeast mixture. Add in 1 1/2 cups of flour, salt, 2 T of oil. Mix together until dough starts to come together.
  3. Continue to add in flour until dough is no longer sticky to the touch. Take the dough ball and place it in a greased bowl. Cover and let rise for about 45 minutes.
  4. Preheat oven to 350 degrees.
  5. Pour remaining olive oil on a large cookie sheet, or 2 medium cookie sheets.
  6. Take small balls of dough off the large ball and roll about 4/5 out in your hands to make the broomstick handle. On the last 1/5, smoosh the dough flat and wide for the broom bristles. With a sharp knife, cut the dough into 4 or 5 "fingers," twirling each bristle to keep it separate.
  7. Place each breadstick on the cookie sheet, dredging each side in the oil to mostly coat the dough.
  8. When all the broomsticks are formed, sprinkle generously with the kosher salt.
  9. Bake for 20-25 minutes until browned. Remove from oven and cook on racks.


Creamy Spinach Dip
From AllRecipes.com
  • 1 10 oz. Package Frozen, Chopped Spinach
  • 1 C. Sour Cream
  • 1 C. Mayonnaise
  • 2 Stalks Green Onions, chopped
  • 1 tsp. Lemon Juice

  1. Thaw, cook, and drain the spinach. Allow it to cool.
  2. Combine all ingredients.
  3. Let sit for at least 1 hour in the fridge for flavors to blend. Serve with bread chunks, breadsticks, or crackers.

Caramel Apple "Quesadillas"

In my menu planning for the party, my goal was to come up with tasty and unique finger foods with autumn flavors. Riiiight... let me just reach in my back pocket for that, right!? Well, everyone loves apples this time of year, especially in New England, and caramel is such a nice pairing. Well, I was NOT about to make 20+ caramel apples. Too messy, too big, too much effort.

Instead I thought of using tortillas as a great delivery device. They have a mild sweet flavor and make for great hors d'oerves wrappers. The vision in my mind was delicious apple chunks in a semi-solid caramel bed, served in cute little tortilla triangle. I came so close, yet so far! The apples I cooked were delicious, though not particularly crisp. The caramel sauce was really tasty and coated the apples perfectly as everything cooked in the oven, but, um, it never set back up. Which means I have very goofy, very drippy caramel sauce oozing out of my wimpy, not crispy tortilla triangles.

Everyone liked them, but it was no happy finger food. I would make the sauce again, but not for this application. I think I would have been better off chopping the caramel candies and interspersing them in the apple before baking. Don't know that it would work better, but it can't be worse!

This picture is sadly accurate... they were not the prettiest thing I've ever made!


Caramel Apple Quesadillas

  • 4 Apples
  • 2 Tbsp. Butter
  • 1/2 Tbsp. Cinnamon
  • 1 tsp. Ground Ginger
  • 1/2 tsp. Ground Cloves
  • 1/2 tsp. Allspice
  • Dash of Nutmeg
  • 2/3 C. Caramel Sauce (recipe to follow)
  • 4 Small Tortillas

  1. Preheat oven to 275 degrees.
  2. Core the apples and chop into small pieces.
  3. In a small sauce pan, melt the butter over medium-low heat. Add in apple pieces and stir to coat. Add in all the spices and cook for about 5-10 minutes until the apples are just softened.
  4. On a large cookie sheet, lay down 2 tortillas. Divide the apples evenly between the two, spreading the mixture out over the surface area of the tortilla.
  5. Spoon the caramel sauce over each batch of apples, drizzling evening.
  6. Place the remaining tortillas over the two loaded ones, and smoosh down a little. Bake in the oven for just about 5 minutes.
  7. Remove from oven and allow to cool. (With any luck, your caramel will set up and not be so gooey!)
  8. Gently slice "quesadillas" into thin triangles. I found using a serrated knife worked best as it was such a mess; pressing down on the dish only oozed out the sauce.


Caramel Sauce
  • 18 Brachs Milk Maid Caramel Candies
  • 1 1/2 Tbsp. Heavy Cream
  • i tsp. Milk

  1. In a small saucepan over low heat, add in unwrapped candies, cream and milk.
  2. Stir the caramels until they melt and combine with the liquids. You will want to stir continually/ very often.
  3. Use for whatever recipe you want, and then clean pan quickly. This stuff gets REAL sticky in the pan real fast! Would be excellent over ice cream or apple pie.

Pecan Stuffed Mushroom Caps

I have a great stuffed mushroom recipe that uses a white sauce to create a thick, creamy filling that gets coated with breadcrumbs and really melts in your mouth. It also takes forever to make and time was something I did not have with such an ambitious party menu plan and busy work week!

So instead I came up with this stand in. I was able to make the filling early in the week and then throw the caps together when the first guests started to arrive. They were reminiscent of Thanksgiving stuffing and had a really nice crunch that paired with the soft texture of the mushrooms.

Apologies for the pictures... in my haste to just get everything on the table as everyone was already streaming in the door! Most items were photographed on the table, in the dark, after being picked over. Better late than never?


Pecan Stuffed Mushroom Caps

  • 2 Large Packages of White Mushrooms
  • 2 Stalks Green Onions, finely chopped
  • 1 tsp. Thyme
  • 1 tsp. Rosemary
  • 1/2 C. Chopped Pecans
  • Kosher Salt
  • Parmesan Cheese

  1. Pop mushrooms stems off of the caps, being careful to not damage the caps. You can use gentle pressure with your thumbs to separate the stem from the cap, but if you run into trouble, a paring knife or your CLEAN thumbnail can dig out any remaining pieces. Set aside the caps.
  2. Chop the stems into small pieces.
  3. Using either paper or cloth towels, press the stem pieces to remove as much moisture as possible.
  4. In a small to medium saute pan with a small amount of oil, saute the green onions and mushrooms.
  5. Add in the herbs and continue cooking mushrooms over medium heat until most of the moisture has cooked out. The mixture will reduce in size significantly and will smell FANTASTIC!
  6. Stir in pecans. At this point, you can let the filling cool and store it for up to a week until final preparations.
  7. Preheat oven to 350 degrees.
  8. Wash the mushroom caps and pat dry as best as possible. Arrange caps on a cookie sheet and lightly sprinkle the insides with the kosher salt.
  9. Spoon a heaping mound of the filling into each cap. Grate a small amount of Parmesan cheese on each cap.
  10. Bake in the oven for 20-30 minutes. Serve either warm or cold.

Thursday, October 25, 2007

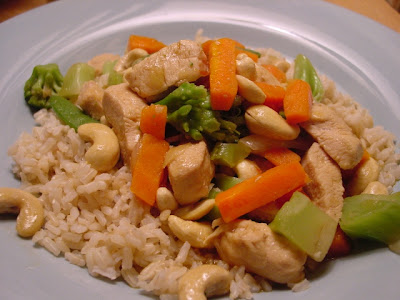
Cashew Chicken

Unlike the rest of the recipes from my 2 week "hiatus" from posting, I was a good girl for this one and [drum roll please] actually wrote down the recipe as I made it! I know, it's a modern miracle.

And I'm glad I did- it was really good! I don't often make Chinese or Chinese-American food at home. I don't have a good reason for that, it just doesn't come to mind. But I saw a recipe on Joelen's blog for something called Bourbon Chicken and it made me think of one of my favorite Chinese take-out recipes, Cashew Chicken. I reviewed her recipe as well as a bunch online and took all that info and made up my own.


I served this with brown rice. I haven't had it before and it was so freaking good with this. I'm sure white rice or fried rice would be a good match, but the brown rice just had the perfect added-depth flavor that worked. Yum.


Cashew Chicken

  • 1 Clove Garlic, minced
  • 1 Onion, chopped
  • 1 C. Chicken Broth
  • 1 C. Fish Broth (I used lobster base.)
  • 2 Tbsp. Sesame Oil
  • 1 Tbsp. Soy Sauce
  • 1 Tbsp. Rice Vinegar
  • 1 T. Apple Brandy (next time I won't bother)
  • 2 Tbsp. Brown Sugar
  • 1/4 tsp. Red Pepper Flakes
  • 1/2 tsp. 5 Spice Powder
  • 2 Chicken Breasts, cubed into bite sized pieces
  • 1 Package Frozen Stir Fry Veggies
  • 1/2+ C. Raw Cashews

  1. In a large saute pan with lid, saute garlic and onion in sesame oil over medium heat.
  2. When onion is tender, pour in liquids, spices, and brown sugar. Stir and let simmer over medium heat for a few minutes.
  3. Add in chicken pieces, stir, and cover. Allow pan to simmer, stirring occasionally, until chicken is thoroughly cooked.
  4. With the heat still on medium, add the frozen veggies. I added them while still frozen. I had to keep them covered, repeatedly stirred to coat with the warm sauce, and turn the heat up to get them to cook. You could save time by mostly thawing them before adding to the pan.
  5. Once veggies are hot, add in the cashews and stir to coat with the sauce. Serve everything over brown, white, or fried plain rice.

Sunday, October 21, 2007

Something with Shrimp

If you happen to be reading these posts in succession, you will see in an earlier post that I've been slacking on keeping the blog up to date and have subsequently forgotten a lot of the details of some of these recipes. Although it says I posted this on the 21st, it is actually the 28th. (I like to keep the dates close to the eating date so I can go back and find things better. Sorry.)

So I found pictures of this recipe on the camera. Ummmm, it looks tasty, but I'll be damned if I know what went into it! I think it was something lemon-y but I can't be sure. But I figure I took pretty pictures, so I'll post it and just make something up.


Mystery Shrimp

  • Shrimp
  • Pasta
  • Cilantro
  • Parmesan Cheese?
  • Juice of one Lemon
  • Lemon Zest from one Lemon
  • Maybe I used garlic too- we like it a lot, so maybe this was another use.
  • I very well might have used white wine, olive oil, and/ or cream too.

  1. Cook and drain pasta, returning to pot when done.
  2. If I used garlic, saute garlic in olive oil.
  3. Cook shrimp in with garlic.
  4. Add lemon juice, lemon zest, and whatever that green leaved herb is. Stir to coat.
  5. If I used some other liquid, throw that in too and maybe reduce it?
  6. Pour shrimp and mystery sauce into cooked pasta. (I know I actually did that!)
  7. Serve with grated Parmesan.


Sorry. I know that was not the world's best recipe. Consider it an opportunity to improve on the given base though, right!!!

Thursday, October 18, 2007

Beet Risotto, Sauteed Mushrooms, & Almost Marsala Chicken

Beet risotto is a menu item that comes up every now and again in our house. We always love risotto- so creamy and cheesy and rich. And we are some of the few people that really like pickled beets from the can. We like them hot, cold, or chopped up in risotto.

I paired this tasty dish with another standard and something I made up and really don't remember what I put in it. The standard was a sauteed mushroom dish- we love mushrooms. The other was a chicken dish that I whipped up. It is kind of like chicken marsala in that is uses marsala wine. Otherwise I just kind of made it up as I went.

That night dinner was delicious. The mushrooms were gone at the end of the night. However, the leftover risotto and chicken were not as good. The risotto was bland and I over nuked the chicken, killing the nice texture it had at first. I'll still make these all again though!


Beet Risotto
Printed from www.kbuxton.com in 2002!

  • 2 Tbsp. Olive Oil or Butter
  • 1 Clove Garlic, minced
  • 1 Small Onion, chopped
  • 1 Can Pickled Beets, finely chopped
  • 1 C. Arborio Rice
  • 1/2 C. White Wine or Vermouth
  • 3+ C. Hot Chicken Broth
  • 1/4 C. Grated Fresh Parmesan

  1. In a medium sauce pan, heat the oil or butter and saute the garlic and onions until soft.
  2. Pour in rice and stir to coat with oil.
  3. Add in wine and stir. Wine will evaporate as you stir.
  4. Add in chicken stock about 1/2 C. at a time, stirring often. The risotto will slowly absorb the broth, cooking and becoming creamy with stirring.
  5. About halfway through cooking the rice, add in the beets. This adds a wonderful color and lets the beet flavor absorb into the rice as it cooks.
  6. When rice is tender (may not require all the broth), stir in the cheese until it melts throughout.
  7. Serve hot with extra Parmesan on hand for grating on the plate.


Sauteed Mushrooms
  • 1 Small Package of Sliced Mushrooms
  • 3 Tbsp. Soy Sauce
  • 1/2 tsp. Garlic Powder
  • Olive Oil

  1. In a small saute pan, heat the olive oil over medium heat. Add in shrooms, soy, and garlic. Saute until cooked through and aromatic. Serve hot.


Caramelized Marsala Chicken
  • 1/2 Red Onion, sliced into thin strips
  • Olive Oil
  • 1/2 C. Marsala Wine
  • 1 1/2 Lbs. Chicken Breasts
  • 1 tsp. Thyme (I think- maybe it was Rosemary)
  • Salt & Pepper to taste

  1. In a large saute pan, heat olive oil over medium heat. Cook red onions until they are soft and starting to caramelize, about 25 minutes.
  2. Add in marsala wine and stir. Increase heat to medium-high and reduce wine a little.
  3. Place chicken breasts in pan and spoon marsala and onion mixture on top of breasts. Sprinkle in the herbs and then cover the pan.
  4. Cook chicken until cooked through, about 30 minutes, turning occasionally. When turning, be sure to spoon more mixture over the chicken to keep the flavors melting over.
  5. Serve warm with onions on top of chicken.

Sunday, October 14, 2007

Non-Spicy or BBQ Chicken Wings

Howdy blog fans... it has been 2 weeks since I posted anything here. (I'm cheating the dates on Blogspot- it helps me keep things straight when I go back to recipes!) It's, uh, it's been busy. I have a relatively new job and I had a lot of work to put in for my first corporate class. So I did a little cooking, but there was time left for blogging- so sad.

The point of all of this is that the next few recipes I'm guessing about. I'm bad in the first place about measuring ingredients as well as writing things down as I cook, so there's a good chance I'm making some stuff up for a few upcoming entries, including this one. Just wanted truth in advertising, ya know?

Ok, so I think this recipe was made back on Sunday the 14th for watchin' football. I thought Adam would really enjoy some chicken wings and beer while enjoying the Pats tear the other team a new one. (I don't recall which team- with a perfect record and crushing against WA taking place as I type, I don't think it matters which one it was.) I don't like hot wings, so I found this kind of sweet, kind of rich marinade online. They were delicious! I may have halved the recipe- I don't remember. I didn't change much though!

However, it turns out Adam doesn't like wings. I guess I missed that somewhere along the way over the last 13 years. I ended up eating about 75% of them- in one sitting. Finger licking good, even if I do peel off most of the skin!


Mahogany Chicken Wings
From AllRecipes.com

  • 1.5 lbs. Chicken Wings
  • 1/2 C. Soy Sauce
  • 1/2 C. Honey
  • 1/4 C. Molasses
  • 2 tsp. Tabasco Sauce
  • 1 tsp. Ground Ginger
  • 2 Cloves Garlic, crushed

  1. Combine all marinade ingredients in a large ziplock baggie. Mush around to mix.
  2. Add in chicken and refrigerate for 30 min to 4 hours.
  3. Light the grill. Grill chicken on medium heat for about 20 minutes, turning once and watching that they don't go up in smoke with all that sugar in the marinade.

Haddock Chowder - Homegrown Gourmet Round 2


It's back! Homegrown Gourmet, the cooking challenge that features local ingredients, cuisine, and creative incorporating, is onto round 2.


This round we've been instructed by Meg to feature a soup, in honor of autumn. Up here in Maine, I considered Lobster Bisque, but I just couldn't bring myself to spend the money on lobster, fish the meat out, and then make something horribly unhealthy with it. (Because we would have eaten it all and then felt like fat bastards!)

Instead I went traditional with a Haddock Chowder. Chowders here up in the northeast aren't necessarily thick and are always focused on simple flavors and combinations. I kept it basic and was very please with the results. Just some fresh fish, potatoes, onion, and liquids and we had a hearty, warm meal for a 40 degree night.

Perfect for watching the Sox and enjoying the wood smoke in the air.


Traditional New England Haddock Chowder
  • 1 1/2 lbs. Fresh Haddock fillets
  • 1 Small Onion, unpeeled and whole
  • 1 Bay Leaf
  • 3 C. Water
  • 2 Tbsp. Salt Pork, diced (Can be substituted with thick cut bacon or pancetta)
  • 2 Potatoes, skinned and cubed (I should have used Maine potatoes, but they only came in 5 lbs. bags and we don't eat that many spuds. Sorry, home state!)
  • 1 Large Onion, chopped
  • 2 C. Milk
  • 1 Tbsp. Butter
  • 2/3 C. Heavy Cream
  • Salt, Pepper, & Thyme to taste

  1. In a large skillet pan with a lid, bring the water to a boil with bay leaf and onion in it. Let simmer for 5 minutes.
  2. Add in fish fillets and cook until just about done. Strain out the water, reserving for the soup. Throw out whole onion and bay leaf.
  3. In the meantime, cook the salt pork in a large stockpot over medium heat. Stir occasionally so meat does not burn to the dry pan. Additionally, some of the fish water can be drizzled in to keep the meat from sticking too much. The meat will brown the bottom of the pan, which will later add flavor to the soup.
  4. Add in the onion and cook until just translucent.
  5. Pour in reserved cooking water from the haddock, increasing heat to medium high. Bring water to a boil and add in the potatoes, cooking until tender.
  6. Stir in haddock, breaking up the fish into large pieces in the pot.
  7. Reduce heat to medium. Stir in the milk, cream, and butter until the butter melts and broth is well heated through.
  8. Taste the broth. Add salt, pepper, and thyme to your desired taste. Note- the thyme flavor should be used very sparingly as the fish and potato flavor should dominate the soup.
  9. Serve with a crusty bread while good and hot! A-yup.

Whole Wheat Sucks

Ok, so I bitched in an earlier post about how I'm never doing my normal shopping again at Whole Foods. Those stupid earthy crunchy people don't have the normal things a basic cook needs in her pantry. I was so flustered and frustrated when I went that I didn't find pizza dough, which I needed for Thursday's meal of Greek calzones.

I did find an awesome "Oh So Greek" lamb sausage there- which was crucial to the meal, so they aren't all bad I suppose.

So on Thursday I had to go to the store last minute to get the dough for these calzones. Well, all my normal chain had in stock on the shelves was whole wheat pizza dough.

What's with this whole wheat craze? It tastes SO BAD!!!! We've tried whole wheat pasta and whole wheat dough now, and they were really both terrible. Bread can be whole wheat, that's it. I understand folks are trying to be healthy, but why mess with a good things like delicious white bread pizza dough. It's just not right.

So, anyway, we made the calzones and they were only ok. The pictures came out pretty awful, so I'm not going to share.

I made a basic tzatziki sauce with yogurt, mint, cucumber, garlic and dill as well as a traditional marinara for dipping. The olives I included were green manzanillas, and I think they detracted as well. Black kalmata might have been better, or maybe just no olives. Overall it was just a blah meal- disappointing when I thought it would have been so good.

Greek Calzones

  • Whole Wheat Pizza Dough (yuck)
  • Lamb Sausage, cooked and sliced
  • Feta Cheese
  • 1 Tomato, chopped
  • Green Olives, chopped

  1. Pre heat oven and pizza stone according to tempurature on dough instructions.
  2. Break the dough in two and roll each half out into a circle.
  3. Fill with ingredients.
  4. Fold over the dough circles and seal the edges, creating a half moon shape.
  5. Brush with olive oil and bake until the dough is golden brown.
  6. Serve with marinara and tzatziki sauce.

Friday, October 12, 2007

Maple Glazed Pork Chops

I've been taking the semi-lazy route this week by turning off my creative cooking brain and instead just making other people's recipes. There is certainly nothing wrong with this- there are some great recipes out there and just because I'm not making stuff up new that doesn't mean we don't get some great variety.

This was yet another delicious "stolen" meal from another lady's blog. Tuesday evening we enjoyed this maple soaked pork recipe from Joelen's Culinary Adventures, although I had to adapt it as I didn't have tons of time or a slow cooker.

I really enjoyed this. It was not too sweet- which I thought it might have been. Adam isn't a huge pork fan and cuts about half of the meat off because they are "fatty pieces." Some are, some aren't, and either way he's crazy because the little bit of fat on my chops was DELICIOUS with this glaze. The only thing I would have changed would have been slightly less cooking time in my oven- it got just a little dry. If I get a crock pot for Christmas, I will for sure try this again with a nice slow roast.


Maple Glazed Pork Chops

  • 3 Large Pork Chops, about 1 1/2 lbs. total
  • 3 Tbsp. Real Maple Syrup
  • 2 tsp. Cumin
  • 2 tsp. Chili Powder
  • 2 tsp. Onion Powder
  • 2 tsp. Garlic Powder
  • 1 Tbsp. Brown Sugar
  • 1-2 tsp. Worcestershire Sauce

  1. Preheat oven to 325 degrees.
  2. In a small bowl, mix together all ingredients except the pork.
  3. Line a medium baking dish with foil. Place pork in dish. Using a fork, poke holes in both sides of the chop. Pour the marinade all over the pork, coating both sides.
  4. Roast pork in hot oven for about 1 hour 15 minutes, turning once about half way through.
  5. Remove pork and let it sit for about 15 minutes, with foil lightly covering the meat and allowing the steam to exit. Serve warm with other autumn inspired sides.

Wednesday, October 10, 2007

Ziti, Chicken, & Broccoli with Cheddar Wine Sauce

I admit it- I was wrong.

Broccoli is pretty tasty.

I know, it's crazy, I was convinced it was disgusting and yet I made it two nights in a row and it was darn good! Monday I had a simply delicious meal that I got from Katie's blog, Good Things Catered. It involved all sorts of yummy things- pasta, cheese, wine, and yes, broccoli. This really came together beautifully, and quickly too! With Adam's help getting the water steaming for veggies, water boiling for pasta, and the chicken defrosting in the microwave, I whipped this up in under 30 minutes. It took as long as pasta- water heating and cooking time! And yet so gourmet tasting!

The only improvements that we could come up with (and this was hubby's suggestion) is to used grilled chicken, rather than boiled. The chicken was the weakest part of our dinner- although it was still good. I think a simple salt & pepper grilling would be so tasty. It would just add such a nice depth to this already delicious meal.

So thanks to Katie!


Ziti, Chicken, & Broccoli with Cheddar Wine Sauce

  • 1 Box Ziti
  • 1 Breast of Chicken
  • 2 Stalks of Broccoli
  • 3 Tbsp. Butter
  • 2 Cloves of Garlic, finely minced
  • 2 Tbsp. Flour
  • 1/2 C. White Wine
  • 1/4 C. Dry Vermouth
  • 2 C. Chicken Broth
  • 1 C. White Cheddar, shredded
  • Salt & Pepper to taste

  1. Get a large pot of water boiling. Cook the ziti according to directions. Drain and set aside.
  2. Meanwhile, cut the florets off the broccoli stalks and steam in a steamer pan. Do not over steam- they should be tender, but still have some crunch to them. Set aside when ready.
  3. Cut up the chicken breast into small bite-sized pieces. Place in a microwave safe bowl and cover with water. Microwave on high for 3-5 minutes until cooked through. Drain and set aside. (Next time we'll use leftover grilled chicken for more flavor rather than boiling it for the recipe.)
  4. As all these other things are cooking, heat a large pot over medium high heat. Melt butter in this pan.
  5. When butter is melted, add in garlic and cook until aromatic.
  6. Stir in flour and mix until smooth and bubbly.
  7. Pour in wine and vermouth and stir. When the liquid has reduced by about half, add in chicken stock.
  8. Heat stock until boiling, stirring often so it will thicken.
  9. Add in cheese and stir until melted. Taste sauce and add salt and pepper as desired.
  10. Pour in pasta, chicken, and broccoli one at a time, stirring to coat with the sauce each time. Serve hot.

Monday, October 8, 2007

Chocolate Rum Cheesecake

I've been on a kick the last few months to try to make new things. Challenges have included mole sauces, fresh bread, crepes, new veggies, etc. Today I passed another mark- I've made a cheesecake!

It didn't come out perfect- there are some serious cracks in the top, but the taste is a-ok by me. Even better, it's great to hubby and he LOVES cheesecake! I went for this chocolate rum version I saw on Michelle's blog since I don't care for the plain flavor. Mmmmm-mmmmmm! So tasty! I hope the coworkers like it since they're going to be expected to eat most of this. I just can't keep this in the house!


Chocolate Rum Cheesecake
From Williams-Sonoma
Crust

  • 1 1/4 C. Graham Cracker Crumbs
  • 1 Tbsp. Sugar
  • 4 Tbsp. Unsalted Butter

  1. Melt the butter with low heat on stovetop or in microwave.
  2. In a small bowl, combine the crumbs and sugar, stirring to blend.
  3. Pour in butter and mix thoroughly.
  4. In a springform pan, spread the crumbs along the bottom and up the sides, pressing down to form the crust.
  5. Refrigerate until ready to bake with cheesecake.


Filling
  • 4 oz. Bittersweet Chocolate
  • 1/6 C. White Rum (half 1/3 C.)
  • 1 Lb. Full Fat Cream Cheese, room temperature
  • 3/4 C. Superfine Sugar
  • 1/4 C. Greek Strained Yogurt
  • 1/4 C. Sour Cream
  • 1 Tbsp. Vanilla
  • 4 Large Eggs

  1. Pre-heat oven to 325 degrees.
  2. In a small saucepan, combine chocolate and rum over low heat. Stir often to melt the chocolate and create a smooth chocolate sauce. Set aside off the heat.
  3. In a large mixer bowl, beat cream cheese until fluffy.
  4. Add in sugar and beat again to cream batter.
  5. Beat in the yogurt, sour cream, and vanilla, all the while trying to get a smooth consistency. Be sure to scrape the bowl walls often.
  6. Add in eggs, one at a time, again beating to maintain smooth texture.
  7. Using a set of steamer pans, bring some water to a simmer and set up the steamer pan. Put the mixing bowl on the steamer pan and stir batter until it thickens slightly and lumps disappear. Again, scrape the sides of the bowl often.
  8. Remove 1 1/4 c. of the plain batter and set aside. Whisk in the chocolate sauce into the remaining mixing bowl batter. Again, warm the batter and stir to thicken.
  9. Pour chocolate batter into chilled graham cracker crust. On top of chocolate, pour the retained plain batter. Using a fork, gently swirl the two batters together to make a pretty pattern.
  10. Carefully place springform pan onto a cookie sheet (to manage any spillage that may occur) and then place in hot oven in a center rack. Bake for about 40-50 minutes until sides are set and center is just a little jiggly. (Watch carefully- this is when mine cracked... I was 5 minutes too long.)
  11. Remove from oven and allow to cool to room temperature on a cooling rack. When cooled, place in fridge to chill, preferably overnight.

3-Day Weekend Breakfast

It's a gray day here in Maine. Not like the lovely brisk Sunday we had yesterday at all! It's kind of chilly and we haven't seen the sun. But it's all ok because it's a 3 day weekend for me and hubby so we have nowhere to go and no obligations! Wa-hoo!

We slept in 'til 8 and once hubby's feet hit the floor, he started talking about making hash browns. I dismissed him with a bunch "Oh yeah, ok, here I go right into the kitchen to do your bidding" and "whatever, go away" retorts. But when I got down into the kitchen, I decided I had nothing better to do for breakfast and it wasn't really hard. So I indulged him- gosh he loves me!

Throwing one potato through the box shredder and frying it up really isn't any effort. And with Adam in charge of scrambled eggs, toast, and the coffee only he drinks, it took no time for a nice meal to come together.

These aren't anything special, but they sure were tasty!


Hash Browns

  • 1 Potato, scrubbed & shred
  • 1/2 Tbsp. Onion Powder
  • 1/2 tsp. Garlic Powder
  • 1/4 tsp. Chili Powder
  • Olive Oil
  • 1 Tbsp. Butter
  • Salt & Pepper to taste

  1. In a large saute pan, heat the olive oil over medium heat.
  2. Add in potato shreds and seasoning. Mix together and then flatten into a pancake type shape to cook.
  3. As the potatoes cook, slice the butter pat into small pieces/ slivers. Place butter on top of potatoes in the pan. The butter will melt and seep through the crevices.
  4. When bottom is golden brown, gently slice the hash browns into 4 quarters. Flip to cook top side.
  5. Be careful not to let the potato cook too much or you will end up with slightly burnt and very crispy hash browns! Serve warm with eggs and toast and with Tabasco available to spice them up!

Potato & Broccoli Soup in Bread Bowls

Hooray for a new veggie! Ok, I do not particularly like vegetables, at least most of them. I've made leaps and bounds in the last few years and have added a lot of new things to my "accepted" list of things I'll eat.

Yesterday (and today too) I am venturing into dangerous territory- that tree like green thing called broccoli. I figured in a yummy fall soup, surrounded by potato and cheese, and served in a homemade bread bowl, broccoli couldn't do me much harm. I was right! In fact, next time I'd add more green to it as I'd like to *gasp* enjoy the flavor more.

I know, stranger than fiction.

Thanks to Michelle from Sugar & Spice where I originally saw this soup recipe!


Potato & Broccoli Soup
Modified from Cooking Light

  • 1/4 C. Flour
  • 3 1/2 C. (or 2 cans) Chicken Broth
  • 1 Small Onion, chopped
  • 2 Potatoes, peeled and cubed
  • 1 Broccoli "Tree", chopped
  • 1 C. Milk
  • 1/4 C. Half & Half
  • 1 1/2 C. Sharp Cheddar, shredded (use fresh from a block of cheese for best melting results)

  1. In a small bowl, whisk together flour and about 1/2 C. broth. This will be used later to thicken the soup.
  2. In a large stockpot, saute the onion in a small amount of olive oil or butter until soft.
  3. Add in remaining broth, potatoes, and broccoli. Bring to a nice simmer and cook uncovered for about 10 minutes until potatoes are tender. Cover and simmer another 10 minutes.
  4. Pour in flour mixture and stir in. Continue to stir over medium-high heat until soup thickens.
  5. Pour in milk and half & half, stirring to mix. Cook over medium heat to warm through.
  6. Finally, just before serving, add in cheese and stir until melted. Serve hot.


Bread Bowls
From AllRecipes.com
  • 1 Packet Active Yeast
  • 1 1/4 C. Warm Water
  • 3 1/2 C. Flour
  • 1 tsp. Salt
  • 1 Tbsp. Vegetable Oil
  • 1 Egg White
  • 1 Tbsp. Water
  • Cornmeal

  1. In a warmed mixing bowl, pour in warm water. Add in yeast and stir. Allow to sit for about 5-10 minutes.
  2. To bowl, add in about 2 1/2 C. flour, salt, and oil. Mix with dough hook until dough starts to come together.
  3. Continue to add in flour in small amounts until the dough has become a solid, non-sticky ball. You should use most, if not all, of the flour.
  4. Knead with dough hook on a low speed for about 3 minutes. When finished, remove dough and place it in a medium bowl that has been greased. Rotate the ball so the top is greased, then cover and let rise in a draft free location for about an hour. The dough will rise to more than double it's original size.
  5. After dough has risen, punch it down. On a cookie sheet, sprinkle the cornmeal evenly. Shape the dough into 4 balls, about 4" in diameter each. Place dough balls onto cookie sheet with some distance between them. Allow to rise a second time in a draft free location for about 30-45 minutes.
  6. Heat oven to 400 degrees. Mix together the egg white and Tablespoon water. Brush dough balls with egg wash and bake for 15 minutes in the heated oven.
  7. Remove the bowls after 15 minutes and apply the egg wash again. Return to oven and bake another 10-15 minutes until crust is golden brown.
  8. Remove from oven and move to a cooling rack. When they are able to be handled, cut an opening in the top of the loaf, about a 3" circle. Carefully remove the plug, keeping as much bread as possible attached. Using either a spoon or knife, carefully remove insides, leaving a 1/2" between the outside crust and soft interior wall. Don't poke holes- your soup will leak!
  9. Ladle in hot soup and serve with the plug on the side or on top of the soup to keep it warm.

Saturday, October 6, 2007

Autumn Apple Cake

Don't you just love the flavors of the season? I think cooking with what is in season really helps a person get that much more involved in what's going on around them and be in tune with Mother Nature. (Listen to me- I sound like a tree hugger and I was just knocking hippies in my last post!)

I bought a bag of Cortland apples at the store to eat as snacks. Now I know for a fact Adam and I will never get through all that fruit before it goes bad, so I did a preemptive strike and made an apple cake. My in-laws were up on Saturday through Sunday morning, and I thought this would double as both a nice dessert and a sweet treat for breakfast before they ran out the door to catch a flight.

It was in fact delicious- still is now on Monday too! We've got about a third left from the pan... if it makes it through tomorrow, I'm sure my co-workers will enjoy it as much as we did. The first day it was very apple-y, but the next morning the flavors had blended into a more even, cinnamon flavor. It is super moist and not too sweet- perfect with a cup of coffee while watching the leaves turn!


Autumn Apple Cake
Modified from epicurious.com

  • 5 Cortland Apples, peeled, cored, and chopped
  • 2 Tbsp. Unsalted Butter
  • 1 1/2 Tbsp. Apple Brandy
  • 2 tsp. Cinnamon
  • 2/3 C. Greek Plain Yogurt
  • 2 C. Flour
  • 1 tsp. Baking Soda
  • 1/2 C. Vegetable Oil
  • 3 Eggs


Optional Crumble Topping
  • 1/4 C. Flour
  • 1/4 C. Brown Sugar
  • 2-3 Tbsp. Cold Butter, cut into small pieces
  • 1 tsp. Cinnamon

  1. Pre-heat oven to 350 degrees.
  2. In a saute pan, melt butter and cook apples about 10 minutes until they start to brown. As they cook, add in the brandy, 1 Tbsp. of sugar, and cinnamon. Stir to mix then set aside when cooked.
  3. In a mixing bowl, cream the remaining sugar and the yogurt.
  4. Blend in the flour and baking soda and mix until smooth.
  5. Beat in the oil and eggs.
  6. Stir in the apple mixture, blending until the batter is smooth and consistent.
  7. Pour into either a non-stick or greased regular 9" x 13" baking pan. (The original recipe called for 1 8" round, but this would have completely overflowed. The larger pan allowed for less cooking time and nice sized squares. A bundt pan would also work well.)
  8. If using optional crumble topping, make this in a separate bowl. Mix together all ingredients using either a fork or your hands to blend. (I use my hands- it is easier to mix it and then sprinkle it on top that way.) When blended, crumble topping randomly over the batter, trying to drop only small bits at a time.
  9. Bake cake for about 30-40 minutes until a toothpick inserted in the middle comes out clean. Allow to cool for a little bit before serving.

Shrimp with Mango & Tomatillo Salsa

One of my best friends Dianna Lee got married last weekend to a great guy Glenn in a lovely ceremony in Boston. We had quite the blast! DLee has blogged here before with her yummy looking Chicken & Sausage Pizza. This time she sent me this recipe and I finally got around to making it on Friday night.

I had gone after work to Whole Foods to do my grocery shopping. Well, it was my second time in there and the first was a lot better. First time I just wanted some speciality things and it was a fun trip. This time I tried to do my normal shopping there and I thought I was going to bunch some granola-eating, patchouli-wearing hippie by the time I was through! Never again. I did however get the tomatillos I needed for this recipe.

Adam and I went out to a local hotel to listen to my neighbor play in a jazz duo. We enjoyed a couple of cocktails and split a couple of appetizers, which killed my appetite and the timing for dinner. I still ended up making this and we ate it around 10 PM. It was late, we weren't that hungry... and it was all devoured! What a tasty, tangy and unique treat! We didn't have the bread for dipping, but when I make this for a full dinner next, it will be a necessity.

Thanks Dianna!


Shrimp with Mango-Tomatillo Salsa
From Guest Blogger dlee, the newly married Dianna Lee!
Salsa

  • 1 Fresh Mango, pitted and chopped (can also use 1 bag frozen mango chunks, thawed)
  • 4-6 Tomatillos, outer papery skins removed, roughly chopped
  • 1 Large Garlic Clove, minced
  • Juice and Zest of 1 Lime
  • 1/2 Jalapeno, seeded & minced
  • 3 Tbsp Fresh Cilantro, chopped


  1. In a blender, combine all ingredients and puree until a smooth consistency is reached. Set aside to serve with shrimp.


Marinated Shrimp
  • 1 Lb. Medium Shrimp, shelled & deveined
  • 2 Large Garlic Cloves
  • 3 Herb sprigs, assorted (parsley, cilantro, basil, dill -whatever you have)
  • 1/4 C. Orange Juice
  • 2/3 C. Vegetable Oil
  • Salt & Pepper to taste


  1. Combine all ingredients except shrimp in food processor. Puree until smooth and consistent.
  2. Cover shrimp with marinate and let it sit no longer than 10 mins.
  3. Cook shrimp either on the grill or in a saute pan for about 5 minutes.
  4. Serve shrimp with prepared salsa either as a plate garnish or a dip to the side. Best served with a crusty bread for soaking!

Tuesday, October 2, 2007

Mom's Version of $h!t on a Shingle

Ok, so I should start this entry by stating that I really like this recipe. Adam says that he likes it too. I get this recipe from my mom and it is a good childhood comfort food. My mom is an excellent cook- she knows her way around delicious and complex recipes and can make a great deal of fancy schmancy meals to delight. This little number showed up probably about once a month and I can only imagine it was a good lazy evening meal to just get the family some nutrition.

Now let's face it- any meal that has toast as a main ingredient (and not caviar or pate too) ain't gonna show up at the Ritz any time soon. However, I find Creamed Tuna on Toast a perfectly decent and yummy meal for when I don't feel like cooking but want something warm, from scratch, and with the major food groups!


Creamed Tuna on Toast
Serves 1-2, can easily be doubled or more

  • 1-2 Tbsp. Butter
  • 1-2 Tbsp. Flour
  • 3/4 C. Milk
  • Salt & Pepper to taste (about 1/2 tsp. each)
  • 1 Can Tuna
  • 1/2 C. Frozen Peas
  • 2 or more Slices of Bread

  1. In a medium saucepan, melt butter over medium heat.
  2. Add in flour and with a whisk, blend butter and flour until smooth and bubbly.
  3. Pour in milk and increase heat to medium-high. Stir often until milk starts to boil and sauce thickens. Continue stirring until you reach the desired consistency- something a little thick and creamy. Reduce heat to medium to prevent burning.
  4. Add in salt and pepper to taste.
  5. Break up tuna into white sauce and stir to blend.
  6. Toast the bread.
  7. Stir in frozen peas and stir over heat until heated through.
  8. Butter toast if desired, and then spoon tuna mixture on toast. Serve hot.

Mexican Chicken Mix

It was Adam and my 2 year anniversary on Monday- yay for love and marriage! We played it low key- he did homework and I watched a little tv and made dinner. Hubby requested Mexican, so I did a little hunting online and found this recipe. It was supposed to be in a tortilla- a staple in my fridge- that somehow we had run out of! By the time I realized we had nothing to wrap around my little treat, it was too late to make rice. So we ate it out of bowls!

The best part of this I think was the flavoring of the chicken, which I would incorporate into other Mexican dishes.


Mexican Chicken Mix
Inspired by AllRecipes.com

  • 2 Gold Potatoes, cubed into 1/2" pieces
  • 2 Chicken Breasts
  • 1-2 Tbsp. Cinnamon
  • 1 tsp. Salt
  • 1 tsp. Black Pepper
  • 1 tsp. Chipotle Seasoning
  • 1 tsp. Chili Powder
  • 1 Medium Onion, chopped
  • 1 Clove of Garlic, minced
  • 1-2 tsp. Chopped Jalepenos
  • 1 Lime
  • 1/2 - 1 C. Shredded Cheddar

  1. Pre-heat oven to 400 degrees.
  2. In a glass dish, add about 1/2 C. water to the potatoes. Microwave potatoes about 5-6 minutes until mostly cooked through.
  3. Slice each chicken breast in half to create two thin fillets. Season both sides of each breast half with the dry seasonings, rubbing them in for flavor.
  4. Bake the chicken for 15-20 minutes in the oven until cooked through.
  5. When potatoes are done in the microwave, remove excess water from dish. Lightly coat with olive, vegetable, or canola oil and toss. Bake in oven with chicken until ready to add to skillet, stirring occasionally.
  6. Remove chicken from oven and carefully cut the breasts into bite sized pieces. Don't burn your fingers!
  7. In a large skillet, saute the onions and garlic over medium heat. Add in jalepenos, chicken, and potatoes, stirring to mix.
  8. As the meal finishes cooking, juice both halves of the lime over the pan and stir to blend.
  9. Serve with cheddar on top. Can be served in a tortilla or with rice, and sour cream always makes a nice addition!