Thursday, August 30, 2007

Gah- I've Been Hit!

TAGGED!

It's happened... I've been hit, tagged, made it, singled out (well, singled along with 7 others!), thrown into a small Internet spotlight. And I know who got me... it was Kate of Paved with Good Intentions, a really entertaining blog- as my mom would say, "she's hot shit!" I think if we lived near each other- rather than, um, on completely opposite sides of the country (Portland and San Diego?!) we'd totally be buds. (Does anyone say "buds" any more?)

So here's the deal... I've got to come up with 8 facts that can be considered interesting. I personally think everything I do is interesting, but from the bored faces I get from my husband, parents, and best friends when I tell stories, it is clear my opinion is in the minority. Once I regale you with this fascinating data, I then have to pick up my virtual sniper riffle and hit another 8 bloggers... newbies watch out!


1. I have quit almost every extra curricular activity I've been signed up for when I was a kid. It's not that I'm not a team player, I just get really bored with things quickly. Let's name the things I've quit: little league baseball, ballet dancing, tap dancing, gymnastics, trumpet lessons, soccer, Brownies, and Girl Scouts. I probably would have quit piano lessons if I could of, but Mom and Dad would have no part of it.

2. I have been playing handbells through various churches for close to 2 decades. Bells are so much fun and I started playing when I was too small to even see over the table- I had a designated box to stand on! I play the little treble bells and am pretty skilled. My choir plays a paid concert at Christmastime that usually sells out.

3. I married my high school sweetheart. But he didn't go to my high school and we broke up for about 4 years around college. All my friends knew we were stupid for each other and it was just a matter of time before we tied the proverbial knot. We remained best friends while we were not dating and no, we never kissed once during our off time.

4. Cops is one of my favorite shows on TV. The best episodes either have someone running away from the cops and they get the dogs sent on them or have drunk/ high people generally acting ridiculous. And I love it when they have shows where someone has no shirt on and has a bad mustache/ hair do- oh wait, that's all of them.

5. The picture of me on my blog here is not accurate. It is from just about 2 years ago on my honeymoon. That is the one and only time I've ever had hair that long and it drove me crazy! I currently have my hair so short that nothing hits the back of my neck and the front angles down just to my chin. However, after looking at my pretty wedding hair, I've decided to grow it out again. It'll never last though- long hair drives me nuts.

6. I took Japanese for a semester in college and all I can say is "Watashiwa, ichi-nichi ju beiro to saki o nomimas." I'm sure I butchered that spelling. It means "All day long I drink beer and sake." Useful, huh?

7. I collect Catwoman stuff. I have over 100 comic books of her title, figurines, dolls, posters, and other miscellaneous stuff. I have dressed up at Catty for Halloween at least 7 times and have black vinyl pants that are perfect. (I can't fit one ankle into them any more though. So sad.) However, I have yet to see the awful Halle Barre movie. It's been on my DVR for months now and I just can't bring myself to watch it- it is so inaccurate and cheesy compared to the real Selina Kyle storyline.

8. I once attended a private party in Malibu that Alan Thicke came to. I was more popular than him though. My friends' uncle is loaded and throws these insane "cookouts" every Sunday at his Malibu place. (Side note as a reference to #7 above- his Hollywood hills house is next door to Michelle Pfiefer- the movie Catwoman.) My friend and I were enjoying the sushi, grilled chicken, and free booze when we look over and see Alan Thicke standing around by himself, looking out of place in a white linen suit. It was sad really. I wanted to go talk to him so he could feel like a part of the group, but then I realized I didn't have anything to say to him and couldn't really remember what that 80's sitcom was he starred in. Plus I was drunk. So I didn't talk to him after all.

And that's that! Phew- god am I long winded. Now [loading my dart gun with tagging darts] to tag 8 new victims!

Tag, you're it Jen,Bridget, Kayte, Shawn, Erin, Dori, Nicole, and Lindsay! Can't wait to learn about you girls!

Wednesday, August 29, 2007

Chicken, Feta, Spinach with Tomato, Rosemary

As with many evenings’ meals, tonight’s based mostly out of wanting to use up what was hanging around in the kitchen that I didn’t want to go bad. Feta was purchased for a salad I had in mind, ricotta was used for my weekend cream puffs, my aunt gave us a ton of tomatoes from her neighbors’ garden, and a bag of spinach was starting to look just a little sketchy.

And so a meal was born! Chicken was filled with feta, spinach, and ricotta- with some other goodies thrown in for good measure. The tomatoes were roasted with fresh rosemary and onion. The chicken was absolutely delicious- how can you go wrong with so much yummy cheese! The tomatoes were also quite tasty, very fresh and, well, tomato-y! The rosemary was the best part.


Spinach & Feta Stuffed Chicken

  • 3 Boneless Chicken Breasts
  • 1/4 C. Feta Cheese, crumbled
  • 1/4 C. Ricotta Cheese
  • 1/2 C. Fresh Spinach, chopped
  • 1/2 Small Onion, chopped
  • 1 Garlic Clove, finely chopped
  • 1-2 Tbsp. Green Olives, chopped
  • Salt & Pepper
  • Olive Oil

  1. Preheat the oven to 350 degrees.
  2. Mix together all of the ingredients except the chicken.
  3. Slice the chicken breasts lengthwise, leaving the back side connected.
  4. Spread the cheese and spinach mixture inside the split breasts. When as full as possible, insert a toothpick or two to keep the breasts shut.
  5. Place stuffed breasts in a glass dish. Season tops with salt and pepper. Pour a little olive oil over the breasts- just a drizzle.
  6. Bake the chicken for 30-45 minutes until the chicken is cooked through. Enjoy hot.


Fresh Oven Baked Tomatoes
  • 2-5 Tomatoes
  • 1/2 Onion, chopped
  • 1 Tbsp. Chopped Garlic
  • 1 Tbsp. Fresh Basil, chopped
  • 2 tsp. Fresh Rosemary, chopped
  • Salt & Pepper
  • Olive Oil

  1. Preheat oven to 350 degrees.
  2. Mix together all ingredients in a small glass or ceramic dish.
  3. Bake for about 15-20 minutes until heated through.

Tuesday, August 28, 2007

Homegrown Gourmet - Maiden Post, Round 1!

I am inspired by all the places where people who read my blog reside. There are so many fantastic places represented, and when talking about favorite places, I immediately think about favorite local foods.

With that inspiration in mind, I'd like to introduce a new blogging event called Homegrown Gourmet.


Since this is my idea, I'll host this first round and explain the guidelines!


  • Anyone can play!

  • A theme will be picked by the host. Participants will make a dish that follows the theme and that somehow represents their home region- town, state, area. Representation can feature a local ingredient, be a traditional dish from your area, or be a creative twist.

  • Participants will have 3-4 weeks (host discretion) to complete their recipes and post them to their blog (or email the pics and text), and notify the host. The host will then post the results and then let everyone know via email or message board the results are up!

  • An explanation of your dish is required; it can be a story about the local custom or ingredient, how you came about eating/ making the recipe, or an explanation about how your creative dish fits the theme.

  • Fresh and local foods are encouraged!

  • When the round is done, the host will announce their favorite dish by updating their blog. Favorite is completely subjective to the host- no one expects the host to make and taste test all the dishes, it is just something that strikes the host's fancy! The creator of the fave gets the honor of hosting the next round, if they so choose!


This round is a salute to one of my favorite types of foods- our theme is going to be:

SANDWICHES

We're talkin' burgers, cold cuts, paninis, grinders and the like! If goes between bread or in a wrap and you eat it at lunch, it counts!


DEADLINE: Monday, September 17

Questions? Comments? Let me know in the comments or email at homegrown.gourmet@gmail.com!

Sunday, August 26, 2007

Platinum Chef 5- Fish Rice Cakes with Cool Sauce

It's Platinum Chef time baby! This challenge was a tough one. I really like coming up with a 1 dish solution for the ingredients, but this had such a weird set of raw materials, "challenge" was a great way to describe it! Avocado, rice, & basil are a-ok; I know what to do with those. But black beans AND grapes... complicated.

I focused on rice. I made a fish and rice cake that I paired with an avocado sauce. I'm not sure where you might find this in the world, and it needs some tweaking, but I'm pleased with this base. The basil didn't really add much flavor, and the raisins and black beans were a subtle but nice addition to the fish. It did need something extra though- hubby thought tang (orange zest?) and I thought spice (cayenne?). The sauce was perfect though- no changes there! I am going to add some lemon and mint to it and use it for a Greek style sauce tomorrow... But that's another day.


Fish Rice Cakes with Cool Sauce
Fish Cakes

  • 1 1/4 C. Sushi Rice (Risotto might also work)
  • 1 3/4 C. Water
  • 1 Haddock Fillet (2 might be better)
  • Chili Powder
  • 1/2 C. Black Beans, drained & divided
  • 1/2 C. Raisins, divided
  • 1 Tbsp. Fresh Basil
  • 1 Tbsp. Chives (I actually used 4 stems.)
  • 1 Tbsp. Olive Oil
  • Chili Powder, Dried Basil

  1. Cook rice according to directions. Let sit and cool while prepping the rest of the ingredients.
  2. In a medium saucepan, heat some water with chili powder to boiling. Add in fish and cook until flaky.
  3. In a food processor, add in fish, basil, chives, 1 Tbsp. olive oil, half of the raisins, half of the black beans, and a couple of spoonfuls of cooked rice. Blend on Chop or Mix mode to just chop the mixture. The rice will turn pasty.
  4. Roughly chop the remaining beans and raisins.
  5. In a large bowl, mix together contents of the processor, rice, chopped raisins & beans, and any additional spices desired. I added in additional chili powder and dried basil.
  6. Form mixture into 3-4" patties that are about 1/2" thick. In a large skillet, heat a little olive or vegetable oil and fry the cakes. Brown on each side, about 3-5 minutes each. Serve warm!


Cool Sauce
  • 1 C. Sour Cream
  • 1 Avocado
  • 1/2 Cucumber, seeded
  • 1 Clove of Garlic

  1. Chop the avocado, cucumber, and garlic into large chunks.
  2. In a food processor, puree all ingredients until a smooth consistency is achieved.
  3. Let sit for a few minutes so flavors can blend.

Lightly Citrus Cream Puffs

Mmmmm-mmmmmm! You know those gourmet light cream puffs that you can get at the grocery store or are served at fancy-schmancy events? The ones with the airy pastries and the pineapple or lemon custard filling?

I love those things. And they seemed like they were too difficult for just little ol' me, a cook not baker, to make. Well, it's not true! They are so easy and delicious and fun to make! I know because we made them tonight. It was part of an evening with my little brother where we chose cooking as the main event for Saturday night. I used 2 recipes I found online and they were fantastic. I wish I had cooked the shells just another 5 minutes to make them a little crisper/ drier, but the filling was great and not too sweet. They look oh so pretty too! These might be my next "bake to impress" item!


Lightly Citrus Cream Puffs
Pastry Shell
From allrecipes.com

  • 1 C. Water
  • 1/2 C. Butter
  • 1 C. Flour
  • 1/4 tsp. Salt
  • 4 Eggs

  1. Preheat oven to 425 degrees.
  2. In a medium saucepan, heat water and butter to rolling boil.
  3. When water is boiling, add in flour and salt and immediately stir. When a ball forms, remove from heat and transfer to either a Kitchen Aid or to a large mixing bowl.
  4. While mixing on a medium speed, add one egg at a time, mixing rapidly into batter after each.
  5. Drop batter by spoonfuls onto a cookie sheet, leaving a few inches between each puff. (They will expand quite a bit.) Bake for 20-25 minutes until both golden brown on the outside and dry on the inside.
  6. Once cooked and cooled, use a serrated knife to split shells for filling. After filled and closed, sprinkle with powdered sugar. Refrigerate any leftovers.


Filling
Modified from epicurious.com
  • 1 C. Whole Milk Ricotta Cheese
  • 1/2 C. Marscapone Cheese
  • 1 C. Powdered Sugar
  • 1/4 C. Heavy Cream
  • Finely Grated Zest of 1/2 Lemon and 1/2 Orange

  1. In a heavy bowl or Kitchen Aid, combine all ingredients and mix first on a low speed, and then high speed for a total of about 1 minute. Mixing on high speed will bring the cream to a semi-solid state and give the filling some additional thickness.

Saturday, August 25, 2007

100% Scratch Pizza

My kid brother is up visiting for the weekend. He's great; I really enjoy his company even though we are 8 years apart. He is a fish eating vegetarian so when I opted for dinner in as the evening's activities tonight, I had to keep meat off the menu.

I suggested a bunch of things that I thought might be something new to try to make and delicious. Both the Adams- brother and husband- voted for pizza. We went all out with from scratch dough, from scratch sauce, and fun fresh toppings. The crust was a little extra crunchy and substantial. The Kitchen Aid recipe we used was good, but nothing special. Some garlic powder and Parmesan sprinkled in might have given it that extra kick. We also should have done 2 thin crusts, rather than one giant thick crust.

The sauce was tasty, but it took a lot of fudging since we made it from straight up fresh tomatoes- it was too fresh tasting until we loaded it with spices. For all the effort, jarred might just be easier. It was nice knowing what went into it though- no extra sugars or preservatives. All in all it was fun baking and cooking with my brother though- and that was the point of the evening!


Scratch Pizza
Dough
From Kitchen Aid Manual

  • 1 Package Active Yeast
  • 1 C. Warm Water
  • 1/2 tsp. Salt
  • 2 tsp. Olive Oil
  • 2 1/2 to 3 1/2 C. Flour
  • Cornmeal

  1. Dissolve yeast in water in the warmed Kitchen Aid bowl.
  2. Add in the oil, salt, and 2 1/2 C. flour and mix for 1 minute on speed 2 with the dough hook. While continuing to stir, add in the remaining flour 1/2 C. at a time.
  3. Continue to mix until the dough makes a clean ball and then let it knead for 2 minutes.
  4. Place the dough in a greased bowl and let it rise, covered, about an hour until it doubles in size.
  5. When risen, punch the dough down. Preheat the oven to 450 degrees. I cook pizza with my pizza stone, and per advice from my friend Dianna, my guest blogger below, I let the stone heat up good and hot in the oven while it preheats. This makes for a crispy, well cooked crust.
  6. Work the dough into a pizza crust shape. (Ours was misshapen!) Sprinkle cornmeal onto the hot pizza stone and gently lay the dough on the stone.
  7. If desired, for a crispy crust, prebake the dough for 10 minutes in the hot oven. Remove and add toppings- sauce, cheese, goodies.
  8. Bake for another 10-15 minutes. Remove from oven and slice. Let sit for a few minutes and then enjoy!


Sauce
  • 3 Ripe Tomatoes, cut into quarters or large chunks
  • 3 Tbsp. Olive Oil
  • Fresh Basil
  • 1 Clove Garlic, crushed
  • 1 Can Tomato Paste
  • Spices to taste: Oregano, Salt, Pepper, Red Pepper Flakes, Basil, Garlic Powder
  • Pinch of White Sugar
  • 2 Tbsp. Parmesan Cheese, finely grated

  1. In a blender, add in all ingredients and mix on Food Processor or Puree mode to make even consistency of sauce. Sauce should be thick, but not so thick that you can't spread it nicely on a pizza.
  2. Continue mixing and tasting until you get the flavor to your liking. Let sit for a little while to let flavors blend.

Wednesday, August 22, 2007

Sesame Herb Crusted Tuna with Citrus Glaze

I took out the salmon from the freezer tonight only to find that was actually tuna- a very nice cut that I had forgotten all about! My salmon recipe I had in mind of course wouldn't work, but I thought this would be a fun opportunity to try my hand at crusting something.

Fresh tuna would have been better, but this was still pretty damn tasty! Next time I would make more of the mayonnaise spice mixture to coat both sides of the fish. The citrus sauce was really good- again, I would double it! The recipes below are the original portions.


Sesame Herb Crusted Tuna with Citrus Glaze
Tuna

  • 1 Lb. Fresh Tuna, cut into single serving fillets
  • 2 Tbsp. Mayonnaise
  • 1-3 tsp. Dried Spices - Rosemary, Thyme, Salt, Black Pepper, Oregano, Ginger, Red Pepper Flakes
  • 1/4 c. Sesame Seeds, black and/ or white
  • Olive Oil, for frying

  1. Mix mayo and spices in a small bowl until well blended. Spread the mayo mixture onto one broad side of each fillet.
  2. Press the herbed side of the fillet into the sesame seeds, coating the side.
  3. In a large skillet, heat around 3 Tbsp. of olive oil over medium heat.
  4. Place sesame side down into the skillet, frying until the fish is well cooked. Flip the fillets and cook on the opposite side until cooked to desired doneness. If your fish is sushi grade, you can leave the tuna raw in the middle. If you are unsure or do not like raw fish, cook until it is cooked through entirely.


Citrus Glaze
  • 1/3 C. Orange Juice
  • 1 Tbsp. Lime Juice
  • 1 Tbsp. Lemon Juice
  • 1 Tbsp. Soy Sauce
  • Splash of White Wine
  • 1/2 tsp. Ginger
  • 1/2 C. Water

  1. In a small saucepan, combine all ingredients except water over medium-high heat. Bring to a boil.
  2. As sauce reduces, add in water to bring to desired quantity. You will not want to add so much water that the flavor is diluted, but 1/2 cup of water will increase the amount of sauce to enough to spread over multiple fillets of fish.

Monday, August 20, 2007

Tarragon Risotto with Caramelized Onions & Chicken

As can be seen by the lack of posting in the last week, I've been slacking in the kitchen. I just haven't had the inspiration, ya know? I have to get back in the swing, so I opted for risotto tonight. Usually I do mushroom or beet or sweet potato risotto, but I didn't have/ want those things. I searched allrecipes.com for some inspiration and came up with the following meal. The chicken really made the recipe- without it the recipe would be bland, but overall it wasn't super fantastic- just quite good. Next time I might step up the tarragon (fresh rather than dried) and more parmesan.


Tarragon Risotto with Caramelized Onions & Chicken
Recipe inspired by allrecipes.com

  • 1 or 2 Boneless, Skinless Chicken Breasts
  • 1 Onion
  • 2-4 Tbsp. Balsamic Vinegar
  • Olive Oil
  • 2-3 Cloves Garlic
  • 1 1/2 C. Arborio (Risotto) Rice
  • 1/2 C. White Wine
  • 5-6 C. Chicken Broth, heated
  • 1-2 tsp. Dried Tarragon
  • Dashes of Basil, Thyme, and Black Pepper
  • 1/4 C. Grated Parmesan
  • 1/4 C. Frozen Peas

  1. Cut chicken into small bite-sized pieces. Put chicken pieces in a microwavable covered container or in a stove top pan, covering meat with water. Cook meat until cooked through, about 4-5 minutes on high if using microwave. Drain and set aside.
  2. Slice onion into very fine strips. In a small saute pan with 2 Tbsp. olive oil, cook onion over medium heat for approx. 15 minutes to caramelize. Onions will have a nice brown color, but will not be burnt.
  3. Pour balsamic vinegar onto onions, stirring. Allow to sit until later.
  4. Crush and chop garlic cloves. In a large saucepan, heat 1-2 Tbsp. olive oil over medium-high heat. Add almost all of the garlic to the saucepan to saute. (The remaining garlic can be added to the water to cook the chicken. Sorry, I know that's out of order.)
  5. Before the garlic burns, add in the rice and stir to coat with olive oil. Turn heat down to medium/ medium-low. Allow to sit for about 1 minute on the heat, stirring often.
  6. Pour in wine and stir. The wine should simmer and bubble and start to cook off. As the liquid diminishes, pour in chicken broth about 1/2 C. at a time, stirring often.
  7. Continue to simmer, stir, and add liquid until the rice is al dente & creamy, about 30-45 minutes. Half way through cooking, stir in herbs. Just before finished cooking, stir in chicken and peas.
  8. When completely cooked, stir in parmesan cheese, getting it melty. Serve hot, adding more parmesan on top if desired.

Dijon Pasta Salad

I went to a lovely bachelorette party (for my guest chef Dianna Lee) this weekend and had a decadent dinner of Crispy Pressed Duck, followed by a jelly donut breakfast and BK Whopper Jr. lunch. I needed something light and relatively healthy for dinner or else I thought I might explode. But after such an exciting weekend, I had no energy to put in any effort. I searched my recipe box, but nothing in the Entree section suited me. I took a chance on the random papers in the back, expecting nothing.

Surprise, surprise, I found a nice little recipe I came up with in 2002. And it fit the bill. Now I followed my recipe to a T, but next time I would double the dressing. Subsequently, the dressing recipe below is doubled!


Dijon Pasta Salad
Salad

  • 1 Box of Small Pasta
  • 1 Cucumber, quartered and sliced
  • 2 Tomatoes, seeded and diced
  • 1 or 2 Cans Tuna, drained

Dressing
  • 5-6 Tbsp. Olive Oil
  • 2-3 Tbsp. Sesame Oil
  • 2 Tbsp. Dijon Mustard
  • 2 Tbsp. White Wine
  • 1 tsp. Fresh Rosemary, chopped (or 1/2 tsp. Dried)

  1. Cook pasta as directed, being sure not to overcook. You want it good and al dente. Drain and cool pasta when cooked and put into large serving bowl.
  2. Add in sliced cucumber quarters, diced tomatoes, and flaked tuna to the pasta. Stir to mix thoroughly.
  3. In a small bowl, whisk together the dressing ingredients. Let sit for a few minutes for flavors to blend. Pour over salad and toss to coat.

Happy Birthday to Me

Last Wednesday was my birthday- it was very nice. Hubby Adam got me a fancy super sharp Japanese santoku knife and (per my instructions) made dinner and dessert. I had belly dancing class that night, so he opted for a quick and classic meal that we refer to as "Tomato Basil Mozzarella." It's as easy as it sounds- and it's perfect for light, fast, and satisfying eating.

And for dessert, it could be nothing but chocolate cupcakes with buttercream frosting. He was instructed to use the family favorite Hershey's Perfect Chocolate cake recipe and to make frosting that was not vanilla or mint. They came out perfectly- although it took a little assistance from myself to get the orange flavor. It was a fantastic evening!


Tomato, Basil, Mozzarella

  • Fresh Tomatoes, sliced
  • Fresh Mozzarella, sliced
  • Fresh Basil, whole washed leaves
  • Fresh Italian/ French Bread loaf, sliced
  • Italian Ham Slices (optional)
  • Olive Oil


  1. Take a slice of bread and dip it in olive oil, not drenching it. Pile the other yummy items on and eat!


The Perfect Chocolate Cake
Courtesy of the Hershey Cocoa Box
Recipe at Hershey's Website

Orange Buttercream Frosting
Courtesy of Betty Crocker
  • 1 C. Butter, softened
  • 3 C. Powdered Sugar
  • 1-2 Tbsp. Milk
  • 1-2 Tbsp. Orange Juice
  • 1/2 tsp. Vanilla
  • Food Coloring (optional)

  1. In a large bowl, blend the sugar, vanilla, and butter, beating until consistent. Add milk and OJ as needed to smooth the frosting and add until smooth. Add in coloring if desired.

Pizza! Pizza!

Mmmm. Pizza! I love this pizza so much, I hardly ever order out. This is a crispy crust pizza and the saltiness of the sausage is delightful! Tonight, I used leftover homemade pasta sauce -- on the pasta, it had been great. On the pizza, it’s too sweet. Usually, I use Trader Joe’s Marinara; it has the right flavors and is one of the few sauces that isn’t too watery (watery pizza, gross!). The key to this pizza is the hot, hot stone. The longer you leave it in the oven, the crispier the crust.

Chicken Sausage Pizza with Crispy Crust

  • 1 package store-bought pizza dough
  • 1 chicken with sun-dried tomato sausage (fully cooked), quartered & diced
  • 1 medium onion, sliced into thin rounds
  • 3 tbsp pasta sauce
  • 6 oz fresh mozzarella, cut into rounds
  • 1 tbsp olive oil
  • Flour (for rolling out dough)
  • ½ tsp cornmeal
  • Dash oregano
Place pizza stone on middle rack and pre-heat oven to 450 degrees. The stone needs to be hot! Leave the stone in the oven for 30-45 mins. Remove pizza dough from fridge and allow to come to room temperature (30-60 mins, or as long as you can stand). Having the dough at room temperature makes it easier to roll out.

Meanwhile, get started on the toppings. Heat olive oil in a large pan over medium heat. Add onions and sautee 15 mins, until just starting to caramelize. Add diced sausage to onions and cook for another 5 mins, until sausage starts to brown. Remove from heat and set aside.

Coat the dough, counter and rolling pin with flour and roll out until it’s almost the size of your pizza stone (I hate this part). Don’t worry if it’s not a perfect circle. Using your fingers, roll 1” of the edge back to the center, forming a thick crust. Dust the pizza stone with cornmeal and transfer the rolled dough to the stone. Cook in oven (without any toppings) for 10 mins, until crust turns lightly brown. Note: for reasons I don’t understand, my dough always gets lots of big bubbles in it. I don’t know why this happens, but I just keep poking them with a fork.

Remove pizza from oven and apply toppings; sauce first, then onions & chicken, then cheese. Sprinkle with oregano and bake for another 10 mins, until cheese is bubbly. Let sit for 5 mins and then serve.

Monday, August 13, 2007

Healthy Mexican- Quesadillas & Cornbread

Our sweet neighbor brought over two gorgeous zucchinis from her yard last night. Isn’t that just the nicest thing- we have the best neighborhood! I decided to celebrate tonight with our favorite zucchini recipe, quesadillas. I got the recipe from my mom a couple of years ago and it’s a favorite. Not only is it super healthy, it is filling and delicious. Tonight it was extra good- maybe it was the particular combo of salsas, but I’d like to think it was the lovingly grown veggies from next door.

Since we only had 3 tortillas and my husband is an eating machine, I needed a side. Tonight I decided to make cornbread and add a Mexican flair to it. The recipe I usually make is sweet, but this one was more mellow. The original recipe from Betty Crocker called for buttermilk, but I substituted sour cream and it was quite yummy. Hubby raved over everything tonight- I guess it was good!


Weight Watchers Veggie Quesadillas

  • 1 Large Zucchini, Shred
  • 1 C. Salsa
  • 1 Can Black Beans, drained
  • 1-2 C. Cheddar Cheese, shred
  • 4 Tortillas
  • Salsa & Sour Cream for garnish

  1. Preheat the oven to 400 degrees.
  2. In a bowl, mix together all of the ingredients except the tortillas.
  3. Heat a large skillet over medium heat and put in a tortilla. Let the tortilla get hot and then place a large scoop of the veggie mix on one side of the tortilla.
  4. Fold the empty tortilla half over the filling. Let it cook for 3-5 minutes to heat through. If feeling ambitious, feel free to flip it, but be prepared for the fillings to fly!


Mexican Sour Cream Cornbread
Inspired by Betty Crocker recipe
  • 1 1/2 C. Cornmeal
  • 1/2 C. Flour
  • 1 C. Sour Cream
  • 1/2 C. Milk
  • 2 tsp. Baking Powder
  • 1 tsp. Sugar
  • 1 tsp. Salt
  • 1/2 tsp. Baking Soda
  • 2 Large Eggs
  • Large Dash Chili Powder (I’d add more next time for more kick.)
  • 2 tsp. Chopped Jalapenos

  1. Preheat the oven to 450 degrees.
  2. Mix together all of the ingredients. Beat vigorously for 30 seconds.
  3. Pour the batter into a greased 8x8x2 baking dish.
  4. Bake for 20-25 minutes. The top will be browned and a toothpick inserted into the middle will come out clean.

Sunday, August 12, 2007

O Sooool Meatbolios!

Tonight we wanted something simple, something standard. Adam suggested pasta- he ALWAYS suggests pasta- and I was unimpressed. Then he reminded me that last week I was going to make meatballs, so why don’t I do that tonight. Now that sounded delicious. The recipe I used is based heavily off of my favorite Betty Crocker cookbook. I opted to make them a little more indulgent by making them into cheesy delights. They came out good- not fancy but good!


Cheesy Meatballs
Inspired by Betty Crocker recipe

  • 1 1/4 Lb. Ground Beef (I used 90% lean tonight.)
  • 1/2 C. Plain Breadcrumbs
  • 1 Egg
  • 1/4 C. Milk
  • 2 Cloves Garlic, crushed and chopped
  • 1 Onion, chopped
  • 2-3 Tbsp. Romano Cheese, finely shred
  • 2-3 Tbsp. Parmisan Cheese, finely shred
  • 1/4 C. Shredded Mozzarella Cheese (I always get Reduced Fat.)
  • Dashes of Oregano (heavy), Basil (heavy), Nutmeg, Black Pepper, Salt

  1. Preheat the oven to 400 degrees.
  2. In a glass bowl, mix together all of the ingredients. I like to start the mixing with a wooden spoon and then switch to my hands.
  3. Shape the meat into 1” to 1 1/2" balls. Place into a large (or two large as I did- I never get the dish size right!) baking dish, leaving enough room around each meatball to let it cook properly.
  4. Bake the meatballs 20-25 minutes or until the centers are warm and no longer pink. Serve warm with pasta and sauce.

Saturday, August 11, 2007

Sushi!

Hiiiiii yaaaaa- SU-SHI! That’s right boys and girls, it was sushi night- homemade sushi! Lots of folks are intimidated by making it. I can understand. 1) It’s raw fish. 2) It’s in weird complicated looking shapes. 3) It’s raw fish.

I however, am undaunted. The first time we made those lovely rolls and rice beds, I was prepared for the consequences, because that’s the kind of fool I am! I’m happy to say though that we always have good luck- and full bellies- when we go for it. Tonight was no exception. We had chilled sake (it does not always have to be warm) and seaweed salad (from the store) with our spread. We were stuffed and satisfied!

It is not a fast process- it’s a labor of love for sure. Tonight I did this solo and it took me about 2.5 hours from start to finish to make 4 types of maki rolls and a bunch of nigiri (rice with fish on top.) You have to make the rice, prep the fish and fillings, and then get to rolling. Below I have the rice recipe from my “Easy Sushi” recipe book- the rice is the most important part of sushi making. You can then choose any fillings that suit your fancy- below are the basics and some of my favorite insides.


Basic Ingredients:

  • Sushi Rice (recipe below)
  • Nori Seaweed Wrappers (if making rolls)
  • Wasabi Paste (optional)
  • Pickled Ginger (optional)
  • Rolling Mat- it just makes things easier for rolls

Fish:
  • Tuna
  • Yellowtail
  • Sea Bass
  • Salmon
  • Mackerel
  • Cod
  • Marinated Eel (comes cooked)
  • Cooked Shrimp
  • Cooked Crab/ Imitation Crab Sticks

*You must find a reputable fish seller to purchase your raw fish. It must be “sushi grade.” If the person you are buying it from doesn’t know what you are talking about, walk away. Fish should not smell “fishy” if it is fresh. It should have vibrant color too.

Filling:
  • Cucumber
  • Carrot
  • Green Onions
  • Garlic Scape
  • Avocado
  • Daikon


Sushi Rice
  • 2 C. Sushi Rice (Must be “sushi rice”- it’s different than long or short grain or risotto)
  • 3 Tbsp. Rice Wine Vinegar
  • 2 1/2 Tbsp. Sugar
  • 2 tsp. Salt

  1. Rinse the rice in cold water, drain and repeat, swishing the rice around with your hand, until the water stays mostly clear. Let the rice soak for 15-45 minutes and then drain.
  2. In a heavy bottomed pot with the lid on, bring the rice to a boil in 2 1/2 C. water over high heat. This should take about 5 minutes. Do not remove lid.
  3. Simmer the rice over low heat for about 10 minutes or until the water is gone. Do not remove lid. Remove rice from heat and let it sit for 10-15 minutes. Don’t remove the lid still!
  4. While rice does it’s thing, mix together the vinegar, sugar, and salt until the sugar dissolves.
  5. After the rice sits, transfer it to a shallow dish. Pour the vinegar dressing over the rice and gently fold it through. If possible, fan the rice to cool it while you fold the dressing in.
  6. The rice will be ready to use once it has cooled to about body temperature.


How to Make Sushi Rolls (Maki)
Have all your items ready to go. Be sure to have a bowl of clean water handy to rinse your hands. The rice is sticky and hard to work with when you’re covered in it!


Put down a sheet of seaweed on your rolling mat. Take a handful of rice and press it down onto the seaweed, spreading it thinly to all sides except the far edge. Leave a half inch or so of the nori empty on the far side.


Lay down a line of filling an inch or so in from the starting edge. Be sure not to overfill it- that is a common mistake of ours. Do feel free to put a thin layer of wasabi down under the filling.


Using the rolling mat, fold the nori and rice over on itself to start the roll. Continue rolling, folding the mat back so as to not roll it into the food.


When the roll is completed, give it a firm squeeze to seal up the nori.


Cut the roll with a sharp serrated knife into 4-8 pieces.


How to Make Nigiri
Moisten your hands and grab a small handful of rice. Gently yet firmly form it into a rectangular form about 1 inch by 0.5 inches.


Firmly place a solid small filet of fish onto the rice bed. If desired, cut a strip of seaweed and wrap it around the fish and rice like a belt!


Enjoy with soy sauce, pickled ginger, wasabi, seaweed salad, and sake wine.

Friday, August 10, 2007

It Ain't All Gourmet

Let's face it, you just can't make fancy or fascinating or complicated meals all the time. Sometimes you're just hungry and want something simple... or bad for you! Tonight I wanted take-out. Specifically I wanted Chicken Parmesan Subs from the local pizza place. BUT, I'm making sushi tomorrow and it's a little pricey to get all the fish, and I couldn't justify spending more money for things I shouldn't eat anyways.

So I made ghetto chicken parm subs. Super ghetto. It was quite tasty and hit the spot. I'm not ashamed.


Ghetto Chicken Parm Subs

  • 4 Frozen Chicken Patties
  • 4 Buns (from the freezer)
  • 4 Slices of Deli Provolone Cheese
  • Jarred Sauce
  • Oregano, Black Pepper, Salt- to flavor the jar sauce

(You'll note we forgot about Parmesan- oops!)
  1. Heat up the chicken patties as instructions indicate- 20 minutes in the toaster oven.
  2. Defrost the buns.
  3. When you flip the chicken halfway through cooking, put a slice of cheese on each patty.
  4. Heat the sauce, stir in spices, and spoon a little on the bottom half of each bun.
  5. Put a warmed patty on the bottom bun half, spoon more sauce on top, and slap on the top half of the bun.
  6. Enjoy!

Thursday, August 9, 2007

Blueberry BBQ & Oven Baked Fries

I am not a big fan of BBQ. It just doesn’t suit me. But I thought I’d give it shot tonight using all the berries that we picked over the weekend- blueberry bar-b-cue! And what goes great with sweet grilled meat, but fries! I prefer not to deep fry because a) it’s not particularly healthy and b) I don’t have anything to deep fry in. So instead I made oven baked sweet and red potato fries.

So the end result is that it was good, but not quite barbecue. The blueberry flavor was prominent- and that was ok- and you could taste the ketchup- also good- and it had a nice mellow heat- just fiiiine! But it was missing something. Hubby says it’s missing that “BBQ flavor”- whatever that means! I think more vinegar might be good- as with another kick of Tabasco. The fries were delish though!


Blueberry BBQ

  • 2 1/2 C. Fresh Blueberries
  • 1/2 C. Red Wine Vinegar (Next time I’d step it up to 3/4 cup.)
  • 3/4 C. Ketchup
  • 1/2 C. Onion, chopped
  • 1 1/2 Tbsp. Brown Sugar
  • 2 Tbsp. Butter
  • 1 Tbsp. Chipotle Seasoning
  • 1 Tbsp. Worcestershire Sauce
  • 2 tsp. Chili Powder
  • 1 tsp. Black Pepper
  • 1 tsp. Mustard Powder
  • 1-2 tsp. Tabasco Sauce
  • Dash of Salt
  • 1 1/2 Lb. Chicken Breasts

  1. In a medium saucepan, cook the berries, vinegar, and ketchup over medium heat. Simmer to let the blueberries breakdown and create a thick sauce.
  2. As the sauce simmers, add in the rest of the ingredients, except the chicken. Stir and taste, making adjustments to the spices as desired.
  3. Allow to simmer for about 15 minutes to reduce sauce. As it simmers, turn the heat down so the sugars from the berries and brown sugar don’t burn.
  4. When the sauce is reduced, pour into a blender and puree until smooth.
  5. In a glass or ceramic dish, put a couple of tablespoons of the sauce over the chicken breasts to marinade. Allow it to sit for at least 30 minutes.
  6. Scoop 1/4 C. of the sauce into a small bowl for brushing on the meat. Return the rest of the sauce to the original sauce pan.
  7. Grill chicken breasts over medium heat, brushing and turning occasionally while the meat cooks. Chicken should be cooked within 20 minutes.
  8. Serve with remaining warmed sauce.


Sweet and Red Potato Oven Baked Fries
  • 2 Good Sized Sweet Potatoes
  • 1 Good Sized Red Potato
  • 2 Tbls. Vegetable Oil
  • 1 Heaping Tbsp. Kosher Salt
  • 1 tsp. Black Pepper
  • Dash of Cinnamon
  • Dash of Cumin
  • 1-2 Tbsp. Onion, large chunks

  1. Preheat oven to 425 degrees.
  2. Scrub all the potatoes and leave the skins on. Slice all the taters up into small fry shaped pieces.
  3. In a large glass or ceramic, microwave friendly dish, place the potato strips in with a splash of water. Microwave on high for 5-7 minutes until the potatoes are mostly cooked through.
  4. Put the vegetable oil into a large ziplock bag and then (carefully- it’s hot) pour in the potatoes. Seal the bag and rub the oil onto the fries. Re-open the bag and add in the spices. Seal again and massage everything around.
  5. Pour the fries onto a cookie sheet onto a single layer. (I like to line the pan with foil for easy clean up!) Place chunks of onion around the fries to add aromatic flavoring while they bake.
  6. Bake for about 30-40 minutes, flipping once, until the fries are crisped.

Wednesday, August 8, 2007

Everyday Beef Burritos

Wednesday evenings are belly dancing nights- I take a class locally. I have to leave for class at 7 and I get home anywhere from 8:30 to 9:15. Makes dinner prep a little challenging. When I got home from work at 5:30, I was STARVING and had to eat before leaving again. That left me 1.5 hours to prep, cook, and eat something with maybe some extra time to digest before having to shake my belly for an hour!

We had some leftover steak that I had grilled over the weekend, so I went for the ol standby of burritos. I always have various tex-mex items around that I can whip up for a quick and filling dinner. I also made a rice that was really quite boring. In fact it's so boring I'm not going to provide the recipe. Ok, I will, but don't bother making it.

The burrito was delicioso though and good for any ol' weeknight. Tonight's ingredients are listed below, but use anything that strikes your fancy! This bad boy was started at 6:00 PM, cooked and assembled by 6:25 PM, eaten by 6:40 PM. Not quite enough time eliminate the stomach food brick in the middle of my belly rolls, but it gave me enough energy to shimmy!


Everyday Beef Burritos


  • 2 Green Onions, chopped
  • Leftover Cooked Steak, chopped (also works with leftover chicken, or most any meat you've got around, including fish)
  • 1/2 C. Tomato Salsa
  • 1 tsp. Chipotle Seasoning
  • Dashes of Cumin and Oregano
  • 2 Tbsp. Green Olives, chopped
  • 1 Can Black Beans, drained
  • 2-3 Tbsp. Cilantro, chopped
  • Shredded Cheddar Cheese
  • Tortillas
  • Sour Cream (optional)

  1. In a medium skillet, heat up some olive oil and saute the green onions.
  2. While the onions cook, put the meat in a pile and pour the seasonings on them. Rub the spices in to flavor them. Put them in the skillet and stir.
  3. Add in the salsa, olives, beans, and cilantro. Heat everything through. (The leftover meat is already cooked, so this whole process is to just simmer down the salsa and warm everything up.)
  4. In a tortilla, spread a handful of cheddar cheese along the center. Place a couple of spoonfulls of mixture on top and then roll up. Add a dab of sour cream and enjoy!


Crappy Mexican Primavera Style Rice
(Please don't make it like this- it needs a lot of help!)
  • 2 C. White Rice
  • 2 1/4 C. Water
  • 1 Package Sauzon Seasoning (I'm convinced this stuff is just orange dye.)
  • 1/4 C. Frozen Peas
  • 1/4 C. Frozen Corn

  1. In a sauce pan, add in rice, water, and seasoning packet. Bring to a boil. Let boil for 1 minute and then cover and turn down heat to low.
  2. Allow to cook 20-30 minutes until rice is done. Add in the peas and corn and stir to heat through.
  3. Put on your plate and pick at it. Admit that it wasn't very good and focus on the tasty burrito next to the untouched pile of grains!

Tuesday, August 7, 2007

Platinum Chef 4- Maharaja Mole

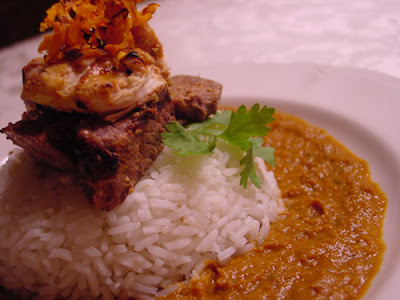
Platinum Chef time!!! This is my first venture into “competitive cooking” and it went well, though it was touch and go for a while! When I heard the ingredients, the first thing I though was ‘MOL-E!” (And not mole like from Austin Powers- moley, moley, moley… dirty mole, mooooole. Like the Latin inspired sauce pronounces moe-LAY.) Garlic, cilantro and chocolate- that’s a mole. Now… yogurt and sweet potatoes… Well, why not use a little Indian inspiration to add some extra flavors in. This is a chance to push ourselves right? And I’m happy to say it actually came out quite tasty- a little zippy, but all around good. I might even make it again!

We'll see what the other Platinum Chefs come up with in the next week. Check out the final results at Cara's blog!


Maharaja Mole

Marinade and Meat

  • 1/2 Lb. Lamb
  • 1/2 Lb. Chicken, Tenderloins
  • 1 6 oz. Non-Fat Plain Yogurt
  • 1 Clove Garlic, crushed
  • 1/2 of 1 Onion, chopped
  • 1 Tbsp. Lemon Juice
  • Dashes of Garam Marsala, Turmeric, and Cumin

  1. Mix together yogurt, garlic, onion, lemon juice, and spices in a shallow glass/ ceramic dish.
  2. Cover and let sit in fridge for at least 3 hours, preferably overnight.
  3. When preparing mole sauce, grill meats over med-high grill heat until cooked. Remove from grill, let sit for a few minutes, and then cut into bite sized pieces. Keep pieces at hand for final steps of overall recipe.


Mole Sauce
  • 1/2 of 1 Onion, coarsely chopped
  • 1/2 Orange Pepper, coarsely chopped
  • 2 Tomatoes, chopped
  • 1/2 Fresh Jalapeno Pepper, chopped (I used 1 full in my version and it was a little too spicy for our tastes.)
  • 2 Tbsp. Cilantro, chopped
  • 1/2 of a Sweet Potato, chopped
  • 2/3 C. Water
  • 1 Tbsp. Unsweetened Cocoa Powder
  • 1 Tbsp. Chipotle Powder
  • 1/2 Tbsp. Garam Marsala
  • 2 tsp. Cumin
  • 1 tsp. Sesame Seeds
  • 1/2 tsp. Each of Cinnamon, Ginger, and Nutmeg

  1. In a medium sauté pan, heat a splash of olive oil over medium heat. Add in onions and peppers and sauté until aromatic. Add in tomato and simmer until tomato reduces some.
  2. In a separate small pan, cook the sweet potatoes over medium heat until tender. (Maybe I could have cooked the sweet potato with everything else, but I kept it off to the side since I wasn’t sure if it would be good the way I intended it.)
  3. Into the tomato pan, add in the spices including the cilantro and cocoa. Continue simmering, adding in the water to sauce to keep it from burning and sticking.
  4. Once sauce is well cooked and blended in the pan, pour entire pot into a blender and add in the sweet potatoes. Puree until it is thick and smooth. Return to pot and keep on low heat until ready to serve.
  5. Serve entire grilled meats, mixed, and mole together with a bed of plain white rice. If desired, shred some sweet potato and quickly fry and use as a garnish.

Monday, August 6, 2007

Homemade Pasta and Rustic Tomato Sauce

[scene opens to a candlelit table with a rose lovingly laid in front of my pistachio Kitchen Aid] Bean, serenading mixer, "Have I told you lately... that I love you?"

Ok, so although I don't use it that often, I in fact love my Kitchen Aid. And my husband loves the pasta extruder attachment! Tonight we used our fancy kitchen power tool to make some yummy fresh pasta from scratch. It's a two man operation; he runs the machine, feeding it dough and cutting off the strands, while I separate the bits and lay them on out the damp paper towels. It's good for a laugh- very similar to the classic 'I Love Lucy' in the candy factory! But Adam did a great job making the dough- I was busy, um, being on the Nest while he got the operation running.

And of course, when having fresh pasta, you can't just slap some jar sauce on it. It's like, sacrilege or something! So while the pasta squeezed out, I simmered a quick and rustic sauce. Slap some fresh Romano cheese on there and you've got a meal. It was all quite delicious!


Fresh Pasta
Basic Egg Noodle recipe from Kitchen Aid pasta manual

  • 3 Eggs
  • Water
  • 2 3/4 C. Flour

  1. Crack the 3 eggs into a glass measuring pitcher, filling with water until you have it 3/4 C. full.
  2. With your wonderful Kitchen Aid with dough hook attachment, put the flour into the bowl. Get the dough hook rotating on speed 2 and slowly pour in the egg/ water.
  3. Mix for 30 seconds and then switch over to the flat mixer blade and mix on 2 for another 2 minutes until you get a thick dough when you squeeze a handful of the mixture. (It will look crumbly in the bowl.) Add more water in very small quantities if your dough does not feel elastic-y enough.
  4. Gather up the dough and knead it by hand on a cutting board for a minute or two. Wrap the dough in plastic wrap and let it sit for 15 minutes.
  5. Get your pasta parts hooked up and then start extruding! If you've got this attachment, take this moment to follow the manual instructions. It works real good.
  6. Boil up a large pot of water and dump the pasta in. It only takes about 60 seconds to cook, so be ready to drain it quickly. Moisten with oil and eat warm.


Freshly made pasta hanging out on damp paper towels


The man behind the plan (who says "Don't put me in your blog!!!!")


Rustic Tomato Sauce
  • 1 28 oz. Can of Diced Tomatoes
  • 2 Tbsp. Olive Oil
  • 1 Tbsp. Balsamic Vinegar
  • 1 Tbsp. Red Wine
  • 1/2 - 1 C. Sliced White Mushrooms
  • 1 Bay Leaf, roughly chopped
  • 2 Tbsp. Sugar
  • Dashes of Oregano, Pepper, Salt, Garlic Powder (too lazy to chop some), and Hot Pepper Flakes

  1. Put all the ingredients in a sauce pan, stir, and simmer for about 20 minutes.
  2. Remove the bay leaf before using on fresh pasta.

Sunday, August 5, 2007

Blueberry Muffins

4 Pounds of BLUEBERRIES!!! Hubby and I took a lovely drive through scenic Maine to pick blueberries today. Oh, what a beautiful day and the berries were fantastic. But now I've got a plethora of fruit to do something with! First on the list- special breakfast treat of blueberry muffins. Betty Crocker hooked me up with a recipe... we'll see if it's any good tomorrow morning. They sure LOOK and smelled tasty!

*UPDATE* So I ate two muffins this morning (Monday) and they were only mediocre. Disappointing- they really are pretty, and I don't know why they aren't yummier. They are too dense and my husband described them as a little too chewy. They aren't particularly sweet, nor rich- but the berries are delicious! Hubby thinks this is a conspiracy from the Betty Crocker people to make you want to buy their box mixes. The cake recipes haven't been great either... maybe he's on to something...


Blueberry Muffins
Betty Crocker Recipe

  • 1/4 C. Vegetable Oil
  • 1 C. Milk
  • 1 Egg
  • 1/2 tsp. Vanilla Extract
  • 2 C. Flour
  • 3 Tsp. Baking Powder
  • 1/2 tsp. Salt
  • 1/3 C. Sugar
  • 1 C. Blueberries

  1. Preheat oven to 400 degrees.
  2. In a large bowl, beat together all the wet ingredients; I used the wonderful Kitchen Aid!
  3. Add in the dry ingredients and mix until everything is just wet. The batter will be lumpy.
  4. Fold in the blueberries.
  5. In a muffin tin with paper liners, fill each muffin spot about 2/3 of the way full. (I made 16 muffins with this batch, although they could have been bigger.)
  6. Cook about 20 minutes until tops are browned. Remove immediately and cool on rack.

Caper Chicken & Tuscan Zucchini

The plan for dinner tonight was to make fresh pasta with the Kitchen Aid. We had gone blueberry picking in the morning and then for a hike on a small mountain. Upon getting home, Adam got to work on painting and working on fixing up the garage. I took a nap and then started on a giant list of chores. I realize this is boring to read, but the end result is that we couldn't be bothered with taking over an hour to make dinner starting at 8 PM!

Instead, my mission (should I choose to accept it or else eat canned soup for dinner) was to find something tasty that would go with the already made French bread based on what I had on hand. Good news! I poked around in my cookbooks and found a recipe to modify with yummy results for the main course and whipped up a veggie side that worked great too. Mission accomplished.


Caper Chicken

  • 1.5 Lbs. Chicken Breasts, cut into bite sized pieces
  • 2 Cloves of Garlic, chopped
  • 1 Can (14.5 oz) Diced Tomatoes
  • 1 Tbsp. Capers and a Splash of Caper Liquid
  • 1/4 C. Green Olives, coarsely chopped
  • Dash Oregano, Salt, Pepper
  • Olive Oil

  1. In a large skillet with lid, heat some olive oil over medium heat. Add in garlic and saute. Add in can of tomatoes (with liquid) and simmer for about 5 minutes.
  2. Put chicken in the pan with the tomato and garlic mixture and continue to cook over medium heat. Cover the skillet and let simmer for about 15 minutes or until chicken is cooked through.
  3. Sprinkle in the spices, chopped olives, capers, and a splash of the caper liquid from the jar. Allow to simmer another 5 minutes and then serve. Serve with a crusty bread for soaking up the sauce!


Tuscan Zucchini
  • 1 Large Zucchini, Sliced into 1/2" Rounds
  • 2 Tbsp. Olive Oil
  • 1 Tbsp. Balsamic Vinegar
  • Salt & Pepper

  1. In a medium skillet, heat olive oil, vinegar, and spices over medium-low heat.
  2. Add in zucchini and stir. Cover and cook for about 5-7 minutes until squash is tender.
  3. Serve warm.

French Bread a la Kitchen Aid

So, this is kind of a lame blog entry as there isn't anything interesting about this, but I think it's cool that I made it, and so you are stuck reading it! This is my second loaf of yeast bread that I've ever made- although I used the same recipe for #2!! All I did was use the generic French Bread recipe from the user's manual. It is so delicious though- I could eat the whole loaf in one sitting by myself.


French Bread
From Kitchen Aid mixer manual, cut in half

  • 1 Package Active Dry Yeast
  • 1 1/4 C. Warm Water
  • 1/2 Tbsp. Salt
  • 1/2 Tbsp. Butter, melted
  • 3 1/2 C. Flour
  • Cornmeal

  1. Dissolve the yeast in the warm water and put it into a warmed Kitchen Aid bowl.
  2. Add in the flour, salt, and butter. Using the hook attachment, mix on speed 2 for about 3 minutes until the dough is in a pretty ball.
  3. Put the dough ball into a greased bowl and cover for an hour until the dough rises into double the size.
  4. When it rises, take it out and roll it flat, around 12" by 15". Tightly roll the dough into a loaf shape. Place it on a cookie sheet that is sprinkled with cornmeal. Cover and let it rise again for another hour.
  5. Heat oven to 450 degrees. Slice 4 diagonal slits in the top of the loaf and then bake for 30 minutes.
  6. Remove, cool, and devour!

Saturday, August 4, 2007

Raspberry Bavarian Creme in Chocolate Cookie Bowls

A few years back in our very small apartment we hosted our first “dinner party.” It was for a set of parents- I can’t remember if it was mine or Adam’s, not that it matters. Although I was a pretty good cook then, I didn’t have much of a repertoire at that point. So I turned to my favorite place, my Betty Crocker cookbook. And there was something both easy and impressive, Raspberry Bavarian Crème. But I didn’t just want to serve some pudding stuff in a bowl and garnish it, so I went to my second favorite place for inspiration- the Internet! There I found a recipe that I modified to create an edible chocolate cookie dish to serve my new treat in. Hope someone out there can whip up these gourmet looking meal for guests, or just for a nice night in with a loved one!


Raspberry Bavarian Crème
(From Betty Crocker’s Cookbook)

  • 2 Small (Single Serve) Raspberry Yogurt containers (low-fat is just fine)
  • 1 Package Instant Vanilla (or French Vanilla) Pudding
  • 1 C. Heavy Cream
  • Red Food Dye (optional)
  • Fresh or Thawed Frozen Raspberries
  • Piroline Cookies for Garnish

  1. In a large bowl, mix the 2 containers of yogurt and the dry pudding with a hand mixer on low for 30 seconds.
  2. Pour in the heavy cream and mix on medium until soft peaks form. If you feel like the mixture is too yellow due to the dye in the pudding mix, feel free to add some red food dye to make it a better pink color.
  3. Stir in the raspberries, reserving a few for garnish if desired. Serve a scoop with fresh raspberry garnish and some cookies stuck in for style. Or wow ‘em with the chocolate cookie bowls I have below!


Chocolate Cookie Bowls
  • 2 Egg Whites
  • 1/2 C. White Sugar
  • 1/8 C. Flour
  • 1/8 C. Powdered Unsweetened Cocoa
  • 1/4 tsp. Vanilla Extract
  • 2-3 Tbsp. Butter, Melted

  1. Preheat oven to 375 degrees.
  2. In a small to medium bowl, whip the egg whites with a hand mixture until you get firm peaks.
  3. Gently fold in the white sugar until you get a consistent texture.
  4. Gently fold in the flour and cocoa, thickening the batter. Note about the 1/8 cups… The original recipe is not for chocolate and it only called for 1/3 cup of flour. So, I modified it to keep around half the flour and then threw in the cocoa to keep the batter the right consistency. It seems to work, so I’ve kept it!
  5. Stir in the melted butter and vanilla, being sure to be gentle.
  6. On a cookie sheet- either greased or covered with parchment paper- pour 3 or 4 very thin and wide circles of batter. The size can definitely be irregular and it should be around 6-8” wide. Be sure to keep it thin.
  7. Bake for 10 minutes. As soon as you remove the cookies from the oven, use a spatula to remove the warm and soft circles and place them on an inverted glass or bowl. If they are not baked long enough, the batter will goop down and ruin your bowls. If they bake too long, they won’t be pliable enough.
  8. Allow to cool on the inverted item and then use to serve puddings, fruit, ice cream, or anything else like that!


This was very tasty on a summer night like tonight- fresh berries and chocolate!