Monday, September 24, 2007

Butternut Bisque

It's fall which means it's time for soups and squash! I'm not really a big soup person, but I need to get in more veggies in creative ways as I don't really like them just plain. By putting those pretty yellow-orange squashes into a pureed cooked form, we were sure to eat it right up! This came out delicious and made a TON of bisque. I mean, 3 large bowls worth that night and two full medium tupperwares. Serve this with a nice garlic or herbed bread for a warm, comfortable meal on a chilled evening.


Butternut Bisque
Inspired by AllRecipes.com

  • 1 Tbsp. Olive Oil
  • 1 Tbsp. Butter
  • 1/2 Medium Onion, chopped
  • 1 Large Garlic Clove, finely chopped
  • 2 Full Size Carrots, sliced
  • 1 Large Butternut Squash
  • 2 1/2 C. Veggie and/ or Chicken Stock
  • 1/2 C. Apple Cider
  • Salt (1/2 tsp), Pepper (dash), Nutmeg (1/4 tsp), and Thyme (1 tsp) to taste
  • 1/3 C. Half & Half

  1. Preheat the oven to 350 degrees. Using a large, heavy knife, slice the squash in half lengthwise. Place the squash in an oven and microwave proof dish with about 1/2 C. water in the bottom, cut side down. Pierce the skin on each half in a few places.
  2. Microwave squash for 3-4 minutes to soften. Then place the squash in the oven for another 15-25 minutes to continue to roast and soften the flesh. Remove from oven, cool slightly, peel and cube.
  3. Meanwhile, in a large sauce or stock pot, heat up the oil and butter over medium heat. Saute onion and garlic until aromatic.
  4. Add in the remaining ingredients except the Half & Half into the pot. The squash can go in after it comes out of the oven, as it will be mostly cooked through.
  5. Bring soup to a boil, stirring occasionally.
  6. In a blender, pour in soup, or as much as you can. (I had to put half in the blender and the other half in a holding bowl.) Puree soup until smooth and then transfer back into the pot. If splitting the batch, pour the finished soup back into the sauce pot while blending the second half.
  7. Put the pot on low heat to keep soup warm. Pour in Half & Half and blend in. Taste and modify spices as desired. Serve warm with chives and a swirl of cream for garnish.

Friday, September 21, 2007

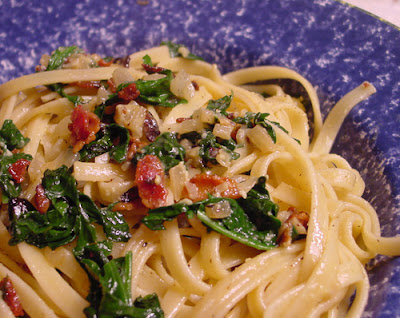
Another Borrowed Recipe - Florentine Fettuccine Carbonara

As I did the previous evening, Thursday night I finally made another recipe from my starred Google Reader list. There are lots of interesting meals that I see from other Nestie ladies, but a lot of them are desserts, casseroles, or pork/ beef dishes I'm just not inclined to make. (For the record, I love pork, but hubby Adam thinks he doesn't so I get an earful any time I make it and it's just not worth the effort to hear all that complaining. As for beef, it's my nemesis; I stink at cooking it and usually it comes out like shoe leather. Ick. I avoid it usually.)

So one of the recipes that caught my eye and made it to the reserved list was Michelle's Pasta Carbonara. Now I have to laugh because Michelle got this recipe from Cooking Light. I don't know what they are smoking over there at Cooking Light, but bacon, cheese, and egg do NOT a light and healthy meal make! I mean, I doubled the pasta from the original (see Michelle's post of the original recipe) and I did not double the bacon but it was still plenty good. I can't even imagine doubling the bacon and expecting this to be considered health food! But I digress...

Don't let the seemingly raw egg scare you away from this recipe. When you add the cheese and egg sauce into the hot pasta, it cooks up and creates a delicious creamy coating that matches perfectly with the bacon. And the wilted spinach really adds a nice tang to the dish that might otherwise be just too much richness.


Florentine Fettuccine Carbonara

  • 16 oz. Package Dried Fettuccine
  • 2 Tbsp. Olive Oil
  • 1 1/2 - 2 C. Coarsely Chopped Raw Spinach
  • 6 Slices of Bacon (should be pancetta, but that wasn't in my fridge)
  • 1 Med Onion, chopped
  • 2-3 Tbsp. White Cooking Wine
  • 1 C. Parmesan Cheese, finely grated
  • 2 Eggs
  • 1 1/2 Tbsp. Dried Parsley (fresh would have been better)
  • 1/2 tsp. Black Pepper
  • 2 Dashes Salt

  1. Prepare pasta according to directions. I started the water boiling right when I started the rest of this meal and the timing was perfect to drop the pasta in the other pan while freshly drained and still plenty wet. If pasta is ready far in advance, reserve 1-2 Tbsp. of the cooking liquid and keep drained pasta warm.
  2. In a very large skillet or a stock pot (large to mix the pasta in), heat the olive oil over medium heat. When hot, add in the spinach and 1 dash of salt. Cook until just wilted then remove to a bowl and set aside.
  3. Place chopped bacon into the pot and cook until crisp, about 5-7 minutes. Stir the meat occasionally to ensure even crisping. When cooked, remove the bacon with a slotted spoon and set aside in the same bowl as the spinach. Dispose of all but 2 tsp of the bacon fat from the pot.
  4. Saute the onions in the remaining bacon fat until soft, stirring often. As onions are cooking, add in the dried parsley.
  5. Add in the white wine and cook the onions for another minute.
  6. As the onions cook, whisk together the Parmesan, eggs, pepper and dash of salt to create your sauce.
  7. At this point hopefully your pasta is cooked and ready to go! Bring the heat on the onion pot to low. First add the spinach and bacon back into the pot with the onions. Next add in the wet pasta or the drained pasta and reserved liquid. Stir the pasta to mix in the onions, bacon, and spinach.
  8. With the temperature of the pot cooled to warm, add in the well mixed egg sauce and stir it quickly to coat the pasta. Serve immediately and enjoy!

Thursday, September 20, 2007

Calzones from my Kitchen

I have finally gotten to making some items from my starred Google Reader recipes. I have a whole bunch of delicious recipes from all the lovely ladies of the Nest What's Cooking board. Tonight I took inspiration from Renea and her calzones. I made a few modifications, but the basic idea is there.

We've decided this is going to be added to our quick, easy, and delish meals for the weekdays. We used spinach & mushroom and then ham & tomato as the two sets of fillings, but these would be excellent with meatball slices, peppers, fresh olives, capers, or sausage as well!


Calzones from My Oven

  • 1 Ball of Pizza Dough, premade from grocery store
  • Shredded Mozzarella Cheese
  • Tomato, chopped
  • Deli Ham, sliced
  • Spinach, chopped
  • Mushrooms, sliced
  • Olive oil
  • Cornmeal
  • Tomato Sauce (for dipping)

  1. Pre-heat oven to tempurature according to pizza dough instructions.
  2. Split the pizza dough into 2 balls. Flatten one of the halves into a circular shape on a clean surface. You may want to lightly flour the surface to prevent sticking.
  3. On one side of the dough, pile in cheese, spinach, mushrooms, and then more cheese.
  4. Fold the dough over and press the edges together, sealing tightly. Rub a small amount of olive oil on the top surface of the calzone and place on a baking sheet or pizza stone, dusted with cornmeal.
  5. Repeat process for ham and tomato calzone.
  6. Bake for suggested baking time until calzone is golden brown, probably about 15 minutes.
  7. Serve hot with marinara pasta sauce for dipping.

Wednesday, September 19, 2007

Homegrown Gourmet - Round 1 Roundup!


We have had a successful first go at the Homegrown Gourmet challenge! 4 cooks submitted delicious looking SANDWICHES using local ingredients, recipes, and inspirations. They really all look fantastic! The original rules can be found here.

I'll go first with my Maine inspired Real Maine Italian. These subs differ from your average meat n' veggie sub in that it has no lettuce, contains no condiments beyond olive oil, salt and pepper, and includes chopped up sour pickles and kalmata olives. With homemade bread and all the fixins' I was really surprised at just how tasty these were- and I don't even like pickles!


Our second entry is from the other side of the country in sunny California. Kate from Paved with Good Intentions took inspiration from that favorite bumpy green ingredient, the avocado. Mmmmm, avocado... She also kept in mind those sun lovers on the west coast want their food tasty and healthy. Her creation was a perfectly baked chicken breast served on a bun with crisp romaine, tangy Swiss, and amazing looking guacamole.


Next we have recipe inspired by local seasonal foods as well as traditional cultural recipes, well, with a twist! Cara of Cara's Cravings had Rosh Hashanah on the brain when crafting this gourmet looking lunch cuisine. A tradition in her family is to make chicken salad with the leftovers from matzo ball soup. As if a delicious curried chicken with the local flavor of cranberry mixed in wasn't enough, she paired this filling with an incredible looking pumpkin challah bread. Have you ever even heard of such a delicious thing!? How good does that look...


And finally, we have what I've decided is my favorite! Meg of Joy Through Cooking went above and beyond with 2 submissions to the event to celebrate both her hubby and alma mater's home and her hometown. I'll start with her tribute to Pittsburgh- a Primanti sandwich. I just love this because I've never heard of it- one of those local things that is special to just one place. And talk about special- it sounds like heaven! Grilled meat, coleslaw, tomato AND french fries all crammed between two sliced of Italian bread. Whoooo-doggie... now that's a sandwich! This was good enough for me, but Meg make some gorgeous looking grilled pork, scrumptious sweet potato fries, and homemade coleslaw. I wish I had smell-o-vision to enjoy the aromas of this masterpiece!

Meg's second entry paid homage to Connecticut, the Nutmeg state. Another original I've never heard of made an appearance with a personalized twist. The basis of this sandwich was Anadama bread, a native New England bakery item, made special with a hint of nutmeg seasoning. It sounds fantastic! Add in some Vermont cheddar cheese, tuna with Massachusetts cranberries, and thin sliced apples from the local farm, and you've got a keeper!


Ok, so I loved Meg's creative twists on new and exciting foods, and the extra effort really was fantastic. But you know what really sealed the deal to pick Meg's as my favorite? It was that her Connecticut dish was the Whalers Melt. Now I know nothing about the Hartford Whalers as a hockey team, but they are referenced in a very favorite movie of mine - Mallrats.

Renee (Shannen Doherty): What are you doing? You promised me breakfast.
Brodie (Jason Lee): Breakfast, shmreakfast! Look at the score, for Christ's sake. It's only the second period and I'm up 12 to 2. Breakfasts come and go, Renee, but Hartford, "the Whale," they only beat Vancouver once, maybe twice in a lifetime.

So maybe it's not a good exclusive reason to choose Meg as the host of the next round, but I'm the hostess for now and that's my choice!!!

Happy cooking!

Sunday, September 16, 2007

"White" Chili Gone Black

Betty Crocker hooked me up with the basics of this football season standard in our house. It was originally made with chicken and just garbanzo or cannelloni beans, but we prefer black beans, so this recipes has gone to the dark side! It also changes every time I make it depending on what beans I have in the pantry and what meat I have. There is always at least 1 can of black beans and we do prefer poultry.

Spices can and should be fiddled with to suit your tastes. Also, letting it simmer for a good long time so it reduces is the only way to go. Serving with sour cream and/ or cheddar on top, biscuits, crusty bread, or cornbread on the side, and a beer to wash it down is just about perfection for a weekend evening of football watching and couch snuggling!


Football Season Black Chili
Inspired by Better Crocker

  • 1 Large Onion, chopped
  • 1-2 Garlic Cloves, chopped
  • 4 C. Chicken Broth (nothing too salty)
  • 1.5 - 2 Lbs. Cooked Chicken or Turkey, either ground meat or cut up, bite sized pieces
  • 3 Cans of Beans, preferably Black or Kidney, but any bean is a good bean
  • 3 Tbsp. Cilantro, chopped
  • 2 Tbsp. Dried Basil
  • 3 tsp. Chili Powder
  • 1 tsp. Ground Cloves
  • 1-2 tsp. Cayenne Powder

  1. In a large sauce pot, saute the onion and garlic until soft.
  2. Add in broth, meat, beans with liquid from cans, and spices. If desired, raw ground meat can be cooked in the pot after the onions and garlic cook. Once meat is cooked through, add in the remaining ingredients.
  3. Simmer over medium high heat for about 45-90 minutes until reduced to desired thickness. Stir occasionally while gently simmering. Taste to adjust spices as desired.
  4. Before serving, remove from heat and let cool for a few minutes as it will be boiling hot throughout pot.

Warm Spice Ginger Cakes

So, it's Sunday night and I've been hankering to bake since Friday afternoon. First, Friday just kind of got away from me. Then Saturday I had a get together with my local Nestie friends in the first half of the day and then was struck down with exhaustion and general icky feelings after I got home. Today I got a bunch of stuff done in the morning and was determined to bake something tasty in the afternoon!

I bought some molasses for no good reason the other day and wanted to use it for my baking adventure. Man, there are a lot of ginger snap cookie recipes out there and I didn't want to use any of them!! I did however find a tasty treat from AllRecipes for a cake/ brownie type thing. Soooo yummy! All the spices made the house smell just delicious.

I did have an issue with the middle being very smooshy and not quite cooked. I was afraid the edges would get too hard. After I took it out of the oven, I cut out the edges to put on the cooling rack and then baked the rest for an extra couple of minutes. I think the entire thing would have been fine had I left it all in for another 4 minutes like the recipe told me to.


Ginger Cakes
From AllRecipes.com

  • 1 C. Shortening
  • 1 C. Sugar
  • 2 Eggs
  • 1 C. Water
  • 1/2 C. Molasses
  • 2 1/2 C. Flour
  • 1 tsp. Baking Soda
  • 1 tsp. Cinnamon
  • 1/2 tsp. Cloves
  • 1/2 tsp. Ginger
  • 1/2 tsp. Salt

  1. Preheat oven to 350 degrees.
  2. In a large mixing bowl, cream together the shortening and sugar, occasionally using a rubber spatula to clean the sides of the bowl.
  3. Add in the eggs and beat until smooth.
  4. Mix in the water and molasses, again beating just until smooth.
  5. In a separate bowl (or not- I never do) add in the remaining dry ingredients. Blend until batter is smooth. Again, clean the sides of the bowl once or twice to make sure all ingredients are thoroughly mixed.
  6. Grease a 15" x 10" baking dish. Spread batter evenly in pan. Bake for 20-25 minutes until a toothpick entered in the center comes out clean.
  7. Slice in pan and remove to cooling rack until ready to eat.

Thursday, September 13, 2007

Excellent Enchiladas

Holy crap- dinner tonight was SOOO delicious. I mean, I'm okay with saying something I made was tasty, but seriously, this was so damn good! I actually ate seconds before Adam, the eating machine, even got his plate filled up!!

Backing up... we've been up to our ears in leftover chicken and I've been trying to find ways to eat it without getting bored. Tonight's meal was enchiladas. Hubby says a big reason it was so good was because I used leftover BioHazard chicken (see July blog entries) and it is the best marinade- so we had excellent raw materials. I looked up some enchilada sauce recipes and although most were tomato based, I found one that sounded more authentic and, well, gourmet.

Hubby was only mildly satisfied with the goat cheese in the enchiladas, but I thought the whole thing was freaking delicious. I give this 9 thumbs up!!!!


Gourmet Enchiladas
Sauce
Inspired by AllRecipes.com

  • 1 Medium Onion, chopped
  • 2 Large Garlic Cloves, chopped
  • 1 Tbsp. Chili Powder
  • 3 tsp. Cumin
  • 2-3 tsp. Tabasco Sauce
  • 2 tsp. Oregano
  • 1 tsp. Cinnamon
  • 2 c. Chicken Broth
  • 1 tsp. Unsweetened Cocoa Powder

  1. In a medium saucepan, heat up some olive oil and saute the onions until soft.
  2. Add in garlic, spices, and Tabasco and cook over medium heat for about 1 minute.
  3. Add in chicken broth and stir. Simmer on a low boil. About 5 minutes into simmering, add in cocoa powder and mix well. Cook for 20-30 minutes until well reduced.


Filling and Assembly
  • 1 1/2 C. Grilled Chicken, chopped into large bite sized pieces
  • 1 Yellow Pepper
  • 2-3 Tbsp. Onion, chopped
  • 1 3 oz. Can Black Olives, chopped
  • 1 oz. Goat Cheese
  • 5 or 6 Large Tortillas
  • 1 C. Shred Cheddar, divided

  1. Preheat oven to 350 degrees.
  2. Mix together chicken, pepper, onion, olives, and goat cheese until well blended.
  3. Place a few spoonfuls of chicken mixture in the center of a tortilla. Roll the tortilla up and place it in an oven proof baking dish. Repeat with the remaining tortillas and filling.
  4. Cover the enchiladas with 1/2 C. of the cheddar cheese. Spoon sauce over the cheese and enchiladas, and then sprinkle the remaining cheddar on top.
  5. Bake uncovered for 25-30 minutes until cheese is melty and tortillas are slightly crispy.
  6. Enjoy with sour cream and avocado pieces if desired.

Wednesday, September 12, 2007

Mushroom & Goat Cheese Raviolis

As I mentioned in the previous post, we are going to be eating a lot of chicken this week- and a lot of Mexican style meals as well. Tuesday's dinner needed to be something non-poultry to break up the week's relative monotony! I had some time to make something interesting and I had purchased some goat cheese without any particular recipe in mind.

All of this culminated in deciding to make homemade raviolis for dinner. Of course, I kind of killed my own plan of using things in my kitchen since I ended up at the store to buy wonton wrappers, sage, portabello mushrooms, and ricotta cheese. (I didn't end up using the ricotta and I probably could have stuck with just plain mushrooms, but that's a whole other sidetrack!)

The meal was very rich and the flavors were good. It took about an hour for it to come together- so not the fastest in the world! However, my butter sauce went from brown to black when I over cooked it, and the raviolis I'm sure would have been better with fresh pasta. The wontons are just too thick and chewy for a meal intended to be delicate. I would make this again, but in the sake of my expanding thighs, I would find another sauce (maybe something white wine based?) and skip the portabellos.


Mushroom & Goat Cheese Raviolis with Browned Butter Sage Sauce
Raviolis

  • Wonton Wrappers
  • Olive Oil
  • 2 Cloves of Garlic, chopped
  • 1-2 Tbsp. Chopped Onion
  • 1 1/2 C. Portabello Mushrooms, finely chopped
  • 1 C. White Mushrooms, finely choppes
  • 1 tsp. Fresh Sage, chopped
  • 3 oz. Goat Cheese, crumbled
  • Egg White of 1 Egg

  1. In a medium saute pan, saute garlic and onion over medium heat until translucent.
  2. Add in all of the mushroom and increase heat to medium-high. Cook mixture, stirring occasionally, until most of the moisture is removed. The mushrooms will shrink significantly. Once cooked, turn off heat and allow mixture to cool down some.
  3. In a medium bowl, mix together goat cheese, fresh sage, and warm/ cool mushroom mixture.
  4. In a small bowl, whip egg white and 1 tsp of water until frothy.
  5. On a dry cutting board, spread out some wontons. (I did 6 at a time.) Brush the facing side of the wrapper with the egg white mixture and then place a small dollop of the mushroom filling in the middle. Depending on the size of your wonton wrappers, this can be as little as 1/2 tsp and as much as 1 Tbsp. I used about 1 tsp. per ravioli.
  6. Fold the wonton in half, gently squeezing out any air and sealing the wet sides together. If desired, press the sides together on one side and then flip the ravioli and repeat on the other side. I did this to make them more symmetrical, but it is not necessary. Also, because my raviolis had an excess of pasta along the corners due to the rectangular shape of the wrappers, I sliced off the corner, creating a rounded crescent shape. This again is optional.
  7. Bring a medium saucepan of water to a gentle boil. Carefully drop in the raviolis, using either a slotted spoon or wire ladle. You can also drop them in manually, but beware of splashing, scalding water!
  8. Cook pasta about 3-5 minutes until wontons become somewhat translucent and the raviolis float. Drain in a colander and serve hot with a light sauce.


Browned Butter Sage Sauce
Inspired by recipes from FoodNetwork.com
  • 3-4 Tbsp. Butter
  • 1-2 tsp. Fresh Sage, chopped
  • 1-2 Tbsp. White Wine

  1. In the pan where mushrooms were cooked, melt the butter over medium heat and allow it to brown slightly.
  2. Add in sage and allow it to get browned.
  3. Splash in white wine and stir in. Serve immediately so sauce does not burn!

Monday, September 10, 2007

South of the Border Chicken Soup

We have a lot of leftover chicken in the fridge- the roasted chicken and grilled chicken both in the blog earlier this week! The challenge this week is to come up with yummy well-rounded dinners that use up this chicken before it goes bad.

Tonight we took a trip to Mexico with a soup perfect for a wet, early fall day. This is one of those recipes that is easy to throw together with stuff you have on hand. This version wasn't spicy, but matched great with the avocado garnish and fried tortilla chips.


Mexican Chicken Soup

  • 1 Med. Onion, chopped
  • 2 Cloves of Garlic, chopped
  • 3 Tbsp. Olive Oil
  • 1 C. Water
  • 1/2 Green Pepper, chopped
  • 1 Med. Tomato, chopped
  • 1 Cooked Corn off the Cob
  • 2 Cans Chicken Broth
  • Juice of 1/2 Lime
  • 1 Tbsp. Chipotle Powder
  • 1 tsp. Dried Cilantro
  • Dash Cinnamon
  • 1 C. Cooked Chicken
  • 1 Tbsp. Sour Cream

  1. In a large saucepan, heat olive oil over medium high heat and saute the onion and garlic until soft.
  2. Add in all the other ingredients except the sour cream and simmer over medium heat for about 30-45 minutes. If everything isn't ready at once, add things in as they are prepped. Just be sure to add liquid in so the goodies don't burn.
  3. About 5 minutes before soup is complete, stir in the sour cream to add some depth to the recipe.
  4. Remove from heat and let cool for about 10 minutes, stirring occasionally. With the oil on top, the heat gets trapped and is sure to scald your tongue if you aren't careful!


Buen Comida!

Homegrown Gourmet - Round 1 Entry!

Yippee for local food!!!


I'm hosting a new event called Homegrown Gourmet that celebrates local food traditions and creativity in using native ingredients in recipes. I chose Sandwiches as the first topic for cooking. I chose this and then realized I had no ideas for my own Maine!

There of course was the option of lobster rolls- yawn. There are also these disturbing bright red hot dogs, but I wasn't about to stuff my own scarlet sausages! After doing a little research, I found that Maine has its own original Italian sub that came about in the early 1900's. Some Italian guy named Amato worked down by the docks at the water and sold bread to the workers. The dock workers requested something with a little more substance like meat, cheese, and veggies. And so the sandwich was born! Amato's is now a local chain that specializes in the yummy lunchtime meal. (Confession- I've never been to Amato's as it looks cheesy to me and before this event I thought their claims to "real Maine Italians" sounded like a cornball slogan.)

So what makes this different than your hoagie, submarine, grinder, or other similar meat n' cheese in bread deal? Well, there are no condiments besides olive oil, it includes sour pickles and Greek olives, and there is no lettuce. The meat and cheese are minimal too- it's really all about the veggies. You can read more about them at MaineToday.com.

I don't like pickles and I've never put salt or pepper on a sandwich, but hubby and I ate ours just like the original recipe. It was really really tasty! The homemade bread was perfect and all the flavors went really well together. So without further ado, the real Maine Italian!!


Real Maine Italian Sandwich

  • Soft White Sandwich Roll
  • Boiled Ham
  • American Cheese
  • Onions, chopped
  • Green Peppers, chopped
  • Tomato, chopped
  • Kalmata Olives, chopped
  • Sour Pickles, chopped
  • Olive Oil
  • Salt & Pepper

  1. Slice your roll vertically along the top.
  2. Lay the cheese and ham along the sides of the bread. (This keeps the oil from completely soaking in!)
  3. Pile on the veggies in the middle. Drizzle some olive oil and shake on salt and pepper. Enjoy!

White Bread Sandwich Rolls

I have to admit, I thought these were going to be a disaster. I do not have much experience with making bread, even less in shaping the dough, and I know nothing about how the ingredients/ kneading/ rising really affect the final product. It's all just a big mystery to me!

So I hunted and scoured and surfed the 'Net looking for a stupid simple, soft submarine sandwich roll recipe. Doesn't that sound easy? Well it's not, but I can tell you there are plenty of crusty, dill, oat nut recipes to be had in its place! I finally found one that I could work with.

The dough seemed to dry even after I made it with all the liquids and less flour than called for. I added more water and kneaded in the mixer. Then it was too sticky. I added some flour and kneaded more in the mixer. This poor dough spent probably 7 minutes circling round while I looked quizzically into the bowl. I figured I killed it with all that kneading! It rose, the house smelled like yeast, and I took it out to shape it. Poor misshapen balls of dough, I had no clue what I was doing! After slapping together what I thought might be some good rolls, I let it rise again. As the oven preheated, I messed with one roll; I mangled it. After baking, the crust seemed hard- that's it, I had screwed it up for sure!

Lo and behold though- they were perfect. I mean, just like at the sub shop. Soft, chewy, inoffensive but delicious white bread rolls! Now, the shapes weren't fantastic, but I couldn't have gotten the taste better had I gotten a clue ahead of time! Next time I'll double the recipe since they came out so good.


Soft White Submarine Sandwich Rolls
Loosely based from AllRecipes.com Soft Onion Rolls

  • 3/4 C. Warm Milk
  • 1 .25 oz Packet of Active Yeast
  • 1/4 C. Warm Water
  • 3 C. Flour (I used all purpose.)
  • 1/4 C. Potato Flakes/ Instant Potatoes
  • 2 Tbsp. White Sugar
  • 1 tsp. Salt
  • 3 Tbsp. Butter, softened

  1. Warm the milk until it is warm, but not hot, to the touch. Stir in yeast to dissolve it.
  2. In a stand mixer, add in warm water (same temp as milk) and swirl around to warm bowl. (Adding the yeast mixture into a cold environment can kill it, thwarting your bread!)
  3. On a low speed, using a dough hook, add in the rest of the ingredients, reserving about 1/2 Cup of flour. Mix until the dough starts to come together into a ball. If too sticky, add in the 1/2 C. of flour a bit at a time until the dough is slightly sticky, but does not come off on your finger when touched. If too dry, add in very small amounts of water at a time.
  4. On speed 2 (Kitchen Aid speed), knead the dough in the bowl for about 3 minutes. While kneading, grease a large bowl. Remove the dough and put it in the bowl, rotating it so the top gets greased. Cover and let it rise in a warm place for about a hour. It should at least double.
  5. After dough has risen, punch it down and divide it into equal pieces for your rolls. For the large sub rolls I wanted, this batch would yield 4 or 5 good sized rolls. Shape the rolls and place onto a baking sheet sprinkled with corn meal. I have no advise as to how to shape them properly; I fudged it and just made rolled up vague log shapes and pinched shut any seams.
  6. Cover the rolls and let rise again for another hour.
  7. Preheat oven to 350 degrees. Bake rolls for 15-20 minutes until they are golden brown and have a dense, hollow sound when you knock on them. The crust will seem to be hard when they come out of the oven.
  8. Allow to cool. The crust will soften and the interior will be hot for at least 15 minutes after they come out of the oven. Slice and enjoy with all the toppings!


These would make excellent meatball sub rolls, and they were fantastic for our Real Maine Italians with all the cold cuts and meat and cheese you could want!

Saturday, September 8, 2007

Roasted Zucchini Boats

Every time I've seen my neighbor Jessie this summer, she has forced zucchini from her garden on me- she must have quite the prolific crop over the fence! It is delicious and it's giving me great motivation to a) find creative recipes and b) actually eat more veggies! The latest batch included a monster of a squash- this zucchini was literally over 1 foot long- hoo doggie!

Jessie made a good suggestion to use it for stuffing since it probably had lost some of it's baby sweetness. I thought it was a fantastic suggestion and went on the hunt for inspiration. A lot of recipes called for ground beef, turkey or sausage meat. My father gave me this giant tub of fake sausage meat that his Boy Scout troop couldn't use. My brother is a vegetarian and swears it's good even if it's a little scary.

This is the industrial tub of the stuff:


That's right it says "Imitation Sausage #10, Flavored Textured Vegetable Protein" and it looks like cat kibble. Mmmmm-mmmm! Honestly, it does taste like sausage, but I'd only ever use it in something else like omelets, soups, meat sauces, etc. And I'd never show them the canister first! Ha! It works for vegetarians though and you can easily sub in real meat in this recipe.

In the end, the baked zucchinis were delicious and it was nice having a warm, healthy, filling meal.


Roasted Zucchini Boats

  • 1 Large Zucchini
  • 1 Onion, chopped
  • 2/3-3/4 C. Cooked Sausage Meat (real or fake!)
  • 1/2 C. Breadcrumbs
  • 1/3 C. Parmesan
  • 1/4 C. Shred Mozzarella
  • 1 Tbsp. Dried Oregano
  • 1 tsp. Garlic Powder
  • 1 tsp. Dried Basil
  • 1/2 tsp. Fresh Rosemary
  • 1/2 tsp. Dried Thyme
  • 1 C. Pasta Sauce

  1. Preheat oven to 375 degrees.
  2. Cut off the ends of the zucchini. Slice the zucchini in half lengthwise.
  3. Using a spoon or melon baller, scoop out in the interior of the zucchini and place what comes out into a large bowl. Leave about 1/4" of the walls on the zucchini, making a hollow boat shape.
  4. In the large bowl, add in all of the remaining ingredients except the pasta sauce. Mix well, creating the stuffing.
  5. Place each zucchini half into a 9" x 13" baking dish. Drizzle insides with olive oil and salt if desired. Fill the boats with the stuffing, filling high and round. Cover stuffing equally with the pasta sauce.
  6. Bake in oven for 20-25 minutes until the zucchini is tender and stuffing is warm throughout.

Tuesday, September 4, 2007

Roasted Spiced Whole Chicken

Oh baby, do I love this recipe!! I don't make whole birds very often- it takes a lot of time and I've had some bad experiences with under cooked meat. (ick) But ooooohhhh this is SOOO good! I love the leftover chicken and the house smells just delectable! Tonight's meal was accompanied by a fresh salad (feta and Greek dressing!) and Mom's Rice Pilaf- another big crowd pleaser. It was so good!.


Roasted Chicken
From Allrecipes.com

  • 2 tsp. Salt
  • 1 tsp. Sugar
  • 1/8 tsp. Ground Cloves
  • 1/8 tsp. Allspice
  • 1/8 tsp. Cinnamon
  • 1/8 tsp. Nutmeg
  • 4+ Cloves of Garlic
  • 1 Whole Roaster Chicken

  1. Preheat over to 500 degrees.
  2. Mix together spices. On the clean prepped chicken, rub the spices on top of and under the skin. We don't eat the skin, so I pull it up gently and rub the spices underneath with my fingertips.
  3. Break up the garlic cloves and place them inside the chicken cavity.
  4. Place the chicken breast side up on a roasting pan and place in the over for 15 minutes.
  5. After the first 15 minutes of roasting, turn the heat down to 450. Cook for another 15 minutes.
  6. Baste the chicken with juices from the pan. Turn the heat down to 425 and cook for another 25-30 minutes until the meat is cooked through. Baste once or twice again if desired. Test for doneness when the juices run clear and you can stick a knife into the deepest part of the breast for just an instant and the tip is hot when touched to your lip.
  7. Remove chicken from oven and let it sit for about 15-20 minutes before carving and serving.

Whoooopieeeeee!!!!!

Summer treat in New England = Whoopie Pies

Oh, chocolaty, fluff filled cakes, how do I love thee! So very much. My mom made these when I was a kid and now I bake them for special occasions like neighborhood cookouts. I don't think I have anything more to say- just look at that picture!


Whoopie Pies
Cake

  • 1/2 C. Shortening
  • 1 C. Sugar
  • 1 Egg
  • 2 C. Flour
  • 1/2 tsp. Baking Powder
  • 1 1/2 tsp. Baking Soda
  • 1/2 C. Cocoa
  • 1 C. Milk
  • 1 tsp. Vanilla
  • 1/2 tsp. Salt

  1. Preheat oven to 425 degrees.
  2. Mix all ingredients until everything is wet. I prefer to mix the dry ingredients first, and then add in the wet. Do not beat much- it just needs to get moistened through.
  3. Drop by the teaspoon onto an ungreased baking sheet. Try to keep them an even size as they will have to be paired up.
  4. Bake for approx. 6 minutes. Check their doneness by observing the color or by smelling for them to just start to toast on the bottom.
  5. Remove immediately from baking sheet and cool on a rack. Cool completely before frosting.


Filling
  • 1/2 C. Shortening
  • 1 C. Confectioners Sugar
  • 1 C. Fluff
  • 1 tsp. Vanilla
  • Milk to moisten

  1. Put all ingredients into a large bowl and beat on medium high until smooth. Add the milk in slowly so that the consistency remains fairly thick.
  2. Fill cooled cake pairs using a pastry frosting gun or even just a spoon. Careful not to overfill or your whoopie pies will be super messy instead of normal messy! Spread filling on one half in the middle and then squish the other half on top, mushing the frosting throughout the treat.

Sunday, September 2, 2007

Rosemary Salmon & Summer Veggie Saute

We decided to do a cookout with the neighbors for Labor Day weekend- sort of impromptu style. Of course I was going to have to go to the store and do a bunch of cooking for company. With all that effort in my near future, I wanted a simple and quick dinner. Since I already was at the store, I wandered past the fish counter and picked up some fresh salmon. I also had a zucchini from the neighbor's garden and needed to eats me greens, so I threw that in the mix as a side too. It was a really simple, attractive, and delicious dinner!


Rosemary Salmon

  1. In a saute pan with a lid, pour in some olive oil. Place a 1 lb. salmon fillet in the pan, skin side down, and place sprigs of fresh rosemary over the fish. I used about 5 or 6 sprigs.
  2. Heat the pan over medium heat and cover. Cook until the fish is cooked through in the thickest part. It should be about 10-15 minutes.


Carrot & Zucchini Saute
  1. Julienne a medium zucchini and either a handful of baby carrots, or 2 full carrots.
  2. Over medium-high heat, cook up carrots for in olive oil for 5-10 minutes.
  3. Add in zucchini and a little more olive oil. Cook for an additional 5-10 until both veggies are crisp tender.
  4. Season with salt and pepper and eat!