Monday, July 30, 2007

Creamy Creole Shrimp & Pasta

Sometimes you just have to eat unhealthy food. I mean, who can rely on veggies and spices all the time- sometimes the old standbys of cream and butter just need to shine!!! This is one of those times. I had made this a couple of years ago and my husband Adam begged me to actually write it down. And for once I listened to him- stranger than fiction! But due to all the cream and my already expanding waistline, I haven't actually made it in forever. Adam didn't even remember it- so much for all that begging! It is delicious though, and don't be deceived, it's got a Cajun Kick!


Creamy Creole Shrimp & Pasta

  • 1 Box of Small Pasta
  • 2 Tbsp. Olive Oil
  • 1-2 Tbsp. Butter
  • 1/4 C. Green Onions, chopped
  • 1/4 C. Red (or Orange or Yellow) Pepper, chopped
  • 1 Plum Tomato, chopped
  • 1 Tsp.+ Chili Powder
  • 1/2 Tsp. Garlic Powder
  • Dashes of Parsley, Chipotle Seasoning, Basil, and Cayenne
  • 1/2 Lb. of more Raw Shrimp, cleaned and shelled (about 12 shrimp)
  • 1 Small Can of Mushroom pieces, drained
  • Splash of White Wine
  • 1 to 1/5 C. Heavy Cream
  • Salt & Black Pepper to taste

  1. Boil a pot of water and cook pasta until al dente. When cooked, drain and return to pot, keeping warm.
  2. In a large skillet, heat the oil and butter over medium-high heat. Saute green onions, pepper, and tomato for about 5 minutes.
  3. Add the spices and continue to simmer over medium heat. The tomato will break down and turn into more of a sauce.
  4. Add the shrimp and cook until mostly cooked, turning occasionally.
  5. Add mushrooms and simmer until shrimp are completely cooked through.
  6. Pour in the white wine, enough that the pan bottom is covered in liquid. Simmer until wine reduces some.
  7. Pour in the cream and stir. Simmer over medium high heat until the sauce thickens. This is up to your discretion. Taste, add any salt & pepper, and then serve shrimp and sauce over the cooked pasta.

Friday, July 27, 2007

Jamaican Jerk Chicken, Coconut Rice, & Mango Salsa

So one of the What’s Cooking Nesties was looking for ideas for something to serve guests this weekend that wasn’t Italian or take out pizza. It was a hot and humid one in Portland, so I suggested some grilled jerk chicken with accompanying Carribean style dishes. It sounded so good that I decided to steal my own idea!


Jamaican Jerk Chicken

  • 1-1.5 lb. Chicken Breasts
  • 1 Tbsp. Soy Sauce
  • 1 Tbsp. Vegetable Oil
  • 1 Tbsp. Brown Sugar
  • Half of 1 Fresh Jalepeno Pepper, chopped
  • 1 tsp. Chili Powder
  • 1 large dash Onion, Garlic, and Ginger Powders
  • Juice of 1/2 a Lime
  • Spices for rub: Chili Powder, Ginger, Allspice, Oregano, Thyme, Cayenne, Cinnamon, Cumin

  1. In a medium to large glass bowl, mix all of the ingredients except the chicken and rub spices. Let it sit for 10-15 minutes to allow the jalapenos and other flavors to meld.
  2. Place chicken in marinade, turning to coat. Allow the chicken to absorb the flavors for about 30 minutes, flipping occasionally.
  3. Light the grill and heat to medium heat.
  4. In a separate bowl (it can be small), mix together the rub spices. Each spice should measure between 1/2 to 1 tsp. Go heavy on the chili, allspice, and ginger; go light on the cayenne, thyme, and oregano. Everything can go to taste.
  5. Remove the chicken from the marinade and place on a dry plate. Sprinkle the rub equally on the breasts and then with hands, massage in the spices. This is messy work!
  6. Cook the chicken on the grill, turning once to thoroughly cook the chicken through.


Coconut Rice
  1. In a rice cooker, add 2 cups white rice, quarter of a can of light coconut milk, and a dash of cinnamon.
  2. Cook through.
  3. When rice is ready, pour in another quarter of the can of coconut milk and stir. Let rice sit for a minute or two for milk to be absorbed further.


Mango Salsa
  • 1 Mango, chopped
  • 1 Small can Pineapple Pieces
  • 1 Tbsp. Cilantro, chopped
  • 1/2 Fresh Jalepeno, chopped
  • 1 Tbsp. Onion, very well chopped
  • Dash of Ginger powder

  1. Combine all of the ingredients and let sit for 30+ minutes for flavors to meld. Enjoy on top of chicken, fish, or as a side.

Tuesday, July 24, 2007

Crepes, Part II: Beef Burgundy Dinner Crepes

Beef, folks, is not my specialty. In fact, I don't make steak; I make shoe leather. At least that's usually the case. Tonight I actually made something tasty as well as unique- Beef Burgundy to be served in a traditional crepe. The crepes were leftover from this weekend's breakfast treat, but they were a good flavor- not too sweet, not too bland- so I thought I'd incorporate them into an evening meal. I think it worked, although the meat and sauce were just as good when they dribbled onto the egg noodle bed beneath them! Served with a side of warm pickled beets, it was quite a tasty meal!


Beef Burgundy Crepes


  • Prepared Crepes
  • 1 Onion, thinly sliced
  • 1 Lb. Sirloin Beef, sliced into thin, bite size pieces
  • 1 C. Beef Broth
  • 1/3 C. Red Wine
  • 1/2 C. Port
  • 1/2 tsp. Thyme (dried)
  • 1/4 tsp. Rosemary (dried)
  • 1/4 tsp. Garlic Powder
  • 1/2 C. White Mushrooms, sliced
  • 1/4 C. Cherry Tomatoes, sliced
  • 2 Tbsp. Plain Parsley, chopped
  • Olive Oil
  • 2-3 tsp. Flour
  • Salt & Pepper to taste

  1. In a skillet, pour in 1-2 Tbsp. of olive oil. Bring pan to medium heat and add in onion slices. Cook onions until translucent and partially caramelized. Stir frequently to keep them from burning. This all can be done in a separate small skillet or in the same large skillet the entire recipe will be cooked in; if using the large skillet, remove onions and set aside.
  2. In large skillet, pour in another 1 Tbsp. of olive oil and increase heat to medium-high. Add in beef and brown meat. When beef has a nice color, pour in wine, port, and beef broth, retaining about 2 Tbsp of broth for later. Bring mixture to a simmer. Stir in thyme, rosemary, and garlic powder.
  3. Cover the beef and allow it to simmer over medium heat for about 20 minutes.
  4. Stir in mushrooms and tomato pieces and cover. Simmer for another 10 minutes or until the beef is tender.
  5. In a small bowl, mix flour and remaining beef broth to create a thick, smooth liquid. There should be no lumps. In the skillet, move the beef and vegetables to the sides of the pan, leaving the middle with nothing but the cooking juices. Pour in the flour mixture and stir immediately. This will cause the sauce to thicken up. Continue stirring, bringing in the meat and vegetables and any sauce that is along the edges, creating a uniform gravy.
  6. Give a taste test to determine if any salt or pepper is desired. Just before serving, stir in the parsley for a little extra flavor and a punch of color.
  7. Quickly warm the prepared crepes. Fill each crepe down the center with the beef & goodies and fold over, drizzling the top with gravy. Enjoy!

Monday, July 23, 2007

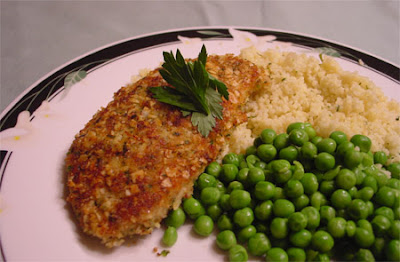
Almond Encrusted Chicken

This is one of the first recipes I made up myself, and I have no idea how I came up with it. It's a weird combo for a new chef, but it's one of my favorites. Tonight I am making it with regular ol' sliced almonds, but to really make it delicious, use smoked almonds. You know, snack nuts like... Excited Nesties love Emerald Nuts... they are salty and smokey and really make the meal.

Also, since this is my own personal recipe, these measurements are total guesses! When I wrote it down, I used measurements like "handful" and "7 leaves"- so go ahead an flex your creative muscles when making this- I always do!


Almond Encrusted Chicken

  • 1 to 1.5 Lb. Chicken Breasts
  • 1/2 C. Whole Smoked Almonds
  • 2/3 C. Plain Breadcrumbs
  • 2 Tbsp. Parmesan Cheese, grated
  • 3-4 Tbsp. Fresh Mint
  • 1-2 Tbsp. Fresh Plain Parsley
  • 2 Stalks of Green Onion, broken into pieces
  • Olive Oil, around 2 Tbsp. plus around 1/4 C.
  • Salt and Pepper to taste
  • Chicken Broth or Milk

  1. Slice each chicken breast in half to create two thin breast fillets. Alternately, you can pound the breasts to thin them, but I like a solid hunk of meat to fry.
  2. In a food processor, add nuts, breadcrumbs, cheese, mint, parsley, and green onion. Pour in a small amount of olive oil and pulse. Blend until it is a slightly moist consistency, adding oil as necessary, and until the nuts are broken into very small pieces. Taste the mix and add salt & pepper as necessary and pulse quickly to blend.
  3. In a medium bowl, pour in either the milk or broth. In another bowl or plate, put in the coating mixture. Dip the chicken breasts in the liquid one at a time and then press the coating on thickly. I find this ends up being a pretty manual process as I push the breadcrumb mix on with the tips of my fingers.
  4. In a large skillet, add the 1/4 cup of oil. Feel free to use less- this isn't about making the chicken greasy! Heat the oil over medium heat for frying the chicken. Not too hot- no one wants a smokey, oil spattered kitchen, not too cold- you want to crisp the meat, not bathe it with warm oil.
  5. Fry the chicken fillets until browned and cooked through, only about 4-6 minutes per side.
  6. Before serving, drain on a paper towel to remove excess oil.

Sunday, July 22, 2007

Mexican Fish Hash and Rosalitas

Years ago I had a subscription to Food & Wine magazine and the only recipe I ever made was this one- and it is such a keeper. I never would have thought fish and mint and thyme and jalapenos would have made such a delicious Mexican dish! We like to have it with white rice or even in a tortilla.

As for a beverage, I have found a way to get rid of this wretched raspberry vodka I purchased a while ago. It's like some kind of awful alcoholic Jolly Rancher and I struggled to find something drinkable to do with it. Now, I am my mother's daughter, and we believe in margaritas that have 3 ingredients- tequila, triple sec, and lime. Dare not bring a mix into my house- perish the thought! Ha ha! In the spirit of Miss Margarita, I've created a beverage I like to call her cousin, the Rosalita. It's a raspberry margarita, and it's a nice change of pace for a drink from South of the Border. Ole!


Mexican Fish Hash
(modified from Food & Wine magazine)

  • 4 Garlic Cloves, 2 of which should be chopped
  • 4-6 Bay Leaves
  • 1 Small whole and 1 Large chopped White Onion
  • 1-2 Lbs. Firm White Fish (cod, tilapia, etc)
  • 2 Medium Tomatoes, chopped
  • 1/4 C. Plain Parsley, chopped
  • 1/2 C. Fresh Mint, chopped
  • 1 Tsp. Thyme
  • 1/c C. Green Olives, chopped
  • 1/4 C. (or less) Pickled Jalapeno Chilies, chopped
  • Olive Oil

  1. Bring a large, preferably wide, pot of water to a boil. Place the whole small onion, 2 bay leaves, and 2 whole cloves of garlic into the water and let simmer for at least 15 minutes. Add in the fish and let it cook until it is flaky, about 5 minutes.
  2. When fish is cooked through, remove using a wire basket or other utensil that will not let the fish pieces go to waste. Put the fish in a bowl and break into small pieces with a fork. Set aside and keep warm with a towel over it.
  3. In a large skillet over medium-high heat, warm around 2 Tbsp. olive oil. Add chopped onion to brown.
  4. Add in tomatoes, parsley, mint, thyme, and remaining bay leaves. Cook until it tomatoes thicken, around 8 minutes.
  5. Stir in olives, jalapenos, and garlic. Cook until warmed through.
  6. Add in fish pieces and simmer on medium heat until the liquid is mostly gone.
  7. Remove the bay leaves and sprinkle with salt. Serve hot and enjoy!


Rosalita (to serve 1)
  • 1 oz. (shot) Tequila
  • 1 oz. Raspberry Vodka
  • 1/2 oz. Triple Sec
  • Juice of 1 Lime
  • Splash of Grenadine for color
  • Kosher Salt to rim glass

  1. In a cocktail shaker with ice, combine all ingredients. Give a good shake to mix.
  2. Using the lime rind, moisten the edge of a margarita glass. Dip the edge in the salt. Load it on... it gives the drink a little more kick when the salt gets in the bottom of the cocktail! If all that salt doesn't work for you, 1/2 salt and 1/2 white sugar can be substituted.
  3. Put a couple of ice cubes in the margarita glass and pour the drink in. Garnish with a raspberry or maraschino cherry.

Blueberry Banana Crepes with Blueberry Sauce

Sunday mornings are the perfect for over indulging breakfasts- sweet, rich, and complicated! This morning I tried my hand at crepes. They were both delicious and surprisingly simple! I made the blueberry sauce last night based on the No Bake BLueberry Pie filling goo and then whipped everything else up this morning. It was wonderfully decadent!


Blueberry Banana Crepes

Crepes (from AllRecipes.com)

  • 2 Eggs
  • 1/2 C. Milk
  • 1/2 C. Water
  • 1 C. Flour
  • 1/4 Tsp. Salt
  • 2 Tbsp. Butter, melted

Filling
  • 1 Banana, sliced thinly
  • 1/2 to 1 C. Fresh Blueberries, washed

Blueberry Sauce

Whipped Cream
  • 1 C. Heavy Cream
  • 2 Tsp. Confectioners Sugar

  1. Prepare whipped cream by combining cream and sugar in a bowl. Wisk briskly until cream takes on a solid consistancy, approximately until your wrist falls off. Chill in fridge until ready to serve.
  2. Prepared crepes. In a medium bowl, wisk together milk, water, and eggs.
  3. Gently mix in flour and salt. Wisk until batter is smooth.
  4. Stir in melted butter until well blended.
  5. On the stovetop, heat a small saute pan over low to medium heat. If using a non-stick pan, no additional preparation is necessary. If using a regular pan, lightly oil the pan to prevent crepes from sticking.
  6. Using a 1/4 C. measuring spoon, pour a cup full of batter into the heated pan. As pouring, or as soon as batter is poured, swirl the batter around to spread it thin and evenly onto the entire surface of the pan.
  7. Let crepe cook, browning on one side, about 4 minutes. Be sure the pan is not too hot so as to burn the crepe. When crepe is browned, carefully flip and cook the other side until browned as well.
  8. While hot, fill crepe down the center with a smattering of sliced bananas and whole blueberries and fold sides around the filling. Drizzle with sauce and top with a dollop whipped cream.

Saturday, July 21, 2007

Summer Salad with Homemade Croutons & Strawberry Infused Balsamic Vinaigrette

In the words of the Fresh Prince, today was a beautiful day in the "Summer summer summertime, time to sit back and unwind!" But rather than playing double dutch, I made a delicious salad to eat out on the back patio with my little husband. The highlights were the from scratch croutons, strawberry enhanced dressing, and leftover grilled chicken. Below find the crouton and dressing recipes and then all the junk I put in the salad. (Let's face it, a recipe for a salad is just all the stuff you dump in the bowl, so you can figure out what you particuraly want and how much of it!) So let the alpine blast and enjoy!


Homemade Herbed Croutons

  • 4-5 Sliced of Italian Bread
  • 1-2 Tbsp. Olive Oil
  • Dried Herbs & Spices (Thyme, Oregano, Garlic Powder, Black Pepper, Salt, Tarragon)

  1. Preheat oven to 400 degrees.
  2. Cut the bread slices into bite sized squares/ rectangles. I cut them into pieces around 1/2" to 1" wide.
  3. In a large sealable bag, drizzle in olive oil. Seal the bag and smoosh the oil around so it isn't just a giant puddle on the bottom.
  4. Add in the bread pieces, shaking them quickly around the bag to evenly coat them with oil. If you are not careful to get the bread moving, the first few pieces will sink to the bottom and soak up most of the oil. If that happens, squeeze those pieces like a sponge to try to get some oil out for the other pieces!
  5. Open the bag and shake in a bunch of delightful herbs and spices. You do not need a lot of herbs to be effective. I would estimate I used no more than a pinch of each. Again, shake bread around, trying to evenly coat the pieces with seasoning.
  6. Line a cookie sheet with foil for easy clean up. Place seasoned bread bits in a single layer on the foil. Cook croutons in the oven for around 10-12 minutes, turning occassionally to brown on all sides.
  7. When browned, remove croutons and allow to cool before using in salads, soups, or casserole toppings.


Strawberry Infused Balsamic Vinaigrette
  • 2 Tbsp. Olive Oil (high quality)
  • 1 to 1 1/2 Tbsp. Balsamic Vinegar
  • 1 Tsp. Toasted Sesame Oil
  • 4-5 Small OR 2-3 Normal Strawberries, finely chopped
  • 1 Tsp. White Sugar
  • Dash of Black Pepper
  • Dash of Salt

  1. In a small bowl, mix together all of the ingredients. Mash the strawberries around to extract some of the juice.
  2. Let the dressing sit for 15 minutes to allow the flavors to mix.
  3. Before serving, strain out some of the strawberry bits.


Salad Fixins
  • Boston Lettuce
  • Leftover BioHazzard Chicken, cold and sliced (Recipe available on blog)
  • Tomatoes
  • Cucumbers
  • White Mushrooms
  • Hard Boiled Egg
  • Homemade Croutons
  • Strawberry Infused Balsamic Vinaigrette

Friday, July 20, 2007

Grilled Marinated Salmon with Grilled Artichokes

I was on the hunt this week for something to do with the artichokes that were slowly turning brown in my kitchen. Friday I decided to try something new from my trusted friend, AllRecipes.com- a grilled artichoke recipe and marinated salmon. They both sounded delicious- turns out they were only ok. Part of this was my fault- should have cooked the fish longer. But the artichokes were a lot of effort without a lot of oomph. Next time I'll just skip the oil add ons and just grill them. The salmon we'll do again!


Grilled Artichokes
Source: AllRecipes.com

  • 2 Large Artichoke globes
  • 2 Tbsp Olive Oil
  • 1 Tbsp Melted Butter
  • 2 Cloves Garlic, only 1 crushed and chopped
  • 1 Green Onion stalk, chopped

  1. Fill a large stalk pot of water and add in the unchopped clove of garlic and a few green onion pieces. Bring to a boil.
  2. While water gets boiling, prepare the artichokes.
    - First use a serrated knife to slice off the pointy bottom of the veggies- don't get poked!
    - Next pull off any brown leaves from the top. (Tip- use scissors if it's too hard to pull them off.)
    - Cut off pointy bottoms of any leaves around the sides that didn't get pulled off.
    - Finally, slice the artichokes down the middle exposing the heart and remove the "choke" part. The choke is the fuzzy gross part in the middle. Use a paring knife to cut it out, along with any ouchy pointy leaves in the middle.
    *Note- this took longer than I planned- so be sure to start prepping the artichokes as soon as you get the water going!
  3. When water is boiling, drop in the artichokes and boil for around 20 minutes, until the stems are tender. When done, take them out and drain on a paper towel.
  4. While veggies cook, mix together oil, butter, chopped garlic, and green onions in a small bowl.
  5. After artichokes have drained, brush the oil mixture onto them.
  6. Cook artichokes on a grill preheated to medium heat. Cook, turning frequently, until tips are slightly charred.


Marinated Salmon for the Grill
Source: AllRecipes.com
  • 1 lb. Fillet of Salmon, with skin on
  • 1 Tbsp. Olive Oil
  • 1 Tbsp. Low Sodium Soy Sauce
  • 1 Tsp. Worcestershire Sauce
  • 1 Tbsp. Honey
  • Juice of half a Lemon
  • 1/4 C. Fresh Basil, chopped
  • 1 Clove Garlic, chopped
  • Couple of shakes of Ground Ginger

  1. Mix together all the ingredients except salmon in a small bowl.
  2. On a small cookie sheet, create an aluminum foil "platter" with sides. (You want to marinade and cook the fish on this, but you don't want to spill the marinade on the floor.) Place fish on the foil.
  3. Pour most of the marinade over the fish. Let it sit in the fridge for at least 30 minutes.
  4. Fire up the grill (or boiler I suppose) to medium heat. When hot, carefully transfer the foil platter with salmon onto the grill. Pour the rest of the marinade on the fish.
  5. Cook until the fish flakes- not until you think it would probably flake as I did- and the marinade gets a little cooked on. (That's how I imagine this would be tastiest, though it was still good under cooked!)

Thursday, July 19, 2007

Pesto Penne

It's been a busy week at work and the weather tonight is crummy. I should have been at the grocery store right after work, but oh, I just couldn't bring myself to do it- too tired! So once I arrive home, what's a "chef" to do when the pantry is getting bare and the will to cook is lacking? Well, I made do with the good stuff I had- namely the staples of pasta, garlic, olive oil and then add in the fresh basil I bought at the store and we successfully planted!

Aside from the insane amount of delicious garlic, the best part of this recipe is that is it insanely quick! I put the water on and in the time it took to get it boiling and cook the pasta, I picked the basil, washed it, and leisurely made the pesto. Throw a little Parmesan on that bad boy and it's a gourmet delight for a lazy gourmand!


Pesto Penne

  • 1 16 oz. Box Penne (or any small pasta)
  • 1 to 1 1/2 C. Fresh Basil
  • 1 Large Clove of Garlic
  • 1/3 to 1/2 C. Olive Oil
  • 1/3 C. Parmesan Cheese, finely grated
  • 1 Tbls. Butter

  1. Get a pot of water boiling. When the time comes, put the pasta in and cook it.
  2. While things get going with the pasta, wash the basil and dry it. (A salad spinner is great for this if you have it. I love my salad spinner.)
  3. Peel the garlic clove. I give it a good whack (with a metal tenderizer, side of a chefs knife, wooden spoon)to both remove the peel and to break it into multiple pieces.
  4. Put the basil, garlic, and olive oil in a food processor. Pulse the ingredients to get a smooth, well chopped mixture. The key it to make sure the garlic is well broken up- no one wants giant chunks of raw garlic!
  5. Add the pat of butter and then drizzle around 2 Tbsp. of the boiling pasta water over it to melt it a little. Pulse the pesto to break up the butter.
  6. In a small to medium bowl, stir together the pesto mixture and the grated Parmesan cheese.
  7. When the pasta is ready (al dente), drain it, put it back in the pot, and pour in the pesto. Mix it up and serve hot.


Now technically, pesto is supposed to have pine nuts, but I never have that on hand. Nor do I have romano cheese to add in. But I promise, this is still yummy- and garlicky!

Monday, July 16, 2007

Guacamole & Traditional Tomato Salsa

Buenas noches bloggers! Hubby has a Christmas in July shindig tomorrow with his office crowd and was charged with making an appetizer to bring to the party. Guess who was called upon to help a) come up with something to make, b) go with him to tell him what to buy, c) mostly make it for him?! Bean to the rescue! I thought what better way to spice things up than with some fresh salsa and guacamole. Let's turn this get together into a fiesta!


Traditional Tomato Salsa

  • 3 Tomatoes
  • 1 Medium Onion
  • Medium to large bunch of Fresh Cilantro
  • Small handful of sliced Jalapenos (jarred or canned)
  • Juice of half a Lime
  • Pinch of White Sugar

  1. Chop tomatoes, onion, cilantro and jalapenos.
  2. Place chopped veggies into a glass bowl. Mix in lime juice and sugar.
  3. Let the salsa sit for up to 2 days. Letting it sit for at least an hour will allow the delicious flavors blend!


Guaca-Guacamole

  • 2 Avocados (relatively ripe)
  • 2-4 Tbls. Jarred Salsa
  • Juice of half a Lime
  • Small bunch of Fresh Cilantro
  • 1/4 tsp. Salt
  • Pinch of Cumin
  • Dash of Black Pepper


  1. Peel the avocados, remove pits, and break into smaller pieces. Place avocado pieces in a mixing bowl. Save the pits.
  2. Add all ingredients to avocado. The amount of salsa is according to taste.
  3. Mush avocado and other ingredients together with a sturdy fork. Mix into a smooth consistency.
  4. Chill guacamole until shortly before serving. Guacamole should be close to room temperature. Enjoy with nachos.


My mother claims that storing the pits with the prepared guaca-guaca will keep it from turning brown; mine still turns brown no matter what. I recommend serving soon after making this delicious green spread.

Buena comida!

Sunday, July 15, 2007

BioHazard Chicken

Marinading is not my specialty. Sure, sure, I can make a perfectly tasty marinade, but it's the whole letting it sit thing that gets me every time. Usually I let that delicious seasoning sink in for, oh, I'd say 15-20 minutes or however long it take the grill to heat up! I just don't have the time to wait- we're hungry! I love this recipe as it is good after 24 hours or 24 minutes. It ain't pretty- looks pretty gory in the bag, like something being transported in a foam cooler to an awaiting transplant patient- but it's delightful when cooked to perfection over a nice hot flame!

I do recommend making the marinade in a Ziploc bag. Aside from it fulfilling the gruesome namesake, it makes for very easy mixing during prep and even easier clean-up. You may find this full recipe is a little too much for serving just 2-4. I usually cut it in half or more, but will keep at least one full garlic clove. It is great served with white rice and corn on the cob.


BioHazard Chicken

  • 1 C. Ketchup
  • 1/2 C. Soy Sauce (I keep low sodium on hand, but either works.)
  • 1/4 C. Honey
  • 1-2 Garlic Cloves, crushed & chopped
  • 2-12 Boneless Chicken Breasts

  1. Combine all ingrediants except chicken in large plastic Ziploc bag. Close bag tightly. Mush everything together until well mixed.
  2. Add chicken into bag and reseal. Massage marinade into meat.
  3. Chill chicken until it is ready to be grilled. Chicken will keep at least 24 hours, though it will still be yummy after only 15 minutes.
  4. Cook chicken over medium grill heat until cooked through, but still moist.

No Bake Blueberry Pie

I think that nothing says summertime like blueberries! (Well, ice cream is a close second, but you can just pile the blueberries on French vanilla ice cream and you've got a sure July winner.) A bunch of us Nesties had a small cook out today to celebrate a beautiful summer day in Maine. I brought along a blueberry pie that is just too easy for words. Enjoy while the days are long and the berries are ripe!


No Bake Blueberry Pie

  • Graham craker pie crust
  • 4 1/2 c. Fresh blueberries
  • 1 c. White sugar
  • 1/3 c. Water
  • 2 Tbsp. Cornstarch OR 3 Tbsp. Tapioca

  1. Fill graham cracker crust with 2 1/2 c. blueberries. Set aside.
  2. In a medium saucepot, combine remaining 2 cups of blueberries with sugar, water, and thickening agent (cornstarch or tapioca).
  3. Heat saucepot over medium to medium high heat, stirring occassionally. Blueberries will begin to break down and create a blue syrup as they cook. Be sure that the syrup does not become too hot or boil, as no one wants burnt pie goo. The syrup will not be entirely smooth- not all the berries will disappear.
  4. Turn off heat and let blueberry syrup cool. Stir occassionally to allow heat to escape.
  5. When the syrup is no longer steaming when stirred, pour entire pot of syrup over fresh blueberries in crust. Give a small shake to level filling. Place in fridge to cool. Allow 1-2 hours to cool before serving. Keep chilled until ready to serve.

Sunday, July 8, 2007

Howdy and hello!


A blog is born! Talking to my husband incessantly is no longer enough for me- it's time for me to take my hand at babbling to the general Internet population. Who's to say anyone will listen... but that's not the point, now is it!

I'm going to try to keep this mainly cooking related- the hobby that I enjoy most of all. I love cooking any and all cuisines and my husband loves eating them! I'm not afraid to try something new and though I'm mostly a pretty good chef, man are there some doozies that slip in there. I make no promises that items regarding my cat or other uninteresting things though... nor do I promise I won't lose interest in this after a week or two.

Have a gourmet day!